

Drawing an ice cream cone is easy and fun. You only need a few simple steps.
Want to learn how to draw an ice cream cone? Whether you are a beginner or looking to improve your drawing skills, this guide is for you. Drawing can be a relaxing and creative activity. It helps you express yourself.
In this post, we will break down the process into simple steps. Each step will guide you through the basic shapes and details. By the end, you will have your own sweet masterpiece. Ready to start? Grab your pencil and paper, and let’s draw an ice cream cone together!
Materials Needed
Creating a delightful ice cream cone drawing can be a fun activity. Before starting, gather all the necessary materials. Having the right tools makes the drawing process smooth and enjoyable. Let’s break down what you’ll need to get started.
Drawing Tools
Begin with a quality sketchbook or drawing paper. Choose paper that handles both pencil and color well. Next, grab a set of pencils. A range of pencil grades helps create different textures and shades. Use an HB pencil for sketching and softer pencils for shading. An eraser is a must for correcting mistakes. A kneaded eraser works best for lightening areas without damaging the paper. Lastly, a sharpener keeps your pencils ready for detailed work.
Coloring Supplies
Color brings your ice cream cone to life. Use colored pencils for precise and vibrant colors. They blend well and are easy to control. Markers offer bold and solid colors. Choose markers with fine tips for details. Watercolor paints are great for a softer, blended look. If you use watercolors, make sure your paper can handle the moisture. Brushes of various sizes help in applying watercolors effectively.
Now, with these materials in hand, you are ready to start drawing your ice cream cone. Enjoy the process and watch your creation come to life with every stroke and color.
Sketching The Cone
Tools we use for food and still life drawings
Food and still life pop with bright colored pencils, plus a graphite layer to plan the form before color goes down.


As an Amazon Associate, drawingseasy.com earns from qualifying purchases. Prices and availability are subject to change.
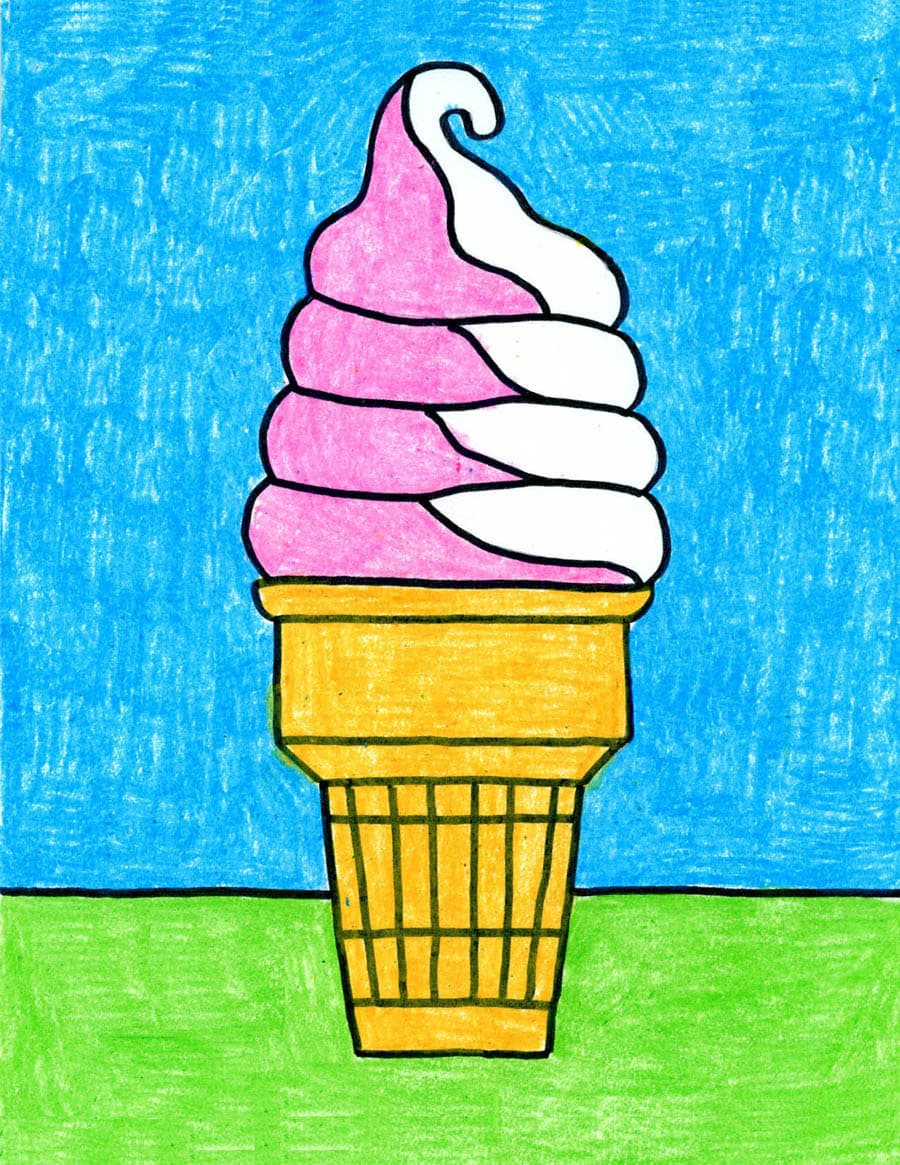
Drawing an ice cream cone starts with an oval for the top. Add a triangle for the cone. Finish with a scoop of ice cream on top.
Drawing an ice cream cone starts with sketching the cone. This part serves as the foundation. It’s important to get it right. A well-drawn cone makes your ice cream look delicious. Let’s break it down into simple steps.
Drawing The Base
Start with a triangle. Draw it upside down. This forms the base of your cone. Make sure the sides are even. The bottom should be flat. This gives your cone a solid look. Next, draw a curved line at the top. This is where the ice cream sits. The curve should be gentle. Imagine a smile. This line completes the base of your cone.
Adding Texture
Textures add realism. Start with diagonal lines. Draw them across the cone. These lines should be evenly spaced. They resemble a waffle pattern. Next, draw intersecting lines. They go the opposite direction. This creates diamond shapes. These shapes mimic the texture of a real cone. Finally, add small dots in some diamonds. This adds depth. Your cone now looks textured. It appears more realistic. “`
Drawing The Ice Cream Scoops
Drawing the ice cream scoops is a fun part of creating your ice cream cone. The scoops add a delightful touch to your drawing. Let’s break it down step by step so it is easy to follow.
First Scoop
Start by drawing a large oval at the top of the cone. This will be your first scoop of ice cream. Make sure the oval is slightly wavy at the bottom edge. This gives a realistic melting look to the ice cream. Next, add some small curves to the wavy edge. These curves will make your scoop look fluffy and soft.
Additional Scoops
To add more scoops, draw another oval on top of the first scoop. This second oval should also have a wavy bottom edge. It should slightly overlap the first scoop. This overlapping gives the drawing depth. Repeat the process for as many scoops as you want. Each new scoop should be a bit smaller than the one below it. This makes the ice cream look stacked.
Finally, add some texture and detail to your scoops. You can draw small lines or curves on the ice cream. This makes it look more realistic. Don’t forget to have fun and be creative with your flavors and colors.
Adding Details
Adding details to your ice cream cone drawing can make it look more realistic and fun. It’s time to make your drawing pop by focusing on the waffle pattern and defining the scoop lines. These small touches will bring your ice cream cone to life.
Creating The Waffle Pattern
To make the cone look like a real waffle cone, start by drawing diagonal lines. Begin from the top of the cone and move downward. Make sure the lines are evenly spaced.
Next, draw another set of diagonal lines going in the opposite direction. This will create a crisscross pattern. It should look like a series of diamonds on the cone.
Tip: Use a ruler to keep your lines straight and even. This will give your cone a clean look.
Defining The Scoop Lines
Now, it’s time to add details to the ice cream scoop. Start by drawing curved lines along the edges of the scoop. These lines should follow the shape of the scoop. They will give the scoop a rounded, soft look.
Next, add some texture by drawing small, wavy lines on the surface of the scoop. These lines can represent the creamy texture of the ice cream.
Pro Tip: Vary the length and direction of the wavy lines. This will make the ice cream look more realistic.
Once you have added these details, your ice cream cone will look delicious and lifelike. Remember to keep your lines light and gentle for a softer appearance.
Outlining The Drawing
Creating a well-defined outline is crucial for your ice cream cone drawing. Outlining helps to give shape and structure to your drawing. It also makes it easier to add details and color later. Below, we will cover some tips on using a fine line pen and ensuring clean lines.
Using A Fine Line Pen
A fine line pen is ideal for outlining your drawing. It provides precision and control, which is essential for detailed work. Start by outlining the general shape of the ice cream cone. Pay attention to the proportions and angles. Remember to keep your hand steady.
Fine line pens come in various nib sizes. Choose one that suits your drawing style. A 0.3mm nib is perfect for delicate details. Thicker nibs can be used for bolder outlines. Practice on a scrap piece of paper before working on your final drawing.
Ensuring Clean Lines
Clean lines make your drawing look professional and polished. Here are some tips to achieve clean lines:
- Use a ruler: For straight lines, a ruler is your best friend. It ensures accuracy and neatness.
- Draw lightly first: Start with light pencil strokes. This allows you to make corrections easily.
- Go slow: Rushing can lead to mistakes. Take your time to ensure each line is perfect.
Once you are satisfied with the pencil outline, trace over it with your fine line pen. Make sure to let the ink dry completely before erasing any pencil marks. This prevents smudging and keeps your lines crisp.
Coloring The Ice Cream Cone
Coloring your ice cream cone can bring it to life. You can make it look real or fun. It depends on the colors and techniques you use. Here is a guide to help you get started.
Choosing Colors
Choosing the right colors is important. Think about the flavor of the ice cream. Vanilla is usually white. Chocolate is brown. Strawberry is pink. You can also use bright colors for a fun look.
- Vanilla: White or light yellow
- Chocolate: Dark brown
- Strawberry: Pink
- Mint: Light green
For the cone, use shades of brown. A light brown base with darker lines can look like a waffle cone.
Blending Techniques
Blending colors makes your ice cream look smooth. Start with the lightest color. Then add darker shades. Use small circles to blend the colors together.
- Apply light color: Color the whole ice cream with the lightest shade.
- Add shadows: Use a darker color for shadows and edges.
- Blend: Use small, circular motions to blend the colors.
For the cone, use a similar technique. Start with the lightest brown. Add darker lines for texture. Blend them for a smooth look.
| Color | Use |
|---|---|
| White | Vanilla Ice Cream |
| Dark Brown | Chocolate Ice Cream |
| Light Green | Mint Ice Cream |
| Light Brown | Ice Cream Cone |
Remember to have fun. Experiment with different colors and techniques. Your ice cream cone will look delicious and unique.
Final Touches
The final touches can transform your simple ice cream cone drawing. They add depth, realism, and a touch of magic. Focus on small details to make your ice cream cone stand out. Let’s look at some key finishing techniques.
Adding Shadows
Shadows give your drawing a three-dimensional look. Decide where the light source is. Shade the opposite side of the cone and ice cream. Use light, short strokes for a natural effect. Blend the shadows gently for a smooth transition.
Highlighting
Highlights make your ice cream look glossy and fresh. Add them on the side facing the light. Use a white pencil or eraser for this. Make small, curved lines on the ice cream scoop. Add a thin, vertical line on the cone. This brings your ice cream cone to life.
Frequently Asked Questions
What Materials Do You Need To Draw An Ice Cream Cone?
You need paper, pencils, erasers, and colored pencils or markers.
How Do You Start Drawing An Ice Cream Cone?
Begin by drawing a large triangle for the cone.
What Steps Are Involved In Drawing The Ice Cream?
Draw circles or scoops on top of the cone. Add details like sprinkles.
Can Beginners Easily Draw An Ice Cream Cone?
Yes, it’s simple. Follow basic shapes and add details step-by-step.
Drawing an ice cream cone is simple and fun. Follow the steps, and you’ll create a charming treat on paper. Practice makes perfect, so keep trying. Use your imagination for colors and flavors. Share your artwork with friends and family.
They will love it. Enjoy the process and stay creative. Happy drawing!


