

Drawing a coffee cup is easier than you think. Start with basic shapes and add details.
In this guide, you’ll learn simple steps to create a perfect coffee cup sketch. Many people love drawing but often feel intimidated. Drawing a coffee cup can be a fun and relaxing way to practice. You don’t need to be an artist to follow along.
Whether you want to create art for your home or just enjoy some quiet time, this guide is for you. Grab your pencil and paper, and let’s start drawing. By the end, you’ll have a lovely coffee cup sketch you can be proud of.

Gathering Your Supplies
Before you start drawing your coffee cup, gather all the necessary supplies. Having the right tools and materials will make the process easier and more enjoyable. You don’t need many items, but each one is important for creating a great drawing.
Essential Tools
First, you’ll need a few essential tools for drawing. A good quality pencil is a must. Choose a set of pencils with different hardness levels like HB, 2B, and 4B. These will help you create various shades and textures.
Next, get a reliable eraser. A kneaded eraser is great for lightening lines without damaging the paper. You might also want a white plastic eraser for removing darker marks.
A pencil sharpener is necessary to keep your pencils sharp. A manual sharpener works fine, but an electric one can save time.
Finally, consider using a ruler for straight lines and a blending stump to smooth out shading.
| Tool | Purpose |
|---|---|
| Pencils (HB, 2B, 4B) | Creating different shades and textures |
| Kneaded Eraser | Lightening lines without damaging paper |
| White Plastic Eraser | Removing darker marks |
| Pencil Sharpener | Keeping pencils sharp |
| Ruler | Drawing straight lines |
| Blending Stump | Smoothing out shading |
Choosing The Right Paper
Selecting the right paper can affect your drawing’s quality. Look for paper specifically made for drawing. It should be smooth but have enough texture to hold the graphite.
A good option is a sketch pad with medium-weight paper. This type of paper is durable and works well with different pencils. Avoid very thin paper as it can tear easily and won’t hold the pencil marks well.
If you’re planning to add color, choose paper that can handle various mediums. Mixed media paper is versatile and can support both dry and wet techniques.
Ultimately, the right paper will make your drawing process smoother and your final artwork more refined.
| Paper Type | Features |
|---|---|
| Drawing Paper | Smooth, holds graphite well |
| Sketch Pad | Medium-weight, durable |
| Mixed Media Paper | Supports dry and wet techniques |
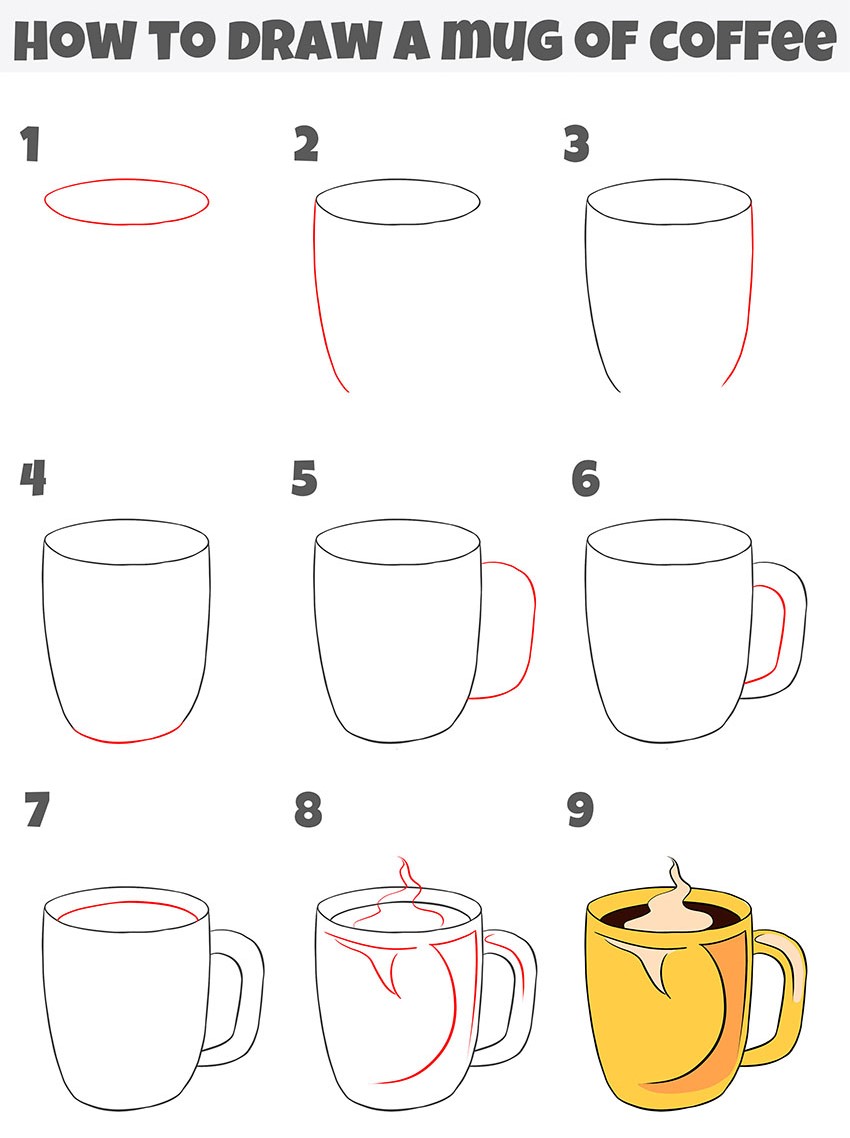
Sketching The Basic Shape
Drawing essentials
These are the everyday tools we recommend for any drawing tutorial on this site, picked for reliability and beginner-friendly pricing.


As an Amazon Associate, drawingseasy.com earns from qualifying purchases. Prices and availability are subject to change.
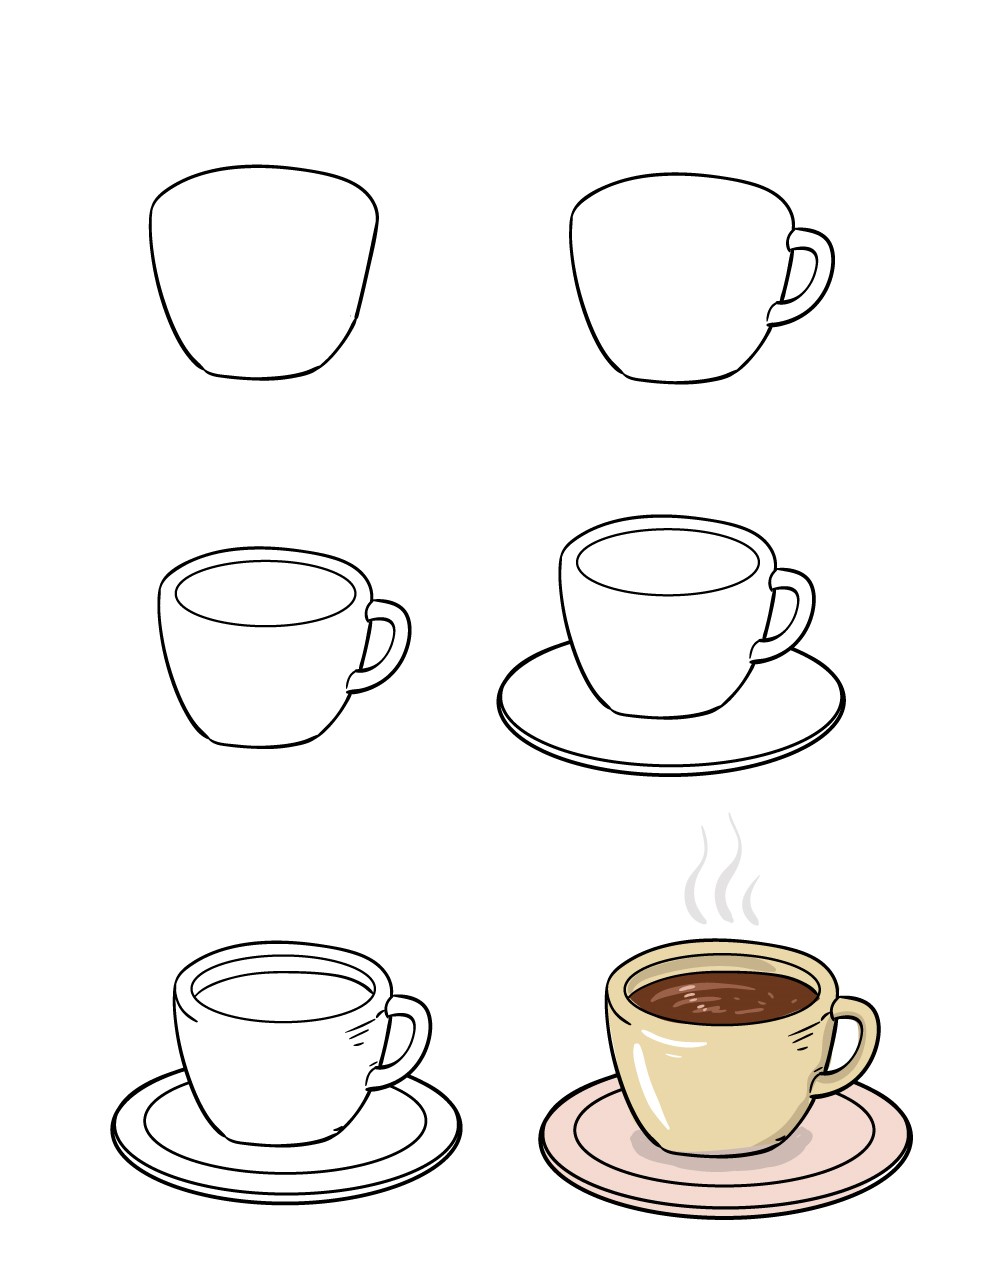
Creating a realistic coffee cup drawing starts with the basic shapes. These shapes form the foundation of your sketch, making the final image look more accurate. Focusing on the essential elements like the cup and saucer helps in achieving better results. Below are the steps to guide you through this process.
Drawing The Cup Outline
First, draw a vertical line in the center of your paper. This line helps in keeping your drawing symmetrical. Next, draw an oval shape at the top of the line. This oval will be the rim of your coffee cup. Ensure the oval is wide enough to resemble the top view of a cup.
Now, draw two vertical lines starting from the edges of the oval and extending downwards. These lines represent the sides of the cup. Connect the bottom ends of these lines with a curved line to form the base of the cup. Make sure the curve at the base mimics the shape of the oval at the top.
For the handle, draw a small curved line on one side of the cup. This line should look like the letter “C”. Then, draw another curved line inside the first one to complete the handle. Adjust the shape and size as needed to make it look natural.
Creating The Saucer
Start by drawing a larger oval beneath the cup. This oval should be wider than the cup’s base, as it represents the saucer. Make sure it is centered with the cup to maintain symmetry.
Next, draw a second oval inside the first one. This smaller oval should be slightly smaller than the cup’s base. The space between the two ovals forms the edge of the saucer.
Now, connect the bottom of the cup to the inner oval of the saucer. Use two short, curved lines to do this. These lines represent the part of the cup that sits on the saucer. Adjust the curves to ensure they look natural and seamless.
Here is a simple table summarizing the steps:
| Step | Description |
|---|---|
| 1 | Draw a vertical center line. |
| 2 | Sketch an oval at the top. |
| 3 | Draw two vertical lines from the oval. |
| 4 | Connect the lines with a curved base. |
| 5 | Draw the handle with two curved lines. |
| 6 | Sketch a larger oval for the saucer. |
| 7 | Draw a smaller oval inside the first one. |
| 8 | Connect the cup to the saucer with curved lines. |
Following these steps helps in accurately sketching the basic shape of a coffee cup and saucer. Practice makes perfect, so keep trying until you get the hang of it!
Adding The Handle
Adding the handle to your coffee cup drawing can bring it to life. The handle not only makes the cup look functional but also adds an extra element of realism. This step can be tricky, but with the right guidance, you can do it with ease. Let’s break down the process into two main parts: positioning the handle and shaping the handle.
Positioning The Handle
First, decide where to place the handle on your coffee cup. The best spot is usually on the upper side, near the top half of the cup. This makes it look natural. Ensure the handle lines up with the center of the cup’s top edge. This will help it look balanced.
Shaping The Handle
Next, draw the shape of the handle. Start with a simple curved line extending from the cup. The curve should be smooth and even. Think of the letter “C” or an ear shape. This is a common shape for handles. Make sure the handle is thick enough to look sturdy.
Once you have the basic shape, refine it. Add another curve inside the first one to give the handle some depth. This makes it look three-dimensional. Erase any unnecessary lines. Your handle should now look like it can be held comfortably.
Adding small details can make a big difference. You can add small lines to show where the handle attaches to the cup. These details give a more realistic look. Now your coffee cup has a handle that looks both practical and inviting.
Detailing The Cup
Now that you have the basic shape of your coffee cup, it’s time to add some details. This step will bring your drawing to life. Pay attention to the small elements. These elements make your cup look more realistic.
Rim And Inner Lines
Begin by drawing the rim of the cup. The rim is the top edge where you would drink from. Draw a thin, curved line along the top of the cup. This line should follow the shape of the cup’s opening.
Next, add the inner lines to show the cup’s thickness. Draw a parallel line inside the rim. This line should be slightly smaller. This will create the illusion of depth.
| Step | Action |
|---|---|
| 1 | Draw the rim |
| 2 | Add inner lines |
Adding Depth
To make the cup look three-dimensional, you need to add some shading. Start by adding shadows inside the cup. These shadows should be darker near the edges.
Use light pencil strokes for shading. Gradually build up the darkness. Focus on areas that would naturally be in shadow, such as the bottom and sides of the cup. This will give your drawing a more realistic appearance.
- Shadows inside the cup
- Shading with light strokes
- Focus on natural shadow areas
Lastly, add some highlights to show where the light hits the cup. Use an eraser to create light spots on the rim and sides. These highlights will make your cup look shiny and smooth.
- Add shadows
- Use light strokes
- Create highlights with an eraser
Shading Techniques
Shading techniques bring your coffee cup drawing to life. They add depth and dimension. The right shading makes your drawing realistic and engaging. Let’s explore some effective shading techniques.
Light Source Considerations
First, decide where the light comes from. This affects all your shading. Imagine the light hitting the coffee cup. The side facing the light will be bright. The opposite side will be darker. This contrast creates depth.
Creating Shadows
Shadows are key in realistic drawings. Draw the shadow on the opposite side of the light source. The shadow should follow the shape of the cup. Make the shadow darkest near the cup. Gradually lighten it as it moves away.
Don’t forget the shadow inside the cup. Think of the light hitting the coffee. The coffee will have a highlight. The sides of the cup will cast shadows inside. This adds realism to your drawing.
Adding Highlights
Adding highlights to your coffee cup drawing can bring it to life. Highlights make the cup look shiny and realistic. They add depth and dimension. This section will guide you through adding highlights effectively.
Using An Eraser
One simple way to add highlights is by using an eraser. Start by lightly erasing parts of the cup where light would naturally hit. These spots are usually on the top and sides. Be gentle to avoid over-erasing.
Use a kneaded eraser for more control. Knead the eraser into a point for detailed highlights. Lightly dab the eraser on your drawing. This technique creates a soft, natural look. Repeat until you achieve the desired effect.
Enhancing The Gloss
To make the highlights pop, enhance the gloss. Use a white colored pencil or gel pen. Carefully trace over the erased areas. This step adds a bright shine to your drawing.
Blend the edges of the highlights with a blending stump. This action creates a smooth transition from light to dark. It gives your coffee cup a polished look. Practice these steps to improve your skills.
Final Touches
Adding the final touches to your coffee cup drawing is essential. These small details make your drawing stand out. They bring your work to life.
Reviewing Your Drawing
Take a moment to review your drawing. Look at the overall shape. Check if the proportions are correct. Ensure the handle looks realistic. Compare your drawing to a real coffee cup.
Make sure your shading is even. Shadows should be soft. Highlights should be bright. These areas add depth to your drawing. They make it look more three-dimensional.
Fixing Minor Errors
After reviewing, fix any minor errors. Use a clean eraser to remove unwanted lines. Be gentle to avoid smudging. Redraw any lines that need to be clearer. This step is crucial for a neat drawing.
Adjust the shading if needed. Darken the areas where shadows fall. Lighten areas where light hits. Use a blending tool to smooth out rough patches. This creates a polished look.
Finally, add any small details you might have missed. Include the steam if your coffee is hot. Add texture to the cup’s surface. These little extras enhance your artwork.
Frequently Asked Questions
How Do I Start Drawing A Coffee Cup?
Begin with a simple oval shape. This will be the top of the cup.
What Materials Do I Need To Draw A Coffee Cup?
You need paper, a pencil, an eraser, and optionally, colored pencils or markers.
How Do I Add Details To The Coffee Cup?
Draw a curved line for the handle. Add lines for the bottom and sides.
Can Beginners Draw A Coffee Cup Easily?
Yes, beginners can draw a coffee cup. Follow step-by-step instructions for best results.
Drawing a coffee cup can be fun and easy. With practice, your skills will improve. Follow the steps outlined, and you’ll see progress. Remember to enjoy the process. Mistakes are part of learning. Keep experimenting with shapes and lines. Soon, you’ll create detailed coffee cup drawings.
Share your art with friends and family. They will surely appreciate your efforts. Happy drawing!


