Drawing a canyon might seem tough at first. But it’s simpler than it looks.
With the right steps, anyone can create a stunning canyon drawing. Canyons are majestic and awe-inspiring. Capturing their beauty on paper can be rewarding. Whether you’re a beginner or have some drawing experience, understanding the basics is key. In this guide, we will explore step-by-step methods to draw a canyon.
From sketching the rugged cliffs to shading the deep crevices, you’ll learn techniques that make your drawing come alive. Grab your pencils and let’s embark on this artistic journey together. By the end, you’ll have a canyon masterpiece to be proud of.

Materials Needed
Drawing a canyon can be an exciting artistic journey. Before you begin, gather the necessary materials. Having the right tools will make the process smoother and more enjoyable. Below, we will outline the essential materials needed.
Paper And Pencils
Start with a good quality drawing paper. Choose a paper that can handle erasing and blending. A sketchbook or loose sheets will work. Next, you need pencils. Use a range of pencils from H to B. Hard pencils (like 2H) are good for fine lines. Soft pencils (like 6B) are great for shading.
Coloring Supplies
To bring your canyon to life, you will need coloring supplies. Colored pencils are a great option. They allow you to add depth and detail. You can also use markers or watercolor paints. Pick colors that reflect the natural beauty of a canyon. Think about earth tones like browns, reds, and oranges.
Preparing Your Workspace
Set up a clean, well-lit workspace with all necessary drawing materials. Ensure a comfortable seating position to avoid strain.
Creating a calm and organized workspace is crucial for drawing a canyon. A well-prepared area can enhance your focus and creativity. Let’s explore how to set up your workspace efficiently.
Choosing A Quiet Place
Select a quiet spot where you won’t be disturbed. Avoid areas with high traffic or loud noises. Your environment should help you concentrate. A peaceful corner in your home or a serene outdoor spot works well. Make sure the space is comfortable and clutter-free. This helps you stay focused on your drawing.
Setting Up Lighting
Proper lighting is essential for drawing details. Natural light is the best option. Position your workspace near a window. If natural light isn’t available, use a bright, adjustable lamp. The light should come from the side or above. This prevents shadows from falling on your work. Avoid harsh or dim lighting. It can strain your eyes and affect your drawing quality.
Sketching The Basic Shapes
Creating a canyon drawing starts with understanding its basic shapes. Start simple. Focus on the main shapes before adding details. This approach makes the process easier and more manageable.
Outlining The Canyon
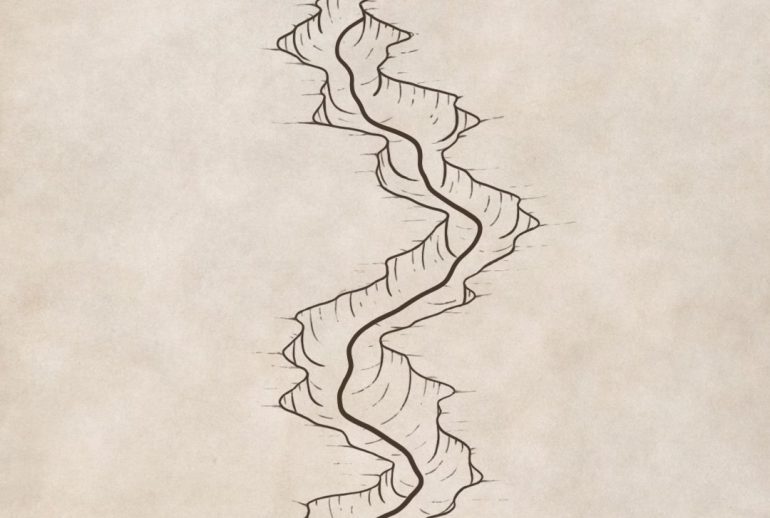
First, draw the outline of the canyon. Use light pencil strokes. Begin with the canyon walls. These are usually jagged and uneven. Draw a wavy line to represent the top edge. Then, draw another wavy line parallel to the first. This represents the bottom edge.
Next, connect the two lines with vertical lines. These lines show the depth of the canyon. Keep them irregular to mimic natural rock formations. Remember, canyons are not symmetrical. Vary the width and angles of these lines. This adds realism.
Adding Key Landmarks
Now, add key landmarks to your canyon sketch. These might include rock formations, cliffs, and ledges. Identify the most prominent features first. Draw them with light strokes. This allows you to adjust their placement easily.
To add a rock formation, start with a simple shape like a rectangle or oval. Then, refine the shape by adding curves and edges. For cliffs, draw a series of jagged lines. This gives the impression of rough terrain.
Include ledges by drawing horizontal lines along the canyon walls. These lines should be uneven and staggered. This creates a natural look. Use shading to give depth and dimension to these features.
Refer to the table below for a quick summary of steps:
| Step | Action |
|---|---|
| 1 | Draw the outline of the canyon |
| 2 | Connect lines to show depth |
| 3 | Add key landmarks like rock formations |
| 4 | Include cliffs and ledges |
By following these steps, you build a solid foundation for your canyon drawing. Stay patient and keep practicing. Your skills will improve over time.
Defining The Landscape
Drawing a canyon can be a fun and rewarding experience. The first step is to define the landscape. This sets the foundation for your entire drawing. It helps to visualize the canyon’s vast and rugged terrain. Think about the various elements like cliffs, rock layers, and the depth of the canyon. By focusing on these details, your drawing will appear more realistic and dynamic.
In this section, we will explore how to create depth and draw rock layers. These elements are crucial for capturing the essence of a canyon. Let’s dive into the details.
Creating Depth
To create depth, begin with basic shapes. Use overlapping lines to suggest layers of rock and cliffs. This technique helps to show which parts are closer and which are farther away. Use lighter shades for distant elements and darker shades for those closer. This contrast adds a sense of distance.
Incorporate perspective lines. These lines guide the viewer’s eye into the drawing. They also help maintain the proportions of the canyon. Draw lines that converge at a point on the horizon. This creates a realistic sense of depth.
Drawing Rock Layers
Rock layers add texture and detail to your canyon. Start by sketching horizontal lines to represent different rock strata. Vary the thickness and spacing of these lines. This variation mimics natural rock formations.
Next, add cracks and crevices. These details make the rock layers look more realistic. Use short, jagged lines for these features. Keep them random and irregular. This randomness mimics the natural erosion process.
Shading is also important. Add shadows to the cracks and crevices. This gives the rock layers a three-dimensional feel. Use a soft pencil or shading tool for smooth transitions between light and dark areas.
Adding Details
Adding details to your canyon drawing brings it to life. These details create depth, texture, and interest. Focus on key elements like texture, patterns, vegetation, and wildlife.
Texture And Patterns
Textures and patterns make your canyon realistic. Use lines and shading to show rock surfaces. Vary your lines for depth. Short, quick strokes can show rough surfaces. Long, smooth lines can show flatter areas. Patterns can indicate different rock layers. They add a sense of history and age.
| Texture Technique | Effect |
|---|---|
| Cross-hatching | Creates shadows and depth |
| Stippling | Shows rough textures |
| Smooth shading | Indicates smooth surfaces |
Vegetation And Wildlife
Add vegetation for a lively scene. Draw small bushes, cacti, or shrubs. Place them on different levels to show scale. Wildlife adds dynamic elements. Simple shapes can suggest birds or small animals. These details make the canyon feel alive.
- Small bushes: Use short, curved lines.
- Cacti: Draw tall, segmented shapes.
- Birds: Simple ‘V’ shapes in the sky.
- Rocks: Rounded shapes with shadows.
By focusing on textures, patterns, vegetation, and wildlife, your canyon drawing will be detailed and engaging. These elements create a vivid and natural scene.

Shading Techniques
Mastering shading techniques is essential for creating realistic canyon drawings. Shading brings depth, dimension, and life to your artwork. Understanding how light interacts with the canyon’s surfaces will help you achieve a more lifelike effect. Let’s explore some key shading techniques.
Light And Shadow
Light and shadow play a crucial role in depicting the canyon’s depth. First, identify the light source in your drawing. This will determine where the shadows fall. Light areas will be highlighted, while dark areas will create shadows.
Use the following tips to create realistic light and shadow effects:
- Identify the main light source.
- Highlight the areas that catch the most light.
- Shade the areas that are blocked from the light source.
- Use soft transitions between light and dark areas.
Blending Methods
Effective blending methods can enhance the depth and texture of your canyon drawing. Various tools and techniques can be used to blend your shading smoothly. Here are some common methods:
| Method | Description |
|---|---|
| Smudging | Use a blending stump or your finger to soften harsh lines. |
| Layering | Build up layers of shading with light strokes for a gradual effect. |
| Cross-Hatching | Create texture with intersecting lines at different angles. |
| Tissue | Use tissue paper to smooth out pencil marks for a soft look. |
Experiment with these techniques to find what works best for your drawing style. Combining different methods can yield unique and realistic results.
Final Touches
The final touches on your canyon drawing can elevate your artwork. This stage ensures your work looks complete and polished. Let’s dive into the essential steps for perfecting your canyon drawing.
Reviewing Your Work
Take a step back and look at your entire drawing. Notice any areas that seem off or incomplete. Look for balance in your composition. Ensure the canyon’s depth and details are accurate. This step helps identify areas needing improvement.
Making Adjustments
Once you have reviewed your work, start making adjustments. Add more shadows to enhance depth. Refine lines that may appear too harsh or uneven. Consider adding subtle textures to rocky surfaces. Ensure the colors blend smoothly. Small tweaks can make a big difference.

Frequently Asked Questions
How Do I Start Drawing A Canyon?
Begin by sketching the basic shape. Use light lines for the outline.
What Materials Do I Need To Draw A Canyon?
You need paper, pencils, erasers, and coloring tools. Optional: rulers and brushes.
How Can I Add Depth To My Canyon Drawing?
Use shading techniques. Darken areas to show shadows. Lighten areas to show highlights.
Any Tips For Drawing Realistic Canyon Textures?
Observe real canyons. Draw rough, uneven lines. Use different shades to show rock layers.
Conclusion
Drawing a canyon can be a fun and rewarding experience. Follow the steps outlined, and practice often. Remember to observe real canyons and note their details. Use different shades to create depth and texture. Your skills will improve with time and patience.
Keep experimenting with various techniques. Enjoy the process and let your creativity flow. Soon, you’ll be drawing beautiful canyons with confidence. Happy drawing!

