Drawing a volcano can be fun and rewarding. It’s a great way to express creativity.
Volcanoes are fascinating natural wonders that capture the imagination of both kids and adults. Learning how to draw a volcano can be an exciting journey, whether you’re an artist or a beginner. This guide will help you create a realistic volcano step by step.
With simple instructions, you’ll see how easy it is to bring this explosive scene to life on paper. Ready to start? Let’s dive into the world of drawing and create an amazing volcano together!

Materials Needed
To draw a vibrant and realistic volcano, gather the right materials. The right tools make the process smoother and more enjoyable. This section details the essential supplies you will need.
Paper And Pencils
The base of any drawing is the paper. Choose a good quality paper that suits your style. You can use:
- Sketch paper: Ideal for beginners.
- Bristol board: Offers a smooth surface for detailed work.
- Watercolor paper: Perfect for adding water-based colors later.
Next, select your pencils. A variety of pencils helps create depth and detail. Recommended types include:
- HB pencil: Good for initial sketches.
- 2B pencil: Adds darker shades and details.
- 4B pencil: Excellent for deep shadows.
Coloring Supplies
To bring your volcano to life, use coloring supplies. The following are essential:
- Colored pencils: Offer precision and control.
- Markers: Provide vibrant and bold colors.
- Watercolors: Ideal for blending and creating realistic effects.
Consider the following:
- Choose colors that match real volcanoes, like reds, oranges, and browns.
- Blend colors to create a natural look.
- Use dark shades for shadows and lighter shades for highlights.
With these materials, you are ready to start drawing your volcano. Remember, the right tools make a significant difference in your artwork.
Setting Up Your Workspace
Before you start drawing a volcano, it’s important to set up your workspace. A well-organized area can help you focus and create better art. Let’s explore how to prepare your space for a successful drawing session.
Choosing A Quiet Place
Find a quiet place where you won’t be disturbed. A peaceful environment helps you concentrate. Turn off any distractions like TV or loud music. This will help you stay focused on your drawing.
Gathering Your Materials
Gather all the materials you need before starting. You will need paper, pencils, erasers, and coloring tools. Make sure everything is within reach. This saves you from getting up often and losing your focus.
Having a clean and organized workspace is also important. Clear any clutter from your desk. A tidy space helps your mind stay clear and focused on your art.
Drawing The Volcano Base
Learning how to draw a volcano is fun and exciting. The first step in creating a realistic volcano drawing is drawing the base. This part sets the foundation for your entire artwork. Follow these simple steps to sketch and shape the volcano base effectively.
Sketching The Outline
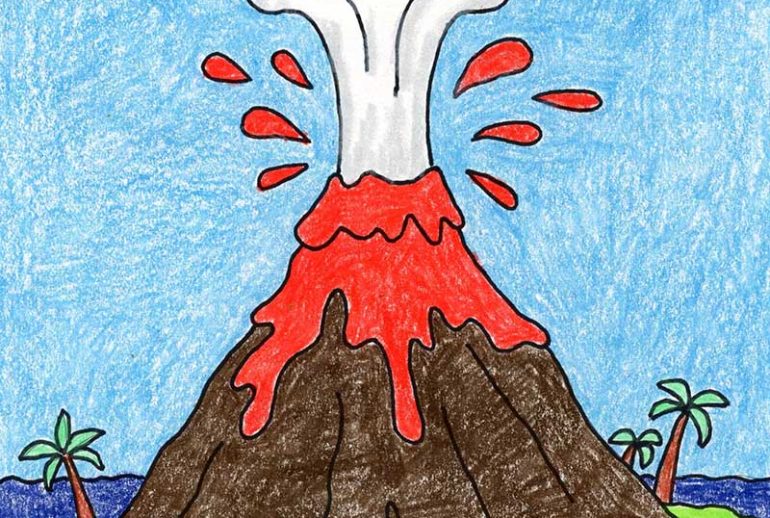
Start by drawing a large triangle shape. This will serve as the main structure of your volcano. Use light strokes so you can easily make changes. At the top of the triangle, draw a small, flat line. This represents the crater where the lava will come out.
Shaping The Base
Now, refine the triangle shape. Make the sides slightly curved to give a natural look. Add some jagged edges to resemble rocks and uneven terrain. This makes your volcano look more realistic. Draw the base wider to show stability. This is where the volcano sits on the ground.
Add some lines and details at the bottom. These lines represent the ground and surrounding area. You can also draw some small rocks and vegetation to complete the base. Remember, details make your drawing come alive.

Adding Lava Details
Adding lava details to your volcano drawing brings it to life. Lava adds drama and excitement to your artwork. Focus on the flow and texture to make it realistic.
Drawing Lava Flow
Start by sketching the path of the lava. Use wavy lines to show movement. Let the lava flow from the crater down the sides. Make sure the lines are irregular. This makes the flow look natural.
Add smaller streams branching off the main flow. These smaller streams add detail. Vary the width of the lava flow. Wider at the top, narrower at the bottom.
Creating Lava Texture
To create lava texture, use short, quick strokes. These strokes should look like cracks. Add these cracks along the flow lines. This shows the lava cooling and hardening.
Darken some areas to show shadows. This adds depth. Highlight other areas with lighter shades. This creates the effect of glowing hot lava. Use orange, red, and yellow colors. Blend these colors for a realistic look.
Finish by adding small splashes of lava. These splashes show the lava bubbling. They add a dynamic feel to your drawing.
Incorporating Surrounding Landscape
To make your volcano drawing come alive, you need to add the surrounding landscape. This helps to set the scene and provides context to your artwork. By including elements like rocks, trees, smoke, and ash, you create a more dynamic and realistic picture. Let’s explore how to add these details step by step.
Drawing Rocks And Trees
Start by sketching small rocks around the base of the volcano. Use irregular shapes to make them look natural. Vary the sizes and angles to add depth and interest. Draw some rocks in clusters and others scattered.
Next, draw trees around the volcano. Pine trees work well for a rugged look. Draw a simple triangle for the tree’s body. Add a straight line in the middle for the trunk. Repeat this with varying sizes to create perspective. Place smaller trees farther away and larger ones closer.
| Step | Action |
|---|---|
| 1 | Draw small, irregular rocks at the volcano’s base. |
| 2 | Add pine trees with simple triangles and lines. |
| 3 | Vary sizes for depth and perspective. |
Adding Smoke And Ash
To give your volcano a dramatic effect, add smoke and ash. Start by drawing a cloud of smoke at the top of the volcano. Use wavy lines to create a billowing effect. Make the smoke wider as it moves away from the volcano.
For the ash, draw small dots and short lines falling from the smoke cloud. Scatter the ash around the volcano to show it spreading. Vary the density of the ash to create a natural look. Heavier near the volcano and lighter farther away.
- Draw a cloud of smoke using wavy lines.
- Make the smoke wider as it rises.
- Add dots and lines for falling ash.
- Vary ash density for a natural effect.
By adding these elements, your volcano drawing will look more complete and engaging. The rocks, trees, smoke, and ash all contribute to a realistic and dynamic scene.
Coloring Your Volcano
Coloring your volcano brings it to life. It adds depth and realism. You can use different colors to show lava, smoke, and rock. Follow these tips to make your volcano look amazing.
Choosing Colors
Colors are important in making your volcano look real. Use red, orange, and yellow for lava. These colors show heat and movement. For the rocks, choose dark grays and browns. These colors make the volcano look strong and solid. Add some black to show burnt areas.
Applying Shading
Shading adds depth and detail. It makes your volcano stand out. Use darker shades on one side of the volcano. This shows where the light is not hitting. Use lighter shades on the other side to show light. Blend the colors smoothly. This will make the volcano look more natural.
Final Touches
You’ve made it to the final stage of drawing your volcano. This stage involves refining your drawing, correcting any mistakes, and adding the final details. These steps will make your volcano look more realistic and complete. Let’s dive into the final touches.
Reviewing Your Drawing
Take a moment to review your drawing. Look at each part of your volcano closely. Ensure that the shape looks natural and the lava flows correctly. Pay attention to the lines and shading.
- Check the shape of the volcano.
- Ensure the lava flows naturally.
- Review the lines and shading.
Ask yourself: Do the elements look balanced? Is there anything that looks off or needs adjustment?
Making Corrections
If you find any mistakes, don’t worry. It’s easy to make corrections. Lightly erase the areas that need fixing. Redraw the lines or shapes as needed. Ensure you use light strokes to avoid damaging the paper.
- Lightly erase mistakes.
- Redraw with light strokes.
- Check for balance and proportion.
After making corrections, review your drawing again. Make sure everything looks good. This step is crucial for achieving a clean, finished look.

Frequently Asked Questions
How Do You Start Drawing A Volcano?
Begin by drawing a large triangle. This will be the volcano’s shape.
What Materials Do You Need To Draw A Volcano?
Use paper, pencil, eraser, and colored pencils or markers for coloring.
How Do You Add Lava To Your Volcano Drawing?
Draw wavy lines from the top of the volcano to show flowing lava.
Can Kids Draw A Volcano Easily?
Yes, with simple steps, kids can draw a volcano easily and have fun.
Conclusion
Drawing a volcano can be fun and easy. Follow the steps carefully. Practice often to improve your skills. Use different colors to make it look real. Share your artwork with friends and family. Enjoy the process and be creative. Don’t worry about mistakes; they help you learn.
Keep experimenting with new ideas. Soon, you’ll draw amazing volcanoes. Remember, patience and practice are key. Happy drawing!

