

Drawing a sphere may seem complex at first. But with the right steps, it’s easier than you think.
Creating a three-dimensional shape on a two-dimensional surface can be a fun challenge. A sphere, with its perfect roundness, is a great place to start. Understanding the basics of light and shadow will help you create a realistic sphere. In this guide, we will break down the process into simple steps.
Whether you are a beginner or just need a refresher, these tips will help you draw a convincing sphere. Get your pencil and paper ready, and let’s get started!
Introduction To Sphere Drawing
Drawing a sphere may seem difficult at first. Yet, with some practice, it becomes easier. This guide will help you understand the basic concepts. You’ll learn why it’s important to draw a sphere. You will also get simple steps to get started.
Importance Of Learning
Learning to draw a sphere is quite important. It helps in understanding shapes and forms. Spheres are found in many objects around us. Think of balls, globes, and even fruits like oranges. Mastering this shape can improve your overall drawing skills. It enhances your ability to draw more complex objects.
| Benefits | Details |
|---|---|
| Improves Spatial Understanding | Helps understand how objects occupy space. |
| Enhances Shading Techniques | Teaches shading for a realistic look. |
| Builds Foundation Skills | Prepares for more complex drawings. |
Basic Concepts
Before starting, let’s cover some basic concepts. First, a sphere is a three-dimensional object. It is perfectly round, like a ball. To draw a sphere, you need to create the illusion of depth on a flat surface.
- Outline the basic shape: Start with a simple circle.
- Add depth: Use shading to give the circle a three-dimensional look.
- Light source: Decide where the light hits the sphere. This will determine where the shadows fall.
Understanding these concepts is key to drawing a realistic sphere. Let’s summarize the steps in a simple ordered list:
- Draw a circle.
- Determine the light source.
- Add shading to create depth.
- Blend the shadows for a smooth look.
With these basics, you’ll be well on your way. Drawing a sphere becomes less intimidating and more fun.
Materials Needed
Drawing essentials
These are the everyday tools we recommend for any drawing tutorial on this site, picked for reliability and beginner-friendly pricing.


As an Amazon Associate, drawingseasy.com earns from qualifying purchases. Prices and availability are subject to change.
Before starting to draw a sphere, gather the right materials. Having the right tools and supplies ensures a smooth drawing process. Let’s explore the essential tools and some optional supplies that can enhance your artwork.
Essential Tools
These are the basic tools you need to draw a sphere:
- Pencil: A graphite pencil is ideal. Choose a medium grade (HB) for balanced shading.
- Paper: Use smooth drawing paper. This provides a clean surface for your work.
- Eraser: A soft eraser helps correct mistakes without damaging the paper.
- Ruler: A ruler helps draw guidelines and ensures symmetry.
- Compass: A compass is necessary to draw a perfect circle for the sphere’s base.
Optional Supplies
These supplies are not necessary but can enhance your drawing:
- Blending Stump: This tool helps blend pencil marks for smoother shading.
- Kneaded Eraser: This eraser is great for lifting graphite without leaving residue.
- Colored Pencils: Use colored pencils to add depth and dimension to your sphere.
- Sharpener: Keep your pencils sharp for precise lines and details.
- Sketchbook: A sketchbook provides a dedicated space for practice and improvement.
With these materials, you are ready to start drawing a sphere. The essential tools are enough for a basic drawing. The optional supplies help you refine and enhance your artwork.
Preparing Your Workspace
Before you start drawing a sphere, it’s essential to prepare your workspace. A well-organized and comfortable space can enhance your focus and creativity. This section will guide you through setting up your workspace and ensuring proper lighting.
Setting Up
Start by selecting a quiet and clutter-free area. A clean space helps keep distractions at bay. Use a sturdy table and a comfortable chair to maintain good posture while drawing.
| Item | Purpose |
|---|---|
| Sturdy Table | To provide a stable surface |
| Comfortable Chair | To ensure good posture |
| Drawing Supplies | Pencils, erasers, paper |
Gather all necessary drawing supplies. You will need pencils, erasers, and drawing paper. Arrange them within easy reach to avoid unnecessary interruptions.
Ensuring Proper Lighting
Good lighting is vital for detailed work. Position your workspace near a natural light source, like a window. Natural light provides the best visibility and reduces eye strain.
If natural light is not available, use a bright lamp. Place the lamp on the opposite side of your drawing hand. This setup prevents shadows from obstructing your view.
- Natural Light: Best for visibility
- Bright Lamp: Use if natural light is unavailable
- Position Lamp: On opposite side of drawing hand
Proper lighting helps you see fine details clearly. It also keeps your eyes comfortable during long drawing sessions.
Starting With Basic Shapes
Starting with Basic Shapes is a great way to learn how to draw a sphere. Begin with simple forms to build up your drawing skills. This approach helps you understand the structure and create a more accurate representation.
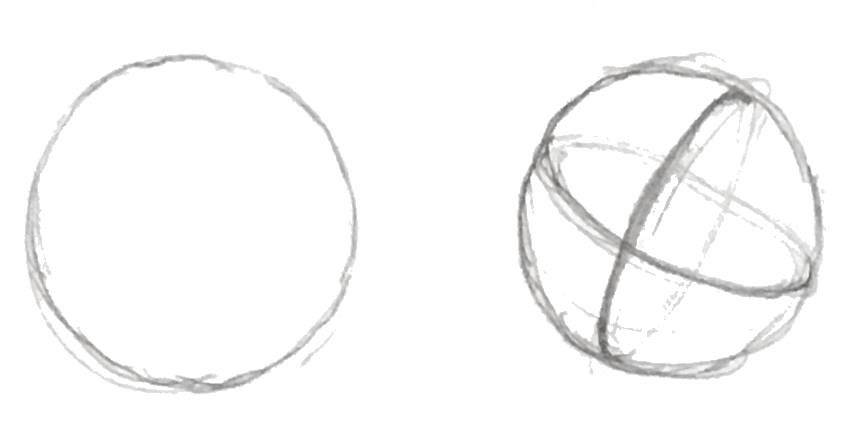
Drawing A Circle
First, draw a circle. Use a compass or trace a round object for precision. If you prefer freehand, practice multiple times to get a smooth shape. The circle is the foundation of your sphere drawing.
Adding Guidelines
Next, add guidelines to your circle. Draw a vertical line that splits the circle in half. Then, draw a horizontal line crossing the vertical one. These lines help in maintaining symmetry.
To give your sphere depth, draw additional curved lines inside the circle. These lines should follow the shape of the circle. They create the illusion of a three-dimensional object.
| Step | Description |
|---|---|
| 1 | Draw a circle using a compass or freehand |
| 2 | Add vertical and horizontal guidelines |
| 3 | Draw curved lines to add depth |
These basic shapes and guidelines form the base for your sphere. They ensure your drawing is symmetrical and has depth. Now, you are ready to add details and shading to bring your sphere to life.
Creating Depth And Dimension
Drawing a sphere can be tricky. One of the most important aspects is creating depth and dimension. This makes the sphere look realistic. Let’s dive into techniques to achieve this.
Shading Techniques
Shading helps create depth. Different shading techniques can enhance your drawing.
- Hatching: Draw parallel lines. The closer the lines, the darker the shade.
- Cross-hatching: Draw intersecting lines. This technique provides more texture.
- Stippling: Use dots to create shade. More dots mean darker areas.
- Blending: Use a blending tool. This smooths out the shades.
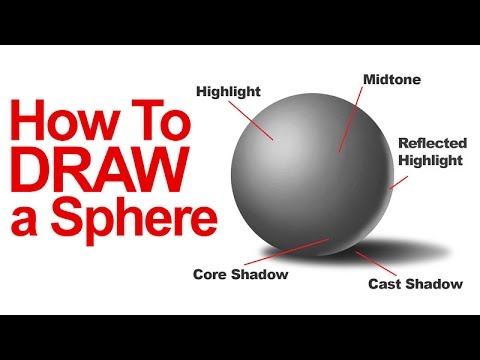
Highlighting And Shadows
Highlights and shadows give your sphere a three-dimensional look. Follow these steps to achieve it:
- Identify a light source: Decide where the light is coming from.
- Highlight: Leave a spot unshaded. This will be the brightest part.
- Midtones: Shade lightly around the highlight. This shows the curved surface.
- Core shadow: Shade the area opposite the light source. Make it the darkest part.
- Cast shadow: Draw a shadow on the surface below the sphere. This anchors the sphere.
Use these techniques to make your sphere look realistic. Practice often, and your skills will improve.
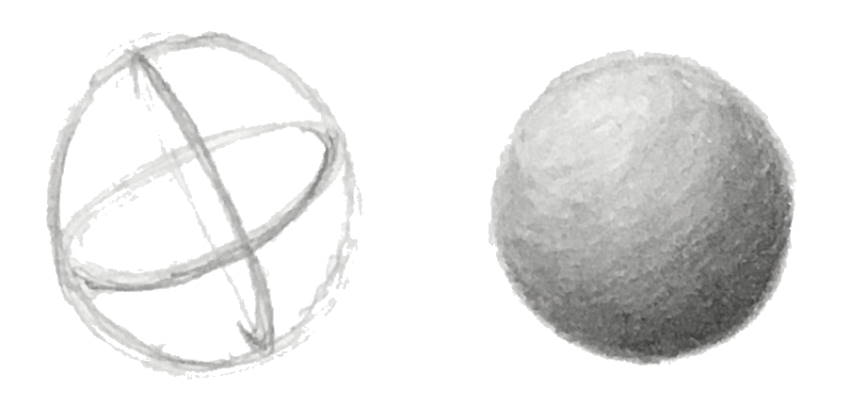
Refining The Sphere
Refining the sphere is a crucial step in your drawing process. This step adds depth and realism to your sphere, making it look three-dimensional. By smoothing the edges and enhancing details, you can make your sphere stand out.
Smoothing The Edges
First, observe the rough outline of your sphere. Use a soft eraser to gently smooth the edges. This will help create a more natural, rounded look. Next, take a blending stump or your finger to softly blend the graphite or charcoal. This will even out harsh lines and give your sphere a smooth surface.
Enhancing Details
After smoothing the edges, focus on enhancing details. Add shading to give your sphere depth. Identify the light source and shade the opposite side of the sphere. Use darker tones near the edges and lighter tones towards the light source. This creates a gradient effect that adds realism.
Finally, add highlights to your sphere. Use a white pencil or eraser to create small, bright spots where the light hits the sphere. This will make your sphere look shiny and three-dimensional. These steps will help refine your sphere and make it look more realistic.
Common Mistakes To Avoid
Drawing a sphere can be tricky. Beginners often make common mistakes. Avoiding these mistakes will improve your drawing skills. Let’s discuss two key mistakes to avoid.
Over-shading
One common mistake is over-shading. Shading adds depth to your drawing. But too much shading can blur details. It can make your sphere look flat. Use shading sparingly. Focus on light and dark areas. Keep the shading balanced.
Ignoring Light Source
Ignoring the light source is another mistake. The light source affects how your sphere looks. Without considering it, your drawing can lack realism. Identify the light source before you start. Observe how light affects the sphere. Shade accordingly to create a realistic effect.
Practice Tips And Exercises
Developing the skill to draw a sphere takes time and dedication. Practice is key. This section provides helpful tips and exercises to improve your sphere drawing skills. Consistency and variation in practice will lead to noticeable improvements.
Daily Drawing Routines
Practice drawing spheres every day. Start with simple sketches. Use light pencil strokes to create the basic shape. Gradually add more details. Focus on shading. Shading adds depth and realism. Experiment with different light sources. Observe how shadows change. Keep your practice sessions short. Consistency matters more than duration.
Try drawing spheres from different angles. This helps you understand their three-dimensional nature. Use reference images. They provide a good starting point. Compare your drawings with the references. Note any differences. Make adjustments as needed. This will improve your observation skills.
Advanced Exercises
Once comfortable with basic spheres, move to advanced exercises. Draw spheres within complex scenes. This adds a new layer of challenge. Practice drawing transparent spheres. This helps in understanding light and shadow interaction. Try drawing textured spheres. Experiment with different materials like wood or metal.
Use different drawing tools. Switch from pencil to charcoal. This helps you adapt to different mediums. Try drawing large spheres. This improves control over larger areas. Draw small spheres to practice precision. Combine spheres with other shapes. This tests your ability to maintain proportions.
Remember, progress takes time. Keep practicing and experimenting. Your skills will improve with dedication.
Next Steps
Drawing a sphere can be a fun and rewarding experience. You have learned the basic techniques and applied them step-by-step. Now, let’s summarize your progress and look at what you can do next to improve your skills.
Reviewing Progress
Take a moment to review your drawing. Compare it to your initial sketch. Notice the improvements you have made. Identify areas where you can refine your shading and lines. Acknowledge your effort and the skills you have developed.
Exploring Further Techniques
Consider exploring more advanced techniques. Experiment with different shading methods. Try cross-hatching or stippling to add texture. Study light sources and how they affect shadows on a sphere. Practice drawing spheres with different materials, like glass or metal, to challenge yourself.
Remember, drawing is a journey. Each step you take brings you closer to mastering the art of creating realistic spheres. Keep practicing and exploring new methods to enhance your skills.
Frequently Asked Questions
What Materials Do You Need To Draw A Sphere?
To draw a sphere, you need a pencil, paper, an eraser, and a compass. You may also use shading tools like blending stumps or pencils of different hardness.
How Do You Start Drawing A Sphere?
Start by drawing a perfect circle using a compass. Then, lightly sketch guide lines to help with the shading and curvature.
How Do You Add Depth To A Sphere?
To add depth, use shading techniques. Gradually darken areas where light doesn’t hit, and keep the light source direction consistent.
What Is The Role Of Light And Shadow?
Light and shadow create the illusion of three-dimensionality. Identify the light source and shade the opposite side of the sphere accordingly.
Drawing a sphere can be simple with the right steps. Practice often for better results. Follow the guidelines and techniques shared in this blog. Remember to be patient and enjoy the process. With time, your skills will improve. Spheres can add depth to your art.
Keep experimenting and learning. Soon, you’ll be creating impressive spheres with ease. Happy drawing!


