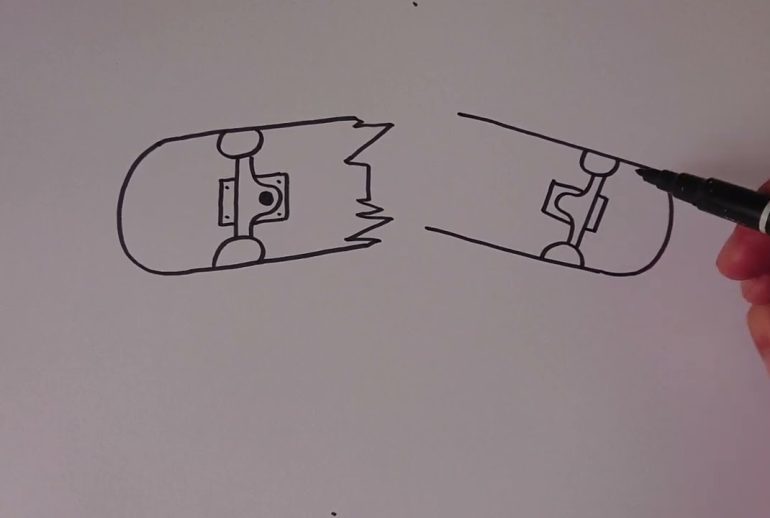
Drawing a broken skateboard can be fun and simple. You don’t need advanced skills to create it.
This guide will help you draw a broken skateboard step-by-step. Skateboards are popular among both kids and adults. Sometimes, they break after a lot of use. Drawing a broken skateboard can tell a story. It might show a tough trick or an accident.
This drawing can also help improve your art skills. You will learn how to draw different shapes and details. Follow this guide to create your own broken skateboard. It’s easy and enjoyable for everyone. Let’s get started on this creative journey!

Materials Needed
Before you start your broken skateboard drawing, gather all the necessary materials. Having the right tools makes the process easier and more enjoyable. Below are the main materials you will need.
Drawing Tools
To create a detailed drawing, you will need several drawing tools. Here is a list of the essentials:
- Pencils: Get both hard (H) and soft (B) pencils.
- Eraser: A kneaded eraser works best.
- Sharpener: Keep your pencils sharp for fine details.
- Paper: Use high-quality drawing paper.
- Ruler: Helpful for drawing straight lines.
- Blending Stump: For shading and blending.
Reference Images
Using reference images is crucial for accuracy. They help you understand the details and structure of a broken skateboard. Here are some tips for finding good reference images:
- Search online for high-quality photos.
- Use images from different angles.
- Look for close-up shots of broken parts.
Having clear reference images will make your drawing more realistic and detailed.
Sketching The Outline
Drawing a broken skateboard is an exciting exercise for beginners. Start with a clear outline to ensure you capture the essence. We’ll break down the process into simple steps.
Basic Shapes
Begin by sketching the basic shapes. Use a light pencil for easy erasing. Follow these steps:
- Draw a long, thin rectangle for the skateboard deck.
- Add two small circles for the wheels at one end of the rectangle.
- Sketch a jagged line to show the broken part of the skateboard deck.
These simple shapes will form the basis of your drawing. Keep your lines light and easy to adjust. Focus on the overall shape before adding details.
Proportions
Maintaining the right proportions is key. Here’s how to get it right:
- Ensure the rectangle is long enough to resemble a skateboard deck.
- The wheels should be proportional to the deck, not too big or small.
- The jagged line should look natural, as if the board broke from stress.
Check your sketch for balance. The broken part should look realistic, not forced. Adjust if necessary, keeping the overall shape in mind.
By focusing on basic shapes and proportions, you can create a solid foundation. Once you have the outline, you can add details to bring the broken skateboard to life.
Drawing The Skateboard Deck
Creating an easy drawing of a broken skateboard begins with the deck. The deck is the main part of the skateboard. It is the flat board where the rider stands. This part is crucial as it defines the shape and style of the skateboard.
Shape Of The Deck
First, draw the overall shape of the deck. A skateboard deck is usually rectangular with rounded edges. Start by sketching a long, narrow rectangle. Make sure the corners are curved, not sharp. This gives it the classic skateboard look.
If the skateboard is broken, show the break. Draw a jagged line somewhere on the deck. This line should be uneven and rough. It represents the point where the skateboard is broken.
Details On The Deck
Next, add details to make the deck more realistic. Draw the grip tape on the top of the deck. This is the rough surface that helps riders’ feet stay in place. It usually covers the entire top surface.
Include some scratches and wear marks. Skateboards often have visible signs of use. Draw some lines and scuffs on the deck to show this wear and tear.
Don’t forget the hardware. Skateboard decks have holes for screws. These screws attach the trucks to the deck. Draw small circles in two sets of four. Place them near the ends of the deck.
Finally, add any designs or logos. Many skateboard decks have graphics or logos. This adds personality to your drawing. You can create your own design or use a famous skateboard brand logo.
Illustrating The Broken Part
Creating an easy drawing of a broken skateboard can be enjoyable. Focus on detailing the broken part to make your drawing realistic. Highlighting the cracks and splinters can bring the skateboard to life. Adding texture effects adds depth and detail to your illustration.
Cracks And Splinters
Begin by sketching the main crack in the skateboard. Use jagged lines to show the break. Ensure the crack looks uneven and natural. Add smaller cracks branching out from the main one. This shows the impact of the break.
Next, draw splinters coming out of the crack. Use short, sharp lines to represent the wood fibers. These splinters should vary in size and direction. This gives a realistic look to the broken skateboard.
Texture Effects
Adding texture effects makes the skateboard look more realistic. Use cross-hatching to show rough areas. This technique involves drawing intersecting lines.
For smoother parts, use gentle shading. Lightly shade around the cracks and splinters. This adds depth to your drawing. Focus on the edges of the broken part. Darken these areas to highlight the damage.
Another way to add texture is by drawing wood grain. Use thin, curving lines along the skateboard’s surface. This mimics the natural pattern of wood. The combination of cracks, splinters, and texture effects creates a detailed illustration.
| Element | Detail |
|---|---|
| Cracks | Jagged lines, uneven, branching |
| Splinters | Short, sharp lines, varying sizes |
| Texture | Cross-hatching, shading, wood grain |
Follow these steps to illustrate the broken part of a skateboard. Your drawing will look more realistic and detailed. Enjoy the process and let your creativity flow.
Adding The Wheels
Adding wheels to your broken skateboard drawing brings it to life. The wheels give the board character and a sense of realism. Follow these steps to make sure your wheels look authentic and match the broken theme.
Wheel Placement
Start by sketching the wheel placement. Imagine where the wheels would naturally sit on a skateboard. Draw small circles for the wheels on each side of the board. Ensure they are evenly spaced and aligned with the skateboard’s width.
Next, add the wheel axles. Draw short lines from the board to the wheels. These lines represent the axles that hold the wheels in place. Keep them straight and proportional to the wheels.
Broken Wheel Effect
To create the broken wheel effect, add cracks and chips to the wheels. Start by drawing small zigzag lines on the wheels’ edges. This will give the appearance of damaged wheels.
Next, shade parts of the wheels to show wear and tear. Use light strokes to add shadows and depth to the damaged areas. This makes the broken effect more realistic.
Finally, add some debris around the wheels. Draw small pieces of broken wheel scattered near the skateboard. This enhances the broken look and adds detail to your drawing.
Enhancing With Shadows
Enhancing your drawing with shadows can add depth and realism. Shadows make your broken skateboard look more three-dimensional. It’s an essential skill for any artist.
Light Source
First, decide where the light is coming from. This will determine where shadows fall. A single light source is best for beginners. It simplifies shadow placement and makes your drawing look cohesive. Imagine a lamp shining from one side of your skateboard. This mental image helps you place shadows accurately.
Shadow Placement
Shadows should fall opposite the light source. If the light is on the left, shadows will be on the right. Draw shadows under the skateboard’s broken edges. These shadows show the damage and add realism. Keep your shadows light and subtle at first. You can always darken them later. This technique helps avoid overdoing it. Use a soft pencil or shading tool for natural-looking shadows.
Final Touches
Finishing your drawing of a broken skateboard requires some final touches. These steps ensure your artwork looks polished and complete. The final touches include refining details and adding color. Let’s explore these steps to bring your skateboard drawing to life.
Refining Details
Refining the details of your broken skateboard drawing is essential. Pay close attention to the cracks and splinters. Use a fine-tip pen or pencil to sharpen these lines. Add small scratches and dents for a realistic effect.
| Elements | Refinement Tips |
|---|---|
| Cracks | Draw jagged lines to show breakage. |
| Splinters | Add thin lines around the cracks. |
| Scratches | Use light, short strokes. |
| Dents | Shade slightly to show depth. |
Highlight the wheels and trucks. Draw small details like bolts and nuts. These details make your skateboard look more realistic.
Adding Color
Now, it’s time to add color to your drawing. Choose colors that match your vision. Use markers, colored pencils, or digital tools.
- Color the deck with vibrant hues.
- Shade the cracks and splinters with darker tones.
- Color the wheels and trucks with contrasting colors.
Use a blending tool to smooth out the colors. This will make your drawing look seamless. Add shadows for a three-dimensional effect. Pay attention to light sources and shading.
Finish by highlighting the edges. This makes the skateboard pop from the page. Your broken skateboard drawing is now complete!

Frequently Asked Questions
How Do You Draw A Broken Skateboard?
Start with a rectangle for the deck. Draw cracks and a broken wheel for detail.
What Tools Are Needed For Drawing A Skateboard?
You need a pencil, eraser, and paper. Colored pencils or markers for details.
Why Draw A Broken Skateboard?
It adds character and interest. Shows action and wear. Fun to draw.
Can Beginners Draw A Broken Skateboard?
Yes, it’s simple. Follow basic shapes and lines. Practice makes it easier.
Conclusion
Drawing a broken skateboard is a fun and easy project. Follow the steps, and you’ll create a unique piece. Practice helps improve your drawing skills. Share your artwork with friends and family. They’ll love your creativity. Keep experimenting with different designs.
Enjoy the process and have fun drawing. Your broken skateboard drawing will surely stand out. So grab your pencils and start sketching today. Happy drawing!


