Drawing a teapot might seem challenging at first. But with some guidance, anyone can do it.
Learning to draw a teapot is a fun and rewarding activity. It helps you understand basic shapes and improve your drawing skills. Whether you’re a beginner or someone looking to refine your technique, drawing a teapot can be a great exercise.
This guide will walk you through each step in a simple and clear way. You will learn to sketch the basic outline, add details, and bring your teapot to life. So grab your pencil and paper, and let’s get started on this creative journey!
Materials Needed
Before you start drawing a teapot, it’s important to gather all the necessary materials. Having the right tools and supplies will make the process smoother and more enjoyable. Below, we have divided the materials into essential tools and optional supplies to help you get started.
Essential Tools
These are the tools you will need to begin your teapot drawing:
- Pencil: Use a standard HB pencil for sketching.
- Eraser: A good eraser helps correct mistakes.
- Paper: Use drawing paper or sketchbook paper.
- Sharpener: Keep your pencil sharp for fine details.
Optional Supplies
These supplies are not necessary but can enhance your drawing experience:
- Colored Pencils: Add color to your teapot drawing.
- Ruler: For drawing straight lines and accurate proportions.
- Blending Stump: Smooth out pencil shading for a realistic look.
- Markers: Use for bold lines and vibrant colors.

Basic Shape
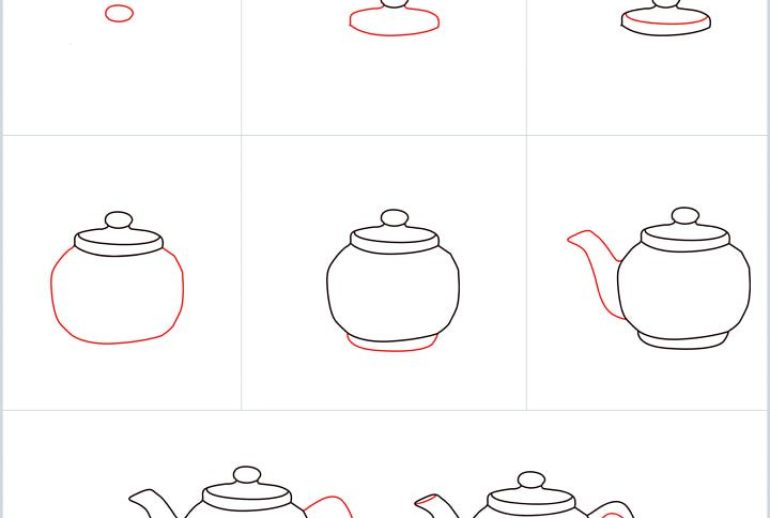
Creating a teapot drawing can be fun and simple. Start with basic shapes. These shapes will form the foundation of your teapot. First, we’ll focus on the body and the spout.
Drawing The Body
Begin by drawing a large oval. This will be the main body of your teapot. Make sure the oval is wide enough to represent the roundness of the teapot.
- Place the oval in the center of your paper.
- Draw lightly so you can erase any mistakes.
- Ensure the oval is symmetrical.
Next, add a small rectangle on top of the oval. This will be the base for the lid of the teapot. Draw another, smaller oval on top of the rectangle to complete the lid.
To create the handle, draw a curved line from the top left side of the oval. Loop it back down to attach to the lower left side of the oval. This completes the basic shape of the body.
Creating The Spout
Now it’s time to draw the spout. Start by drawing a small rectangle on the right side of the teapot’s body. This will be the base of the spout.
- Draw a long, curved line extending from the rectangle.
- Make sure the curve points slightly upwards.
- Add another line parallel to the first to create the spout’s shape.
Connect the two lines at the end with a small curve. This will form the tip of the spout. The spout should look like a tube extending from the teapot’s body.
Finally, add a small circle at the tip of the spout. This represents the hole where the tea pours out.
With these steps, you have created the basic shape of a teapot. Now, it’s time to add details and refine your drawing.
Adding Details
After sketching the basic shape of your teapot, it’s time to focus on adding details. These details will bring your drawing to life. By refining the handle and shaping the lid, you can make your teapot look more realistic. Let’s dive into these aspects.
Defining The Handle
The handle is a crucial part of your teapot. It should be both functional and visually appealing. Start by drawing a curved line that extends from the body of the teapot. This line will form the outer edge of the handle. Use smooth, consistent strokes to keep the shape uniform.
- First, sketch the outer edge of the handle.
- Then, draw a parallel line inside to create thickness.
- Finally, connect these lines at the ends to complete the shape.
Make sure the handle is large enough to be held comfortably. Add small curves or decorations to give it a unique touch. These details can enhance the overall look of your teapot.
Shaping The Lid
The lid is another important element. It keeps the teapot’s contents secure. Start by drawing a small circle or oval at the top of the teapot’s body. This will be the base of the lid.
- Draw a small circle or oval for the base.
- Sketch a slightly larger circle around the base to create the lid’s top.
- Connect the two circles with a short, vertical line to form the lid’s side.
To make the lid more realistic, add a small knob on top. This knob can be a simple circle or a more intricate shape. Small lines or dots can also add texture. Make sure the lid fits the teapot’s style and size.
| Detail | Tip |
|---|---|
| Handle | Use smooth, consistent strokes for uniformity. |
| Lid | Add a knob for a realistic touch. |
By focusing on these details, your teapot drawing will look more complete and realistic. Remember, practice is key. Keep refining these elements until you are satisfied with the result.
Outlining The Teapot
Drawing a teapot can be a fun and rewarding activity. The first step is outlining the teapot. This sets the foundation for the final drawing. Start with simple shapes and refine them over time. This process will help you capture the teapot’s basic form.
Refining Edges
After you have the basic outline, focus on refining the edges. Smooth out any rough lines. Make sure the curves look natural and even. Pay attention to the spout and handle. These parts need to be symmetrical. Use light strokes to adjust the shape.
Enhancing Features
Next, enhance the teapot’s features. Add details to the lid, spout, and handle. Draw lines to show the teapot’s material. Add patterns or designs if the teapot has any. These details make your drawing more realistic. Take your time with this step.
Shading Techniques
Shading brings your teapot drawing to life. It adds realism and depth. This section covers two essential shading techniques: light and shadow and creating depth. Let’s dive into these techniques to enhance your teapot drawing skills.
Light And Shadow
Light and shadow define the shape of your teapot. Start by identifying your light source. The light source determines where the highlights and shadows fall.
Follow these steps to add light and shadow:
- Draw a simple teapot outline.
- Determine the direction of your light source.
- Shade the opposite side of the light source.
- Use lighter strokes near the light source.
- Darken areas far from the light source.
Use a soft pencil for smooth transitions between light and dark. Blend the shades for a natural look. Practice on different shapes to understand how light and shadow interact.
Creating Depth
Depth gives your teapot a three-dimensional look. Use shading to create the illusion of depth.
Here’s how to create depth in your drawing:
- Contour Shading: Follow the curves of the teapot with your shading. This technique highlights the teapot’s roundness.
- Gradual Shading: Start shading lightly and gradually darken. This method creates a smooth transition and adds depth.
- Cross-Hatching: Use intersecting lines to shade. This technique builds texture and depth.
Combine these techniques for a realistic effect. Practice regularly to perfect your shading skills. Use a reference image to guide your shading.
Shading transforms a flat drawing into a lifelike object. Experiment with different shading tools and techniques. Observe how light interacts with real objects.
Remember, shading is an art. It adds emotion and realism to your drawing. Have fun and keep practicing!

Coloring The Teapot
Coloring your teapot drawing can be the most enjoyable part. It brings life and personality to your artwork. The right colors can make your teapot stand out. Follow these steps to make your teapot look vibrant and appealing.
Choosing Colors
Start by selecting the colors you want to use. Think about the style you want to achieve. Do you want a classic, vintage teapot? Or a modern, bold one? Here are some tips:
- Classic Teapot: Use soft colors like light blue, cream, or pastel shades.
- Vintage Teapot: Opt for earthy tones such as brown, olive green, or mustard yellow.
- Modern Teapot: Choose bright, bold colors like red, teal, or vibrant purple.
Consider the background of your drawing. Colors that complement the background will make your teapot pop.
Applying Color
Once you have chosen your colors, start applying them to your teapot. Follow these steps:
- Outline: Begin by outlining the teapot with a fine-tip marker. This helps define the edges.
- Base Color: Fill in the main body of the teapot with the base color. Use smooth, even strokes for a clean look.
- Shading: Add darker shades to areas that need depth. Focus on the edges and the handle.
- Highlights: Use a lighter color or white to add highlights. This makes the teapot look shiny and three-dimensional.
- Details: Add patterns or decorations if desired. Use contrasting colors to make them stand out.
Remember to let each layer dry before applying the next. This prevents colors from mixing and keeps your artwork neat.
Enjoy the process and have fun with it. Your teapot will look fantastic with the right colors and technique.
Final Touches
Final touches bring your teapot drawing to life. These steps refine your work and add depth. This section will focus on adding highlights and reviewing the drawing. These finishing touches ensure your teapot looks polished and complete.
Adding Highlights
Highlights give your teapot a three-dimensional look. Use a white pencil or eraser to add them. Focus on areas where light naturally hits the teapot. This could be the spout, handle, or body. Small, bright spots can make a big difference.
Blend the highlights gently. This makes them look soft and natural. Avoid harsh lines. Think about where the light source is. This helps determine where to place the highlights.
Reviewing The Drawing
Take a step back and review your drawing. Look for any areas that need adjustment. Are the proportions correct? Is the shading even? Fix any mistakes you find. Small corrections can improve the overall look.
Compare your drawing to a real teapot or a reference image. This helps spot any inaccuracies. Make sure your lines are clean and sharp. Ensure the teapot looks balanced and realistic.

Frequently Asked Questions
What Materials Do I Need To Draw A Teapot?
You need paper, pencil, eraser, and colored pencils or markers.
How Do I Start Drawing A Teapot?
Begin with a simple oval shape for the teapot’s body.
How Can I Make My Teapot Look Realistic?
Add details like the spout, handle, and lid. Use shading to create depth.
What Are Common Mistakes When Drawing Teapots?
Common mistakes include incorrect proportions and neglecting the teapot’s perspective.
Conclusion
Drawing a teapot can be fun and relaxing. Follow the steps and practice regularly. Start with simple shapes, then add details. Don’t worry about mistakes; they’re part of learning. Each teapot you draw will look better than the last. Enjoy the process and be creative.
Show your unique style in each drawing. Remember, practice makes perfect. Keep your drawings and see your progress. Happy drawing!


