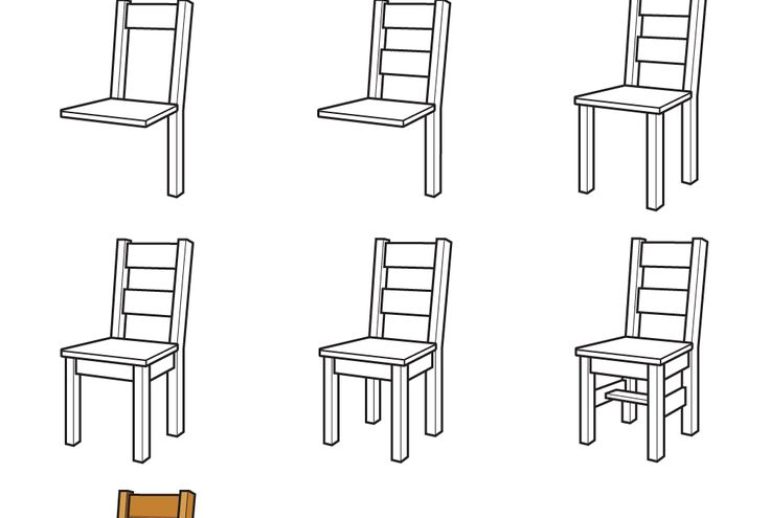
Drawing a chair can seem tricky, but it’s easier than you think. With the right steps, you can create a simple, beautiful chair sketch.
Do you want to improve your drawing skills? Learning to draw a chair is a great way to start. Chairs have simple shapes but can also be detailed, making them perfect for both beginners and advanced artists. Plus, this skill can be useful in many fields, from interior design to animation.
In this guide, we will break down the process into easy steps. By the end, you will have a clear, confident sketch of a chair. So, grab your pencil and paper, and let’s begin your drawing journey!

Materials Needed
Drawing a chair can be a fun and rewarding experience. Before starting, you need to gather some materials. Having the right tools and accessories makes the process easier and more enjoyable. Let’s dive into the essential tools and optional accessories you will need.
Essential Tools
To draw a chair, you need a few basic tools. These will help you create a clear and accurate drawing.
- Pencil: A good quality pencil is vital. It allows for clean lines and easy erasing.
- Paper: Use smooth drawing paper. It works best for detailed sketches.
- Eraser: A soft eraser helps remove mistakes without damaging the paper.
- Ruler: A ruler ensures straight lines and helps with proportions.
- Sharpener: Keep your pencil sharp for fine details.
Optional Accessories
These accessories are not essential, but they can enhance your drawing experience. They add more depth and detail to your work.
- Colored Pencils: Add color to your drawing for a more vibrant look.
- Blending Stumps: Use these for smooth shading and blending.
- Compass: Draw perfect circles for rounded chair parts.
- Graphite Pencils: Different hardness levels offer varied shading options.
- Sketchbook: Keep all your sketches in one place. Great for practice and progress tracking.
Understanding Basic Shapes
Understanding basic shapes is crucial in learning how to draw a chair. These shapes form the foundation of any drawing. By breaking down the chair into simple shapes, you can easily construct a detailed and accurate representation.
Identifying Shapes
First, observe the chair and identify its basic shapes. Most chairs can be broken down into rectangles, squares, and circles. The seat might be a square or rectangle. The legs are usually long rectangles. The backrest could be a rectangle or another shape.
Practicing Shapes
Practice drawing these basic shapes. Start with rectangles and squares. Draw them at different angles. This will help you when you begin drawing the chair. Practicing circles is also important. The chair legs might need circular ends.
Once you are comfortable with these shapes, combine them. Draw a rectangle for the seat. Add four rectangles for the legs. Finally, draw the backrest shape. Practice this until it becomes second nature. The more you practice, the easier it will be.
Sketching The Chair Frame
Sketching the chair frame is the first step in drawing a chair. This stage sets the foundation for your entire drawing. You will create a basic structure. This will guide you in adding details later.
Drawing The Outline
Start with a simple rectangle for the seat. Draw it slightly tilted. This gives a realistic perspective. Add four lines for the legs. Make sure they are evenly spaced. The back legs should be longer. This creates the backrest. Draw another rectangle above the seat. Connect it to the back legs. This forms the backrest frame. Add diagonal lines for extra support. These lines should connect the legs and the seat.
Refining The Frame
Now refine your outline. Make the legs thicker. Add curves to the backrest. This makes the chair look more realistic. Check the proportions. Adjust any parts that look off. Add small details like screws or joints. These make the chair look sturdy. Finally, add some shading. This gives depth to your drawing. Your chair frame is now complete and ready for more details.
Adding Chair Details
Adding chair details is a crucial step in making your drawing look realistic and complete. This section will guide you through the process of enhancing your chair by focusing on two main parts: the seat and the backrest. Follow these steps to bring your chair drawing to life.
Drawing The Seat
Start by defining the shape of the seat. Most chairs have a rectangular or square seat. Draw a neat rectangle to represent this. Ensure the seat is proportional to the legs and backrest. This will make your chair look balanced. Add depth to the seat by drawing lines that show its thickness. These lines should run parallel to the sides of the seat. Now, add any upholstery details. For example, draw lines or patterns to indicate cushion seams.
Creating The Backrest
The backrest is another important part of the chair. Begin by extending the lines from the seat upwards. These lines will form the sides of the backrest. Connect the tops of these lines with a horizontal line to complete the backrest shape. Make sure it aligns well with the seat. To add detail, draw vertical or horizontal lines on the backrest. These lines can represent wood slats or cushion patterns. Consider adding a curve to the top of the backrest. This will give your chair a more comfortable and stylish look.
Incorporating Texture
Adding texture while drawing a chair brings it to life. Use shading to create a soft or rough look. Play with different pencil strokes for a realistic effect.
Incorporating texture into your chair drawing can make it more realistic and engaging. Textures add depth, helping your artwork stand out. There are two main textures to focus on for a chair: wood grain patterns and fabric textures. Let’s explore how to incorporate these into your drawing.
Wood Grain Patterns
Wood grain patterns add a natural feel to your chair. Start by observing real wood. Notice the lines and swirls. Draw light, irregular lines that follow the shape of the wood parts. Use a sharp pencil for fine details. Vary the pressure to create lighter and darker lines. This variation mimics real wood. Adding knots and imperfections makes it more realistic. Practice on scrap paper first. Experiment with different types of wood grains.
Fabric Textures
Fabric textures bring a soft and comfortable look to your chair. Identify the type of fabric you want to draw. For smooth fabrics, use light, even shading. For rougher fabrics, use short, quick strokes. Patterns like stripes or checks need careful spacing. Draw each element separately. Combine different textures for a more dynamic look. Practice makes perfect. Keep experimenting with different tools and techniques. Your chair will look more inviting and realistic with well-drawn fabric textures.
Shading And Highlights
Adding shading and highlights can bring your chair drawing to life. It helps create a sense of depth and realism. Let’s dive into key techniques that will enhance your art.
Light Source Awareness
Understanding the light source is crucial for effective shading. Identify where the light is coming from. This will help you determine where to place shadows and highlights.
- Imagine a lamp shining on your chair.
- Where does the light hit first? That’s your highlight.
- Where does the light not reach? That’s your shadow.
Use light, medium, and dark tones to show the light source.
Adding Depth
Depth makes your drawing look three-dimensional. Use shading to create this effect. Follow these steps:
- Start with the darkest areas. These are usually under the seat, legs, and backrest.
- Gradually move to lighter areas. Blend the shades smoothly.
- Leave the highlighted spots almost white. This shows where the light hits directly.
Use a soft pencil for smooth blending. Erase gently to create highlights.
Pro Tip: Use a blending stump for softer edges. This helps in achieving a realistic look.
Final Touches
The final touches are crucial in making your chair drawing look professional and polished. This step involves refining the details and ensuring everything is in proportion. Let’s dive into the key aspects of finalizing your chair sketch.
Reviewing Proportions
Take a step back and look at your drawing. Are the legs the right length? Does the seat look balanced? Compare each part of the chair to make sure everything is in proportion. If something seems off, now is the time to fix it. Use a ruler if needed to measure and adjust.
Cleaning Up Lines
Erase any unnecessary or messy lines. Sharp, clean lines give your drawing a finished look. Go over the main lines of your chair with a darker pencil or pen. This helps the details stand out. Make sure to keep your hand steady while doing this. It ensures the lines remain smooth and straight.

Frequently Asked Questions
What Materials Do I Need To Draw A Chair?
You need paper, a pencil, an eraser, and a ruler.
How Do I Start Drawing A Chair?
Begin with a simple rectangle for the seat. Then, add legs and backrest.
How Can I Make My Chair Drawing Look Realistic?
Add details like shadows, textures, and dimensions. Observe real chairs for accuracy.
Can Beginners Draw A Chair Easily?
Yes, start with basic shapes and simple lines. Practice will improve your skills.
Conclusion
Drawing a chair may seem tough, but practice helps. Start with simple shapes. Follow each step carefully. Pay attention to details. Use light strokes first. Erase mistakes easily. Gradually, add more details. Practice different chair styles. Each drawing improves your skill.
Enjoy the process. Share your progress with friends. Keep a drawing journal. Over time, you’ll see improvement. Remember, patience and practice make perfect. Happy drawing!

