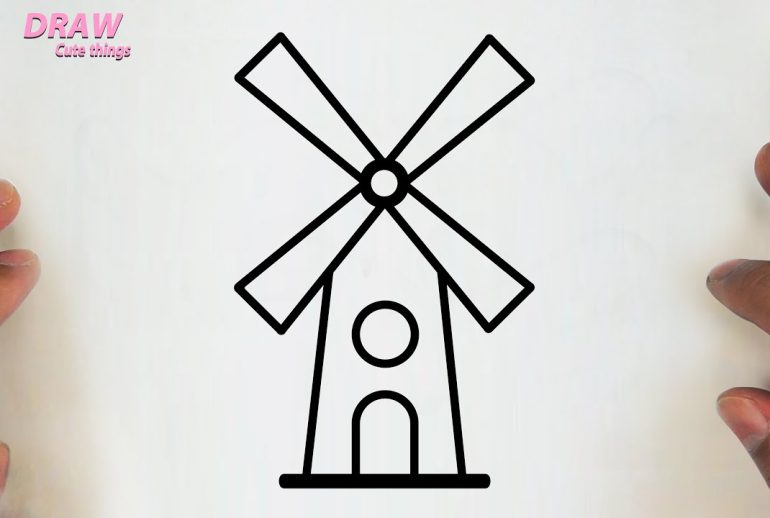
Drawing a windmill can be fun and easy. You just need some simple steps.
Windmills are fascinating structures. They have been used for centuries to harness the wind’s power. Learning to draw a windmill can help you appreciate its design. Whether you are an artist or a beginner, this guide will help you. You will understand the basic shapes and details.
Soon, you will be able to create a beautiful windmill drawing. So, grab your pencils and let’s start this creative journey together. Get ready to bring a windmill to life on paper. It’s easier than you think!

Materials Needed
Drawing a windmill can be a fun and relaxing activity. Before you start, gather the right materials to ensure a smooth drawing process. Having the proper supplies will make your drawing experience more enjoyable and successful. Let’s go over the essentials you will need.
Drawing Supplies
First, you will need some basic drawing supplies. These include:
- Pencils: Use a set of graphite pencils. A range from HB to 6B works well.
- Eraser: A good quality eraser is essential for correcting mistakes.
- Paper: Use a smooth surface drawing paper. A4 size is perfect.
- Sharpener: Keep your pencils sharp for fine details.
Optional Tools
While not necessary, these optional tools can enhance your drawing:
- Colored Pencils: Add color to your windmill drawing for a vibrant look.
- Ruler: Helps in drawing straight lines and precise measurements.
- Blending Stumps: Useful for shading and creating smooth transitions.
- Compass: Ideal for drawing perfect circles and arcs.
Basic Windmill Structure
Understanding the basic windmill structure is crucial for any drawing. This will help you create a realistic and detailed windmill. Let’s break it down into simple steps.
Sketching The Base
Start by drawing a square or rectangle for the base. This will serve as the foundation of your windmill. Make sure the lines are straight. The base needs to be sturdy. Add some details like bricks or wooden planks.
Drawing The Tower
From the top of the base, draw two vertical lines. These lines should be slightly tilted towards each other. This will form the tower of the windmill. Connect these lines at the top with a horizontal line. This creates the top of the tower.
Add some horizontal lines across the tower. These lines represent the different levels of the tower. Make sure they are evenly spaced. This will add depth to your drawing. Finally, add some details like windows or doors.
Drawing The Blades
Drawing the blades of a windmill can be a fun and creative part of the process. The blades are essential for the windmill’s operation and visual appeal. Follow these steps to ensure your windmill blades look realistic and well-proportioned.
Creating The Hub
The hub is the center point where all blades connect. Start by drawing a small circle in the middle of the windmill. This will be the hub.
- Use a compass or a round object for a perfect circle.
- Ensure the circle is centrally placed on the windmill structure.
Once the hub is drawn, you can start adding the blades.
Shaping The Blades
Each windmill blade should be long and narrow, extending outwards from the hub.
- Draw a straight line from the hub to indicate the first blade.
- Repeat this process three more times, evenly spacing the lines around the hub.
Now, give the blades their shape:
| Step | Description |
|---|---|
| Outline | Draw two parallel lines for each blade. |
| Tip | Connect the ends of the lines with a curved line. |
| Detail | Add small lines or designs inside the blades for texture. |
Ensure that each blade is the same size to maintain balance. This will make your windmill look symmetrical and realistic.

Adding Details
Adding details to your windmill drawing can make it look more realistic. These small touches bring your windmill to life. Let’s focus on two key areas: windows and doors, and texturing the tower.
Windows And Doors
Windows and doors are essential parts of a windmill. Start by drawing small squares or rectangles on the tower. These shapes will represent the windows. Position them evenly around the tower. Make sure they are aligned properly. Draw a larger rectangle at the base for the door. Add a small circle or square for the doorknob. Keep the shapes simple and consistent. This will make your windmill look neat and tidy.
Texturing The Tower
Texturing adds depth and dimension to your windmill. Begin by sketching horizontal lines across the tower. These lines should be evenly spaced. They will represent the wooden planks or bricks. Add some vertical lines to break up the horizontal lines. This will create a more natural look. You can also add shading to one side of the tower. This gives the illusion of light and shadow. Use light strokes for shading. This keeps the texture subtle and realistic.
Final Touches
Adding the final touches to your windmill drawing can transform it. These steps refine your artwork and enhance its details. Let’s explore the last steps to perfect your windmill illustration.
Outlining
Start by outlining your windmill with a darker pencil or pen. This will make the windmill stand out. Trace over the main lines, adding definition to the blades and base. Ensure your lines are smooth and confident. Outlining adds clarity and sharpness.
Focus on the edges and intricate parts. Highlight the windows and doors. Don’t rush this part. Take your time to achieve clean, precise outlines.
Erasing Guidelines
Once your outlines are complete, it’s time to erase the guidelines. Gently use an eraser to remove any pencil marks. Be careful not to smudge your drawing. This step will give your windmill a polished look.
Check for any remaining guidelines. Ensure your drawing is clean and free of unwanted lines. This final touch will make your windmill look professional and tidy.
Coloring The Windmill
Coloring the windmill adds life and charm to your drawing. Use a range of colors to create a vibrant and realistic look. Follow these steps to bring your windmill to life.
Choosing Colors
Selecting the right colors can make your windmill stand out. Consider the following options:
- Blades: Use a light, pastel color for a fresh look. Try light blue or green.
- Body: A neutral color like beige or light brown works well. This gives a natural feel.
- Roof: Darker shades like red or brown add contrast. This makes the windmill more visually appealing.
Create a harmonious look by choosing colors that complement each other. Use a color wheel to help you decide.
Applying Shading
Shading adds depth to your windmill drawing. Follow these tips to apply shading effectively:
- Identify Light Source: Determine where the light is coming from. This will guide your shading.
- Use Light and Dark Tones: Apply lighter shades where the light hits directly. Use darker tones in the shadowed areas.
- Blend Colors: Use a blending tool or your finger to smooth transitions. This creates a more realistic effect.
Here’s a quick shading guide:
| Part | Light Source | Shading Technique |
|---|---|---|
| Blades | Top Left | Light shades on the top, darker on the bottom |
| Body | Front | Darker on the sides, lighter in the center |
| Roof | Top | Light on top, darker on the sides |
Practice these techniques to enhance your windmill drawing. The right colors and shading make all the difference.
Tips And Tricks
Drawing a windmill can be a fun and creative process. With a few tips and tricks, you can make your windmill look more detailed and realistic. By avoiding common mistakes and enhancing your drawing, you will have a great windmill drawing in no time.
Common Mistakes
One common mistake is not starting with basic shapes. Begin with simple lines and circles. This helps you get the proportions right. Another error is ignoring the symmetry of the windmill blades. Each blade should be the same size and shape. Uneven blades make the windmill look off.
Also, many forget to add depth. The windmill should not look flat. Adding some 3D elements can make a big difference. Lastly, some people rush through the details. Take your time with each part of the windmill. This will make your drawing look more polished and complete.
Enhancing Your Drawing
To enhance your windmill drawing, start with light pencil strokes. This allows you to erase and make changes easily. Adding texture to the windmill’s surface can also make it look more realistic. Use small lines to show wood grain or brick patterns.
Pay attention to shadows and light. This will give your windmill more depth. Imagine where the light source is and shade accordingly. Also, consider adding some background elements. A few clouds, trees, or hills can make your drawing more interesting.
Finally, use different line weights. Thicker lines can show the main structure. Thinner lines can show finer details. This contrast can make your windmill stand out more.

Frequently Asked Questions
What Materials Do I Need To Draw A Windmill?
You need paper, pencil, eraser, ruler, and colored pencils.
How Do I Start Drawing A Windmill?
Begin with a simple cross for the blades. Draw the base next.
What Details Should I Add To Make My Windmill Realistic?
Add windows, doors, and texture lines to the blades and base.
How Can I Color My Windmill Drawing?
Use brown for the base and bright colors for the blades.
Conclusion
Drawing a windmill can be fun and rewarding. Follow each step closely. Practice makes perfect, so keep drawing. Use simple shapes to start. Add details slowly. Enjoy the creative process. Share your windmill drawings with friends. They will be impressed.
Drawing helps relax the mind. So, pick up your pencil and begin. Have fun and stay creative!


