Drawing a mountain is easier than you think. You just need some simple steps.
Mountains are majestic and awe-inspiring. Drawing one can be a relaxing and creative activity. Whether you’re a beginner or have some experience in art, learning how to draw a mountain can be fun and rewarding. You don’t need fancy tools or techniques.
Just a pencil, paper, and a bit of patience will do. In this guide, we will explore the basic steps to create your own mountain drawing. By the end, you will have a beautiful piece of art. Ready to start? Let’s dive in!
Materials Needed
Drawing a mountain can be a peaceful and rewarding experience. To start, you need the right materials. These tools will help you create detailed and beautiful mountains. Gather your supplies and let’s begin!
Pencils And Paper
Choose quality pencils for your drawing. Use different types of pencils. A hard pencil (H or HB) is great for light sketches. A softer pencil (2B or 4B) adds dark, bold lines. Don’t forget the paper. A smooth, heavy paper works best. It holds pencil marks well and does not tear easily.
Eraser And Sharpener
An eraser is essential. Use it to correct mistakes and lighten areas. A kneaded eraser works best. It does not leave residue. Keep your pencils sharp. A good sharpener makes precise lines possible. Sharp points help with detailed work.
Optional Tools
Consider using a blending stump. It softens lines and shades areas smoothly. A ruler helps with straight lines and proportions. Some artists use a lightbox for tracing. These tools are optional, but they can enhance your drawing.

Basic Mountain Shapes
Drawing mountains can be a fun and relaxing activity. Understanding the basic mountain shapes is the first step. This section will guide you through two common mountain shapes: simple peaks and layered mountains. Mastering these shapes will make your mountain drawings look more realistic.
Simple Peaks
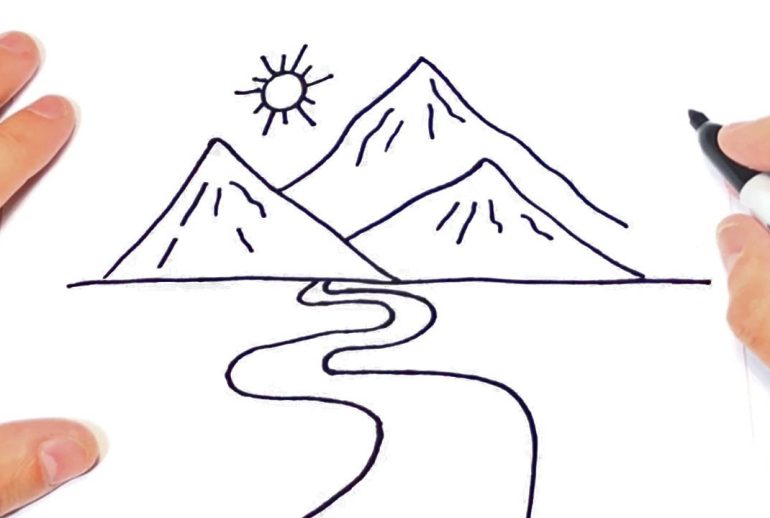
Simple peaks are the most basic mountain shapes. They are often triangular with a pointed top. Here is how to draw them:
- Start with a light pencil line to sketch the outline.
- Draw a large triangle for the main peak.
- Add smaller triangles on the sides for additional peaks.
- Connect the triangles with curved lines to form the mountain base.
- Darken the lines and add details like rocky textures.
Using these simple steps, you can create a variety of mountain peaks. Play with the sizes and angles for different effects.
Layered Mountains
Layered mountains add depth and complexity to your drawing. They consist of multiple peaks overlapping each other. Here is a step-by-step guide:
- Sketch the largest peak in the foreground.
- Draw smaller peaks behind the main peak.
- Vary the shapes and sizes of the peaks for a natural look.
- Connect the peaks with smooth lines to form the mountain range.
- Shade the peaks to show depth and dimension.
Layered mountains give your drawing a sense of distance. Experiment with different layers and shading techniques for a realistic appearance.
Sketching The Outline
Sketching the outline is the first step in drawing a mountain. It’s essential to start with a clear, simple outline to guide your work. This stage sets the foundation for your entire drawing. Let’s break it down into manageable steps.
Light Pencil Strokes
Begin with light pencil strokes. These strokes create a basic framework. Light strokes are easier to adjust. They allow you to make changes without leaving heavy marks. Start by sketching the general shape of the mountain. Avoid pressing too hard on the paper. The goal is to keep the lines faint and flexible.
Defining The Peaks
Next, focus on defining the peaks. Identify where the highest points will be. Draw lines to represent these peaks. Make sure they vary in height. This adds interest and realism. Peaks should not be straight lines. Add gentle curves to make them look natural. Continue to refine these lines until you’re happy with the shape.
Now, you have a basic outline. This foundation will help you move on to more detailed work. Remember, a good sketch starts with a clear, clean outline.
Adding Details
Adding details to your mountain drawing brings it to life. It transforms a simple outline into a realistic scene. Focus on two key aspects: ridges and crevices, and texture and shadows.
Ridges And Crevices
Ridges and crevices add depth to your mountain. Start by sketching the main ridges. Use light, quick strokes. Make sure they follow the mountain’s shape. Add smaller lines branching off. These are the crevices. They make the mountain look rugged and natural. Avoid straight lines. Nature rarely has perfect shapes.
Texture And Shadows
Texture and shadows create realism. Use short, varied strokes for texture. Think about the mountain’s surface. Is it rocky or smooth? Adjust your strokes accordingly. Shadows show where light hits the mountain. Darken one side of the ridges. This adds depth. Blend the shadows for a natural look. Practice to find the right balance. Your mountain will look realistic and detailed.
Creating Depth
Creating depth in a mountain drawing adds realism. It makes the scene more engaging. Depth gives your drawing a three-dimensional look. Let’s explore how to achieve this effect.
Foreground And Background
Start by differentiating the foreground from the background. The foreground is closer to the viewer. Draw larger and more detailed elements here. The background is farther away. Draw these elements smaller and less detailed. This contrast creates a sense of depth.
Overlapping Elements
Overlapping elements enhance depth. Draw some mountains in front of others. This makes it look like some are closer. It adds layers to your drawing. It also makes the scene feel more natural. Practice overlapping to improve your depth skills.

Shading Techniques
Shading is a critical part of drawing a mountain. It gives your drawing depth and realism. Understanding different shading techniques can help you create stunning landscapes. In this section, we’ll discuss two essential techniques: hatching and cross-hatching, and blending for smoothness.
Hatching And Cross-hatching
Hatching involves drawing parallel lines close together. The closer the lines, the darker the shade. Use this technique to add shadows and depth to your mountain.
- Start with light, parallel lines.
- Increase pressure for darker areas.
- Practice consistency in line spacing.
Cross-hatching is a variation of hatching. Draw a second set of parallel lines at an angle to the first set. This adds more depth and texture.
- Begin with hatching.
- Add a second layer at a different angle.
- Adjust the angles for varied textures.
Blending For Smoothness
Blending creates smooth transitions between light and dark areas. This technique is excellent for creating soft shadows and gradients on your mountain.
| Step | Action |
|---|---|
| 1 | Shade the area lightly with a pencil. |
| 2 | Use a blending tool or your finger. |
| 3 | Blend in small circles for smoothness. |
| 4 | Repeat to achieve desired darkness. |
Remember to blend edges gently. This avoids harsh lines and creates a natural look.
Final Touches
Final touches can transform a simple mountain drawing into a masterpiece. These last details bring your artwork to life. Focus on refining edges and highlighting key areas. Let’s dive into these steps.
Refining The Edges
Start by sharpening the mountain’s outline. Use a darker pencil or pen. Trace over the main lines. This makes the mountain stand out. Add small details to the edges. Draw tiny rocks and crevices. These make the mountain look more realistic. Don’t rush this step. Take your time to get it right.
Highlighting Key Areas
Identify the mountain’s light source. This helps with shading. Use a lighter pencil for highlights. Add them to the peaks and ridges. This gives the mountain depth. Next, shade the opposite sides. Use a darker pencil. This creates shadows. It makes the mountain look three-dimensional. Blend the shades smoothly. This avoids harsh lines.
Look at real mountains for inspiration. Notice where the light hits. Replicate these highlights in your drawing. This step adds realism. Your mountain drawing will now look complete and detailed.
Common Mistakes
Drawing a mountain can be tricky. Many beginners make common mistakes. These errors can make a mountain look flat or unbalanced. Let’s explore how to avoid these pitfalls.
Avoiding Flatness
A mountain should look three-dimensional. A common mistake is drawing it flat. This happens when the lines are too straight. Real mountains have curves and angles. Add some irregular lines to show this.
Another way to avoid flatness is by using shading. Shading adds depth. Focus on where the light hits the mountain. Shade the areas that the light does not touch. This creates a sense of volume.
Tips to Avoid Flatness:
- Use curves and angles in your lines.
- Add shading to show depth.
- Observe real mountains for reference.
Balancing Light And Dark
Balancing light and dark areas is essential. Many beginners use too much of one or the other. This can make the drawing look unrealistic. Use a blend of light and dark areas.
Start with light sketches. Gradually add darker shades. Pay attention to where the light source is. This helps in shading correctly.
Here is a simple table to understand light and dark balance:
| Light Source | Shading Area |
|---|---|
| Top Left | Bottom Right |
| Top Right | Bottom Left |
Tips for Balancing Light and Dark:
- Identify the light source.
- Shade opposite to the light source.
- Use a range of shades.
By following these tips, you can avoid common mistakes. Your mountains will look more realistic and dynamic.

Frequently Asked Questions
What Materials Do I Need To Draw A Mountain?
You’ll need pencils, paper, an eraser, and optionally, colored pencils or markers for detailing.
How Do I Start Drawing A Mountain?
Begin with a rough outline of the mountain’s shape using light pencil strokes.
What Are Key Features Of A Mountain?
Key features include peaks, ridges, slopes, and valleys. Add texture for realism.
How Can I Add Depth To My Mountain Drawing?
Use shading techniques to create depth and dimension in your mountain drawing.
Conclusion
Drawing a mountain can be a fun and rewarding experience. Start with basic shapes and gradually add details. Practice regularly to improve your skills. Remember, each artist has a unique style. Don’t be afraid to experiment. Use references for inspiration and guidance.
Enjoy the process and be patient with yourself. Your mountains will look better with time. Keep practicing and stay creative. Happy drawing!

