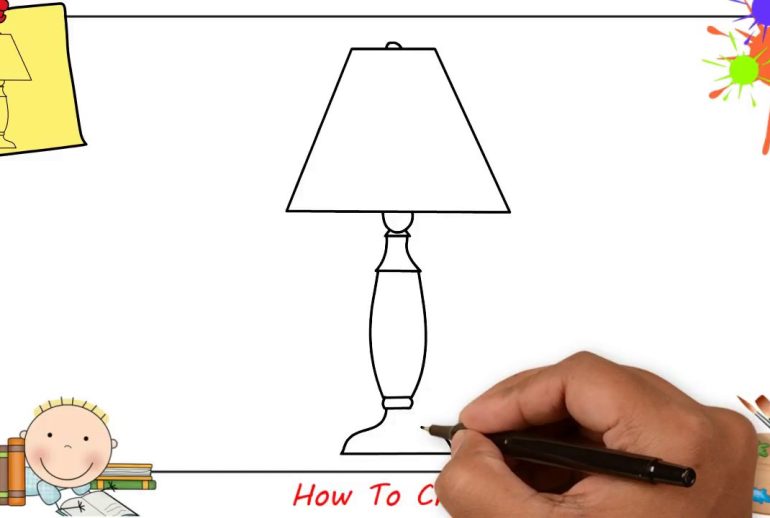
Drawing a lamp is easier than it seems. With a few simple steps, anyone can do it.
Have you ever wanted to sketch a lamp but felt unsure where to start? Whether for a school project, art class, or just for fun, drawing a lamp can be a rewarding experience. This guide will walk you through each step, making the process clear and enjoyable.
You don’t need to be an expert artist; just have some paper, a pencil, and a bit of patience. By the end, you’ll have a lovely lamp drawing to show off. Ready to get started? Let’s dive into the basics and make your lamp come to life on paper.
Materials Needed
Creating a beautiful lamp drawing begins with gathering the right materials. The right tools and surfaces can make your drawing process smoother. Below, we will explore the essential materials you need.
Drawing Tools
Start with a set of pencils. A range of hardness from H to B will be helpful. H pencils are harder and lighter, while B pencils are softer and darker. You will need an eraser. Preferably a kneaded eraser, which can lift graphite without damaging the paper. A ruler is also essential for drawing straight lines. A sharpener will keep your pencils ready for use. Consider using a blending stump for smooth shading.
Paper And Surface
Choose good quality drawing paper. It should have a smooth surface to allow for clean lines. The size of the paper depends on your preference. A standard A4 size is a good starting point. Ensure you have a clean, flat surface to work on. This can be a drawing board or a sturdy table. A well-lit area will help you see the details clearly. Natural light is best, but a good desk lamp works too.

Basic Shapes And Proportions
Learning how to draw a lamp can be an enjoyable and rewarding experience. To start, focus on the basic shapes and proportions. These are the building blocks of any drawing. Getting these right will help you create a realistic and balanced lamp.
Outline The Lamp Base
Begin by drawing the base of the lamp. The base is usually a circle or oval. Draw a horizontal line to represent the bottom. Then, sketch a vertical line in the center for symmetry.
Next, draw the outline of the base. Use the vertical line as a guide. Create the shape you want, whether it’s round, square, or rectangular. Make sure both sides are even. This will help in keeping the lamp balanced.
Sketch The Lamp Shade
Now, move on to the lamp shade. Start with a smaller oval or circle at the top. This represents the top of the shade. Draw a larger oval or circle below it. This represents the bottom of the shade. Connect these two ovals with straight or slightly curved lines on both sides.
Ensure the shade is centered above the base. Use the vertical line you drew earlier. This keeps the lamp proportionate and realistic. Adjust the shape and size as needed. This helps in getting the right proportions.
Remember, practice makes perfect. Keep refining your shapes. Your lamp will look more realistic with each attempt.
Adding Details
Adding details to your lamp drawing can make it look more realistic and polished. This step involves refining the base and detailing the shade. Let’s dive into these aspects to enhance your lamp drawing.
Refine The Base
The base is the foundation of your lamp. Adding details here gives it character.
- Lines and Texture: Draw additional lines to show the texture of the material. For a wooden base, add fine lines to mimic wood grain.
- Shadows: Add shadows to create depth. Shade the side opposite to your light source.
- Ornamentation: Add small designs or patterns. This can be dots, swirls, or even small floral designs.
These small details can make a big difference. They bring your lamp to life.
Detail The Shade
The shade is the most noticeable part of the lamp. Giving it texture and pattern makes it stand out.
- Fabric Texture: If the shade is fabric, add cross-hatching lines to show the weave.
- Patterns: Add any patterns like stripes, polka dots, or floral designs. This adds personality to the lamp.
- Light Effects: Show where the light hits the shade. Add lighter tones in these areas to indicate brightness.
By focusing on these details, your lamp drawing will look more engaging and complete.

Creating Depth
Creating depth in your lamp drawing adds realism and interest. It makes the lamp look three-dimensional. There are simple techniques to achieve this effect. Let’s explore shading techniques and highlighting areas.
Shading Techniques
Shading gives your lamp drawing a lifelike appearance. Start with a light hand. Build up the darkness gradually. Use the side of your pencil. Create soft, even shadows. Focus on areas that light does not hit directly. Under the lampshade, inside the lamp base, and near the bulb are key spots. Cross-hatching and blending are effective techniques. Cross-hatching involves drawing intersecting lines. Blending smudges the graphite for a smooth look. Use a tissue or blending stump for this.
Highlighting Areas
Highlighting is the opposite of shading. It shows where the light hits. Leave some areas almost white. These are your highlights. Use an eraser to lift graphite for a sharp highlight. Think about where the light source is. The top of the lampshade, the bulb, and the base will have highlights. Balance your highlights and shadows. This creates a more realistic lamp.
Coloring The Lamp
After sketching your lamp, the next step is to add colors. This part can bring your lamp to life. The right colors can make your drawing look vibrant and realistic. Here’s how to choose and apply colors effectively.
Choosing Colors
Selecting the right colors is crucial. Consider the lamp’s material. Is it metal, glass, or ceramic? Each material has different colors and textures.
- For a metal lamp, use shades of grey, silver, or gold.
- For a glass lamp, use transparent or light colors.
- For a ceramic lamp, use warm, earthy tones.
Think about the light source. A lamp usually emits light. Use yellow or white to show light areas. Darker shades can be used for shadows.
Applying Colors
Start with the base color. This is the main color of the lamp. Use a light hand to fill in the large areas.
- Apply base colors first. These are the main colors of the lamp.
- Use a light hand to fill in large areas.
- Add shadows and highlights. This gives depth to your drawing.
- Use darker shades for shadows and lighter shades for highlights.
Blend the colors smoothly. This makes the lamp look more realistic. Layering colors helps in achieving the right tone and texture.
| Color Type | Purpose |
|---|---|
| Base Color | Main color of the lamp |
| Highlight Color | Light areas |
| Shadow Color | Dark areas |
Remember to step back and view your drawing from a distance. This helps to see if the colors look balanced. Adjust as needed.
Final Touches
You’ve sketched the basic outline of your lamp. Great job! Now, let’s focus on the final touches to make your drawing stand out. This section will help you correct mistakes and enhance features, adding depth and realism to your lamp.
Correcting Mistakes
Mistakes are common in the drawing process. Don’t worry. Here are some steps to correct them:
- Erase Lightly: Use a soft eraser to gently remove unwanted lines.
- Refine Shapes: Check the lamp’s proportions and adjust as needed.
- Check Symmetry: Ensure both sides of the lamp are balanced.
By carefully correcting these mistakes, your lamp will look more accurate and visually pleasing.
Enhancing Features
Now it’s time to add details that enhance your lamp. Follow these tips:
- Add Shadows: Create shadows to give your lamp depth.
- Highlight Areas: Use a white pencil or eraser to add highlights.
- Texture: Draw textures on the lamp’s surface for realism.
Enhancing features like shadows, highlights, and texture can make your lamp appear more three-dimensional and lifelike.
Here is a simple table to summarize the tips for enhancing features:
| Enhancement | Tip |
|---|---|
| Shadows | Create depth |
| Highlights | Add brightness |
| Texture | Draw surface details |
By following these steps, you’ll give your lamp drawing a polished, professional look. Your drawing will not only stand out but also capture the essence of a real lamp.
Common Mistakes To Avoid
Drawing a lamp can be fun. But, it’s easy to make mistakes. Avoiding these common errors will help your artwork look more realistic and polished.
Proportion Errors
Maintaining proper proportions is crucial. Proportion errors can make your lamp look odd. Check the size of the base compared to the shade. Both parts should be balanced.
Use a ruler or a grid to help with this. Measure and mark points to keep everything in proportion. This will ensure your lamp looks realistic.
Shading Issues
Shading can add depth to your drawing. Many beginners make shading errors. Avoid making the shading too dark or too light.
Observe a real lamp under light. Notice where the shadows fall. Use this observation to guide your shading. Soft, gradual transitions between light and dark areas work best.
Use a blending tool or even your finger to smooth out harsh lines. This will make the lamp appear more three-dimensional.
Misaligned Elements
A common mistake is misaligned elements. The base, stem, and shade should align. Otherwise, the lamp will look off-balance.
Draw a centerline first. This will help you keep everything aligned. Make sure the shade sits directly above the base.
Ignoring Details
Details can make a big difference. Ignoring details can make your lamp look flat. Add small features like the switch, cord, or decorative elements.
Observe real lamps to see these details. Adding them will make your drawing more realistic and engaging.

Frequently Asked Questions
What Materials Do I Need To Draw A Lamp?
You need paper, a pencil, eraser, ruler, and colored pencils or markers.
How Do I Start Drawing A Lamp?
Start with the lamp’s base. Draw a simple oval shape.
How Can I Make My Lamp Drawing Look Realistic?
Add details like shading and reflections to give your lamp a 3D effect.
What Are Common Mistakes To Avoid When Drawing A Lamp?
Avoid uneven proportions. Keep lines smooth and consistent for a balanced look.
Conclusion
Drawing a lamp can be a fun and easy project. Follow the steps and practice. Soon, you will see improvement in your skills. Remember, patience and practice are key. Keep experimenting with different styles and techniques. Your creativity will shine through.
So, pick up your pencil and start drawing. Enjoy the process and happy drawing!


