Drawing a car can seem daunting. But with some guidance, it becomes easy.
Many people wish they could draw a car well. Whether it’s for a hobby or school project, knowing the basics helps. This guide will walk you through the steps. You’ll learn how to sketch the shape, add details, and bring your drawing to life.
No special skills are needed, just some paper, a pencil, and patience. By the end, you’ll have a car drawing you can be proud of. So, let’s get started and discover the fun of drawing cars together.
Materials Needed
Drawing a car can be fun and rewarding. Before you start, gather all necessary materials. These tools will help you create accurate and detailed car drawings. Below, you will find a list of essential materials needed to draw a car.
Drawing Tools
First, you need good drawing tools. Use a sharp pencil for fine lines. Have an eraser to correct mistakes. Get some paper, ideally a sketchpad. You might also need a ruler for straight lines. Colored pencils or markers can add depth and detail to your drawing.
Reference Images
Reference images are crucial. They help you understand car shapes and details. Look for pictures of cars from different angles. You can find these images online or in magazines. Choose clear, high-quality images for better results. Study these images to capture accurate proportions and features in your drawing.
Basic Car Shapes
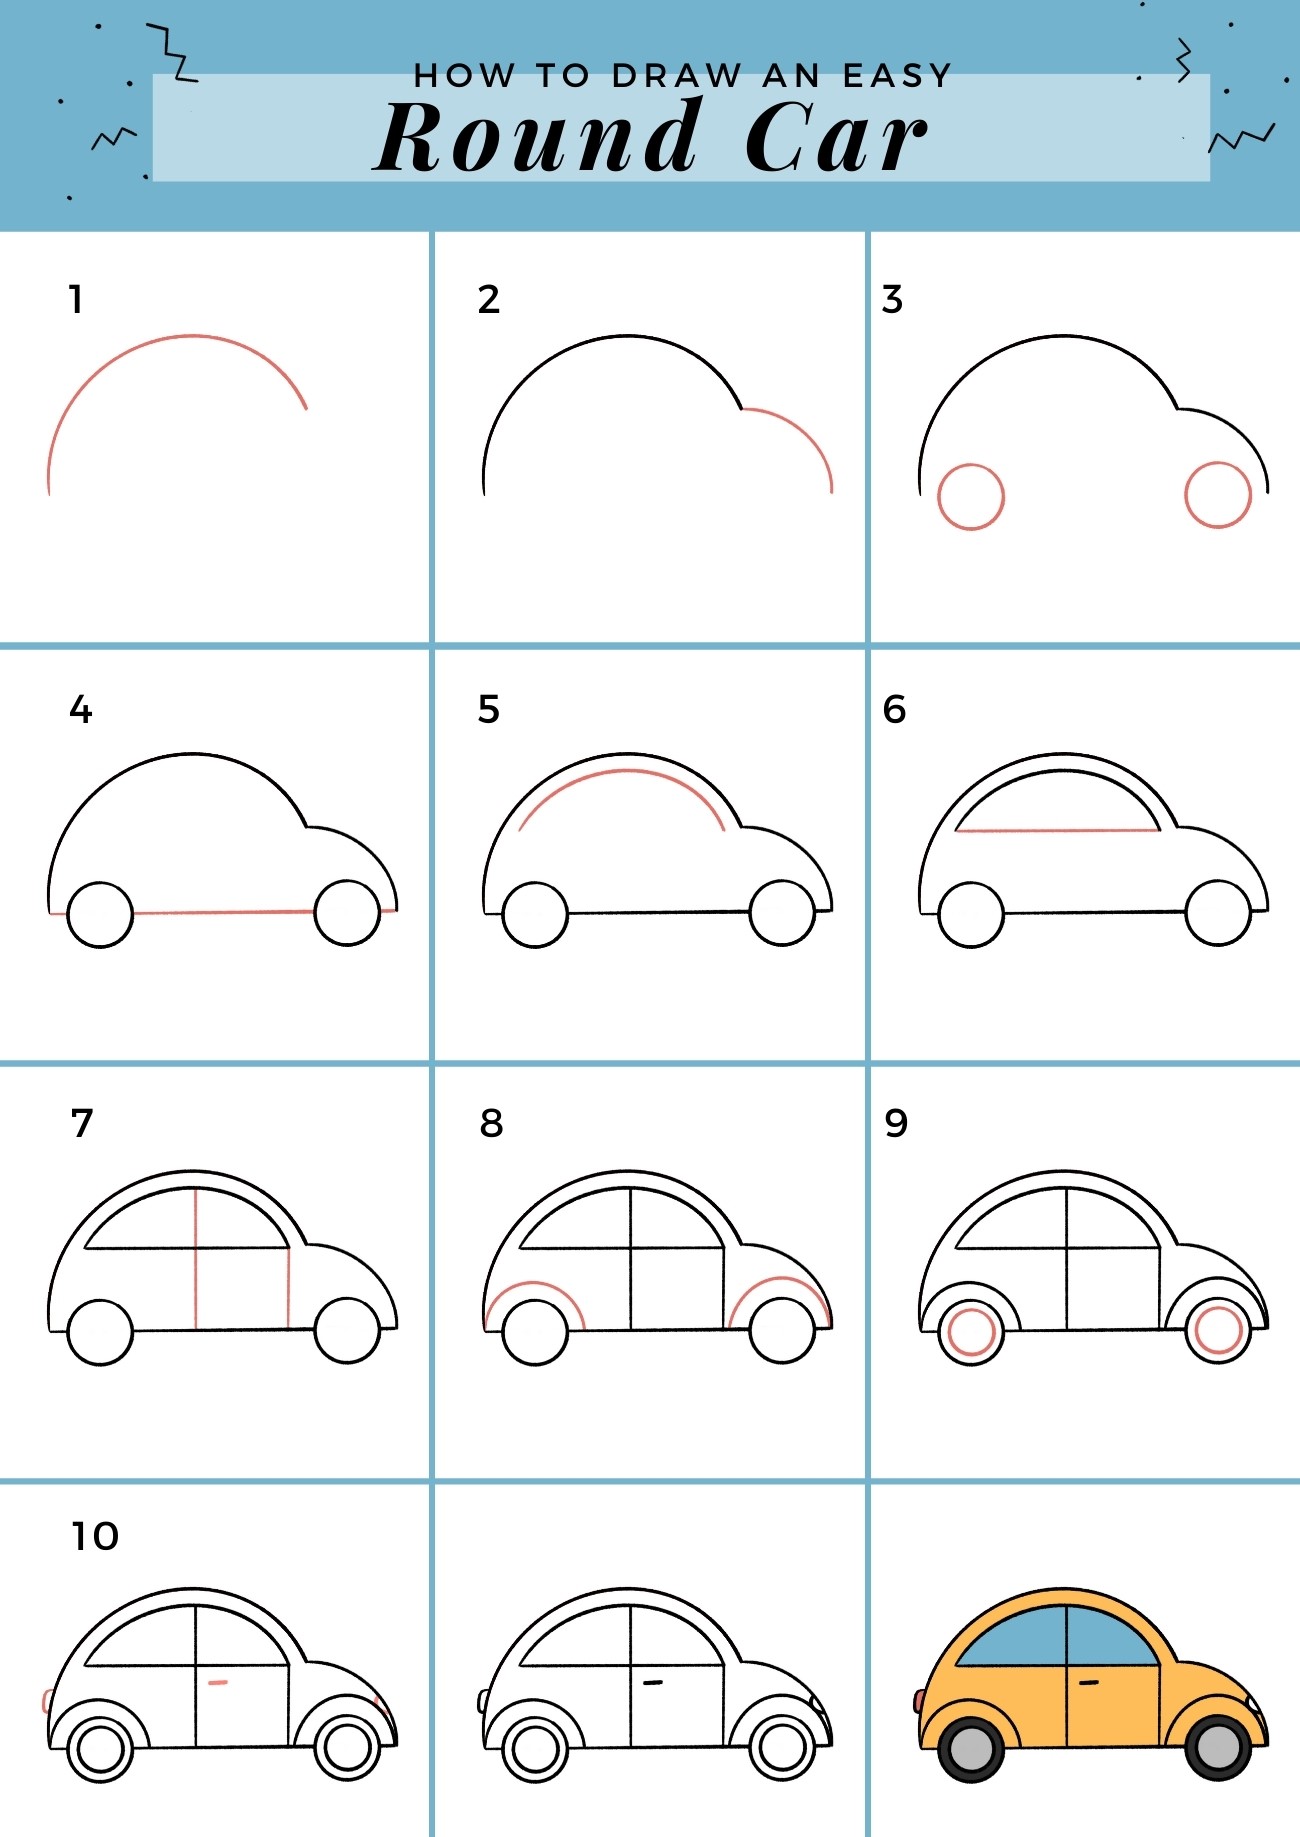
Drawing a car can seem challenging, but it starts with basic shapes. Understanding these shapes will help you create a detailed car drawing. Let’s break down the process into easy steps.
Drawing The Body
Begin by sketching the car’s body. This is the main part of the vehicle. Use a rectangle for the car’s body. Ensure the rectangle is wider than it is tall.
Next, add curved lines at the corners. This gives the car a more realistic look. Pay attention to the proportions. The front of the car should be slightly shorter than the back.
Important Tip: Use light strokes so you can easily erase and adjust.
Adding The Roof
Now, add the roof. Start by drawing a smaller rectangle on top of the car’s body. This represents the cabin where passengers sit.
Connect the roof to the body with slanted lines. These lines should be angled slightly to the front and back. This adds a dynamic look to your car.
Ensure the roof is centered. It should not be too far forward or backward.
Pro Tip: The front windshield should have a slight slope for a more realistic appearance.
Once you have these basic shapes, you can add more details like windows, wheels, and headlights.
Adding Wheels
Adding wheels to your car drawing is a crucial step. The wheels are essential for a realistic look. They must be drawn correctly to make your car appear balanced and functional.
Positioning The Wheels
Start by determining where the wheels will go. The front and rear wheels should be aligned evenly. To do this:
- Draw light guidelines to mark the wheelbase.
- Ensure the wheels are the same size and shape.
- Position the wheels equidistant from the car’s centerline.
Proper positioning ensures your car looks symmetrical. It also helps in maintaining a realistic perspective.
Detailing The Tires
Next, focus on detailing the tires. Good details bring your drawing to life. Here’s how:
- Draw the outer rim and the inner hub.
- Add treads to the tire for a textured look.
- Include lug nuts and spokes for more realism.
Use shading to give depth to the tires. Darken the areas where shadows would fall naturally. This adds a three-dimensional look to your wheels.
Remember, the wheels are more than just circles. They’re an essential part of your car drawing. Pay attention to their details and positioning. Your car will look more realistic and appealing.
Drawing Windows
Drawing windows on a car can be tricky. But with a few simple steps, anyone can do it. In this section, we will focus on two main parts: the front window and the side windows.
Front Window
The front window, also known as the windshield, is an important part of car drawings. Start by drawing a large, curved rectangle at the front of the car. This should be slightly wider at the top than at the bottom. This gives it a realistic perspective.
Next, add some details to the windshield. Draw two thin lines at the bottom corners to represent the wipers. Make sure these lines are parallel to the bottom edge of the window. You can also add a slight tint to the window by shading it lightly with a pencil.
Side Windows
Side windows are usually rectangular or trapezoidal. Begin by drawing a rectangle or trapezoid on the side of the car. This shape should be similar to the overall shape of the car’s side.
To add more detail, draw a thin line down the middle of the window to show the separation between the front and back sections. This line should run vertically from the top to the bottom of the window. You can also add a small rectangle at the top of the window to represent the side mirror.
Finally, shade the side windows lightly to give them a glassy look. Make sure the shading is consistent with the rest of the car to maintain a cohesive appearance.
| Steps | Front Window | Side Windows |
|---|---|---|
| 1 | Draw a curved rectangle | Draw a rectangle or trapezoid |
| 2 | Add wiper lines | Draw a vertical line to separate sections |
| 3 | Shade lightly | Shade lightly |
Creating Car Details
Adding details makes your car drawing look realistic. Let’s explore how to draw these details step-by-step. Focus on three main parts: headlights, grille, and bumpers.
Headlights And Taillights
Start by drawing the headlights. Usually, they are ovals or rectangles. Place them on both sides of the front of your car. For a modern look, add small circles or lines inside the headlights to show the bulbs.
Taillights follow the same process. They are at the rear of the car. Taillights can be rectangular or wrap around the car’s corners. Add some lines inside to give detail, like brake lights and turn signals.
Grille And Bumpers
The grille sits between the headlights. It’s often a rectangle or trapezoid shape. Draw vertical or horizontal lines inside to show the grille pattern. Some cars have a logo in the middle of the grille.
Bumpers are at the front and rear ends of the car. They are usually curved or straight lines that follow the car’s shape. Add small details like bolts or lines to make them look realistic.
| Car Part | Shape | Details |
|---|---|---|
| Headlights | Oval/Rectangle | Bulbs inside |
| Taillights | Rectangle/Wrap-around | Brake lights, Turn signals |
| Grille | Rectangle/Trapezoid | Lines, Logo |
| Bumpers | Curved/Straight | Bolts, Lines |
Adding Shadows And Highlights
Adding shadows and highlights makes your car drawing look realistic. Shadows add depth and dimension. Highlights create the illusion of light hitting the surface. Learn how to use these techniques effectively.
Shading Techniques
Shading is key to making your car drawing look three-dimensional. Use different pencil pressures to create light and dark areas. Start with a light touch for the base shading. Then, gradually apply more pressure for darker areas.
For a smooth look, use the hatching technique. Draw parallel lines close together. For a textured look, use cross-hatching. Draw another set of parallel lines over the first set, but in a different direction. This creates a mesh-like effect.
| Technique | Description |
|---|---|
| Hatching | Draw parallel lines close together. |
| Cross-Hatching | Draw a second set of lines in a different direction. |
Highlighting Tips
Highlights give your car a shiny, realistic look. Use an eraser to lift some graphite off the paper. This creates the effect of light reflecting off the car’s surface.
Focus on areas where light would naturally hit. These include the hood, roof, and fenders. Keep the highlights small and bright. This makes them stand out more.
For extra detail, use a white gel pen. Add small dots and lines to the car’s surface. This makes the highlights pop and adds extra realism.
- Use an eraser for highlights.
- Focus on light-hitting areas.
- Keep highlights small and bright.
- Use a white gel pen for extra detail.
Final Touches
The final touches can transform your car drawing from good to great. This stage is crucial for adding depth, realism, and personality. With careful attention to detail, your drawing will stand out. Follow these steps to perfect your car drawing.
Reviewing The Drawing
Take a step back and look at your car drawing. Check all parts for accuracy. Do the wheels look round and even? Are the proportions correct? Ensure the lines are smooth and clean. This review helps identify areas that need improvement.
Making Adjustments
After reviewing, make necessary adjustments. Refine the lines and correct any errors. Adjust the shading for better depth and contrast. Add highlights to reflect light on the car’s surface. These tweaks can make a big difference.

Frequently Asked Questions
What Materials Do I Need To Draw A Car?
You need paper, pencils, erasers, and colored pencils or markers.
How Do I Start Drawing A Car?
Begin with basic shapes like rectangles and circles for the car body and wheels.
What Are Some Tips For Drawing Car Details?
Focus on lights, windows, and tires. Use references for accuracy.
How Can I Improve My Car Drawing Skills?
Practice regularly. Study real cars and other artists’ drawings for inspiration.
Drawing a car can be fun and rewarding. Practice each step patiently. Focus on basic shapes first. Then add details gradually. Use light strokes for guidelines. Erase unnecessary lines once you’re satisfied. Shading adds depth and realism. Keep practicing to improve your skills.
Remember, every artist starts as a beginner. Enjoy the process. Happy drawing!