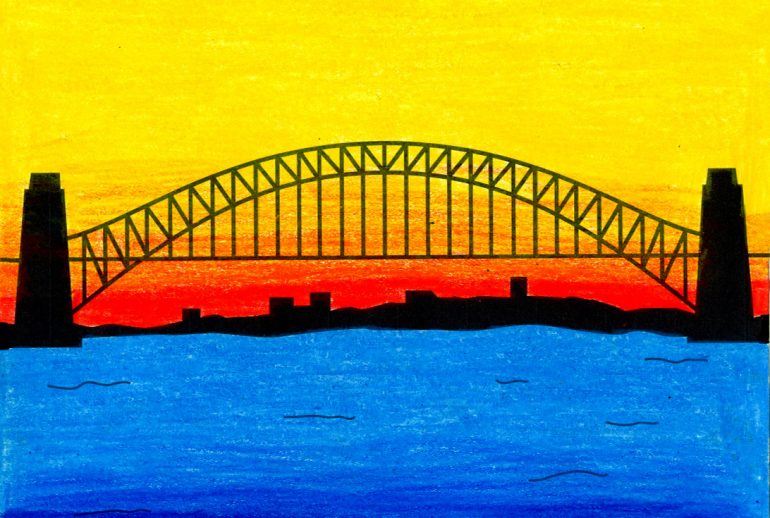
Learning to draw a bridge is easier than you might think. With some simple steps, you can create a beautiful drawing of a bridge.
Drawing is a wonderful way to express creativity. Bridges, with their unique structures, provide interesting subjects to draw. Whether you are a beginner or have some experience, this guide will help you. We will cover basic shapes and lines to build a bridge drawing.
You don’t need special tools, just paper and a pencil. This activity can be fun and relaxing. Plus, it will improve your drawing skills. So, let’s get started on drawing a bridge. Follow along, and soon you’ll have your own bridge artwork!

Introduction To Bridge Drawing
Learn the basics of drawing a bridge with simple steps. Follow easy instructions to create your own beautiful bridge artwork. Perfect for beginners and art enthusiasts.
Drawing bridges can be fun and rewarding. Bridges are a symbol of connection and strength. They come in many designs and styles. Learning to draw them can improve your artistic skills. You will also understand structures better.
Why Draw Bridges?
Drawing bridges enhances creativity. It challenges your perspective and attention to detail. You can explore different types of bridges. From simple wooden bridges to complex suspension bridges. Drawing bridges can also be relaxing. It provides a sense of accomplishment.
Materials Needed
You need some basic materials to draw a bridge. Start with paper and pencils. Use a ruler for straight lines. Erasers are essential for corrections. Colored pencils or markers add life to your drawing. Optionally, use a compass for perfect circles. Gather these materials before you begin. “`

Basic Shapes And Lines
Drawing a bridge may seem complex. But it starts with basic shapes and lines. These elements form the structure. This section will guide you through the initial steps. It will help you create a solid foundation for your bridge drawing.
Starting With Simple Shapes
Begin with simple shapes. Use rectangles and squares for the bridge’s main structure. Draw a long rectangle for the deck. This represents the surface where vehicles move. Add vertical rectangles or squares beneath it. These act as supports or pillars. They hold up the bridge.
For a more detailed bridge, add triangles. Place them between the pillars. This adds strength to the structure. Triangles provide a solid base. They help in distributing weight evenly.
Understanding Perspectives
Perspective is key in drawing. It adds depth and realism. Begin with a vanishing point. This is where all lines converge. Imagine the bridge stretching into the distance. Draw lines from the vanishing point to the edges of your bridge.
Consider the angle. If you draw from the side, make the lines parallel. From an angle, use the vanishing point. This creates a 3D effect. It makes the bridge look more realistic.
Practice different perspectives. Try drawing the bridge from above. Or from below. Each angle offers a unique view. It helps you understand the structure better.
Sketching The Structure
Drawing a bridge can seem like a complex task. Breaking it down into simple steps makes it easier. This section focuses on sketching the structure of the bridge. Start with the main elements and then add support structures.
Outlining The Main Elements
The first step in sketching a bridge is to outline the main elements. These elements include the roadway, the towers, and the cables. Use light lines to create the basic shapes.
- Draw the roadway as a simple horizontal line.
- Sketch the towers as vertical lines extending from the roadway.
- Add the cables as curved lines connecting the towers to the roadway.
Focus on the proportions and the placement of these elements. Ensure they are balanced and symmetrical.
Adding Support Structures
Next, add the support structures to give the bridge strength and stability. These include piers and trusses.
- Draw the piers as vertical lines under the roadway.
- Sketch the trusses as diagonal lines between the piers and the roadway.
Use a ruler for straight lines. Keep your hand steady for smooth curves.
Adding details like railings and beams makes the bridge look more realistic.
Here is a simple table to summarize the steps:
| Step | Description |
|---|---|
| 1 | Outline the roadway, towers, and cables. |
| 2 | Add piers under the roadway. |
| 3 | Sketch trusses between piers and roadway. |
| 4 | Include railings and beams. |
By following these steps, you can create a detailed and balanced bridge sketch. Remember to take your time and enjoy the process.
Detailing The Bridge
Detailing a bridge adds depth and realism to your drawing. It’s the step that brings your artwork to life. In this section, we’ll focus on two main aspects: drawing cables and beams and enhancing with textures. These details make your bridge look professional and well-crafted.
Drawing Cables And Beams
Cables and beams are crucial elements of many bridge designs. They provide structure and support. To draw them accurately, follow these steps:
- Identify the anchor points: Determine where the cables or beams will connect. These points usually attach to the bridge deck and towers.
- Draw straight lines: Use a ruler to draw straight lines for beams. For cables, draw slightly curved lines. This mimics the natural tension in real cables.
- Add thickness: Give the lines some thickness. This makes them look solid and substantial.
Remember to keep your lines neat. Consistency in your drawing ensures a realistic look.
Enhancing With Textures
Adding textures gives your bridge a more detailed appearance. Textures can represent materials like steel, concrete, or wood. Here’s how to add them:
- Choose the texture: Decide what material your bridge is made of. This will guide your texture choice.
- Use shading techniques: For a steel bridge, use cross-hatching to show metal surfaces. For concrete, use stippling to create a rough look.
- Highlight and shadow: Add highlights and shadows. This gives depth and realism to the texture.
Textures make your bridge unique. They add a tactile feel to the drawing.
Combining detailed cables and beams with rich textures results in a stunning bridge drawing. Keep practicing these techniques to improve your skills.
Adding Depth And Shadows
Drawing a bridge can be fun. Adding depth and shadows makes it look real. This guide will help you learn how to do it.
Creating Depth With Shading
Shading gives your drawing depth. Start by deciding where your light source is. The light source affects where shadows fall.
Light: The areas facing the light source should be lighter.
Dark: The areas away from the light source should be darker.
| Light Source | Shading Technique |
|---|---|
| Top Left | Shade the bottom right parts of the bridge. |
| Top Right | Shade the bottom left parts of the bridge. |
- Use soft strokes for light shading.
- Apply hard strokes for dark areas.
Highlighting Light Sources
To make your bridge look real, highlight the light source. The light source determines where to place highlights and shadows.
Highlights: Use an eraser or white pencil to add highlights. These are the brightest parts of your drawing.
Shadows: Add shadows with a darker pencil. These are the darkest parts of your drawing.
- Identify the light source.
- Highlight the areas facing the light.
- Darken the areas away from the light.
Final Touches
Now that the basic structure of your bridge is complete, it’s time to add the final touches. These details will bring your drawing to life and make it look more realistic. Focus on refining lines, adding shadows, and including background elements.
Refining Lines And Edges
Start by going over your initial lines. Make them cleaner and sharper. Use a fine-tip pen or a darker pencil to trace the main lines of your bridge. Ensure that these lines are steady and well-defined.
- Check for any uneven lines or edges.
- Make necessary corrections.
Next, add small details to the structure. This can include bolts, joints, and textures. These details will add depth and realism to your drawing. Don’t overdo it; keep it simple and subtle.
Adding Background Elements
Adding background elements can enhance the overall look of your drawing. Consider including elements such as:
- Sky: Draw a simple sky with clouds. Light shading works best.
- Water: If your bridge is over water, add gentle waves.
- Land: Draw trees, buildings, or hills in the background.
Background elements should not overshadow the bridge. They should complement it. Use lighter shades and fewer details in the background. This will keep the focus on the bridge itself.
| Element | Tips |
|---|---|
| Sky | Use light shading and simple cloud shapes. |
| Water | Add gentle waves with light pencil strokes. |
| Land | Draw trees and buildings with minimal detail. |
These final touches will bring your bridge drawing to life. They will make it more engaging and realistic. Take your time and enjoy the process.
Common Mistakes To Avoid
Drawing a bridge can be a fun and rewarding experience. But, it’s easy to make mistakes that can affect the final result. Here are some common pitfalls to avoid while drawing a bridge.
Overcomplicating The Design
Overcomplicating your bridge design can make it look cluttered. Stick to simple shapes and lines. Focus on the main elements of the bridge.
- Identify the primary structure first.
- Add details sparingly.
- Avoid unnecessary embellishments.
Keeping your design simple ensures clarity and ease. A clean design often looks more professional and visually appealing.
Ignoring Proportions
Proportions are crucial in drawing a bridge. Incorrect proportions can distort the overall look. Pay attention to the size and scale of each part.
| Element | Recommended Proportion |
|---|---|
| Pillars | Equal height and width |
| Suspension Cables | Consistent thickness |
| Roadway | Proper width |
Use guides and references to maintain accurate proportions. A well-proportioned bridge looks more realistic and balanced.

Frequently Asked Questions
What Materials Do I Need To Draw A Bridge?
You need paper, pencils, erasers, a ruler, and coloring tools.
How Do I Start Drawing A Bridge?
Begin by sketching the basic shapes and structure of the bridge.
What Are Common Mistakes When Drawing Bridges?
Common mistakes include uneven lines, incorrect proportions, and lack of details.
How Can I Add Details To My Bridge Drawing?
Add details like cables, beams, and textures to make your bridge look realistic.
Conclusion
Drawing a bridge can be fun and rewarding. Follow the steps mentioned above. Practice regularly to improve your skills. Use simple shapes and lines to start. Add details as you gain confidence. Remember, patience is key. Don’t rush the process.
Each bridge you draw will look better than the last. Enjoy the creative journey. Share your artwork with friends. Happy drawing!

