Drawing realistic fog or smoke with a pencil can be tricky. It’s about capturing the essence of something intangible.
The key lies in understanding light, texture, and subtle shading. Creating the illusion of fog or smoke requires patience and practice. These elements are not solid. They shift, float, and blend softly into their surroundings. To start, you need the right tools.
A range of pencils, from hard to soft, can help achieve different shades and textures. Blending tools like a tortillon or cotton swab are essential. They help in softening lines and creating smooth transitions. Observing real smoke or fog can offer insights. Notice how light interacts with it. Shadows and highlights play crucial roles. In this guide, we’ll explore techniques to bring your pencil drawings to life with realistic fog and smoke effects.
Materials And Tools
Drawing realistic fog or smoke requires the right materials and tools. Choosing the right pencil and paper can make a difference. These elements set the foundation for creating lifelike effects.
Choosing The Right Pencil
Pencils come in different grades, from hard to soft. Hard pencils like H are great for light lines. Soft pencils like B are best for shading. Use them to create depth and texture.
Experiment with different grades to achieve various effects. A softer pencil can make smoky areas appear more realistic.
Selecting Quality Paper
Paper quality affects the final drawing. Choose paper that can handle multiple layers. It should be smooth but also have some texture.
Textured paper holds the pencil marks better. This can help in creating the misty look of fog or smoke.
Try different types to see which one works best for you. A good paper will enhance your drawing and make it look professional.
Understanding Light And Shadow
Drawing realistic fog or smoke with a pencil involves mastering light and shadow. Start with soft, gentle strokes to create a misty effect. Gradually build layers, adjusting pressure for depth and texture.
Drawing realistic fog or smoke with a pencil involves mastering the subtle interplay of light and shadow. These elements are crucial because they define the volume and texture of fog, making it appear lifelike. Understanding how light interacts with fog can transform your sketches from flat to strikingly realistic.
Observing Natural Fog
Look at fog during different times of the day. Notice how sunlight or moonlight hits it. Early morning fog is dense and soft, while evening fog can be wispy and scattered. When you observe natural fog, pay attention to how it moves and changes. Fog isn’t static; it flows and curls. Try sketching quick studies of fog in various conditions. This helps you understand its behavior and texture.
Learning Light Interactions
Light affects fog in unique ways. It diffuses through the fog, creating soft shadows and highlights. Imagine how a beam of light pierces through a foggy scene. Think about how fog affects objects it envelops. Shadows might be less defined, and edges can blur. This creates an ethereal atmosphere in your drawing. Experiment with shading techniques. Use light pencil strokes to mimic the softness of fog. Blend edges to make transitions smooth and seamless.
Consider how shadows and highlights define fog. Are the shadows sharp or muted? How do highlights add depth? Asking these questions will refine your approach. Drawing fog is about capturing its elusive nature. It’s a dance of light and shadow—embrace the challenge and let it inspire your creativity.
Techniques For Texture
Creating realistic fog or smoke with a pencil involves gentle shading and blending techniques. Soft, circular motions help build layers, while using an eraser can add highlights and depth. Light pressure ensures a wispy, natural appearance, capturing the delicate nature of fog or smoke.
When drawing realistic fog or smoke with pencil, capturing the right texture is crucial. It’s the texture that brings your artwork to life, making it feel immersive and real. By mastering a few simple techniques, you can enhance your drawings significantly.
Creating Soft Edges
Soft edges are key to depicting fog and smoke. They create the illusion of airiness and fluidity. Begin by lightly sketching the outline of your smoke or fog with gentle, sweeping motions. Avoid harsh lines, as they can make your drawing look unnatural. Use a blending stump or a piece of tissue to gently blur the edges. This helps in creating a seamless transition between the smoke and the background. Remember, you want your fog to appear as though it’s drifting naturally, not confined by sharp lines. Experiment with the pressure of your pencil. Lighter strokes will provide a softer appearance, which is perfect for subtle, wispy fog. Practice on scrap paper to find the right balance. ###
Building Layers Gradually
Layering is your friend when drawing realistic smoke. Start with a light base layer to establish the shape and flow. This initial layer will act as your guide. Add more layers gradually, increasing the darkness where the smoke is denser. This technique adds depth and dimension to your drawing, making it more lifelike. Each layer should be slightly darker than the previous, but still blend smoothly. Think about the source of the smoke. Is it coming from a chimney, or perhaps a campfire? This will influence how you build your layers and where you place the darkest shades. Don’t rush. Patience is essential in achieving a realistic texture. Take your time to add each layer, frequently stepping back to assess the overall effect. This approach ensures your fog or smoke looks dynamic and convincing. Have you ever found yourself frustrated with your progress? Remember that every artist has been there. The key is persistence and practice. Keep refining these techniques, and you’ll soon see improvement in your work.
Capturing Movement
Drawing realistic fog or smoke with pencil involves soft shading and gentle strokes. Start by sketching outlines lightly, then blend graphite with a tissue or blending stump for smooth transitions. Adjust pressure for depth and realism, creating wispy, ethereal effects that capture movement beautifully.
Capturing the delicate movement of fog or smoke with a pencil can seem daunting, but it’s a rewarding skill to develop. The key lies in understanding how these elements move and fluctuate in real life. This involves observing their natural flow and translating that onto paper with subtle pencil strokes. As you refine your technique, you’ll begin to notice how slight variations in pressure and direction can bring your drawings to life.
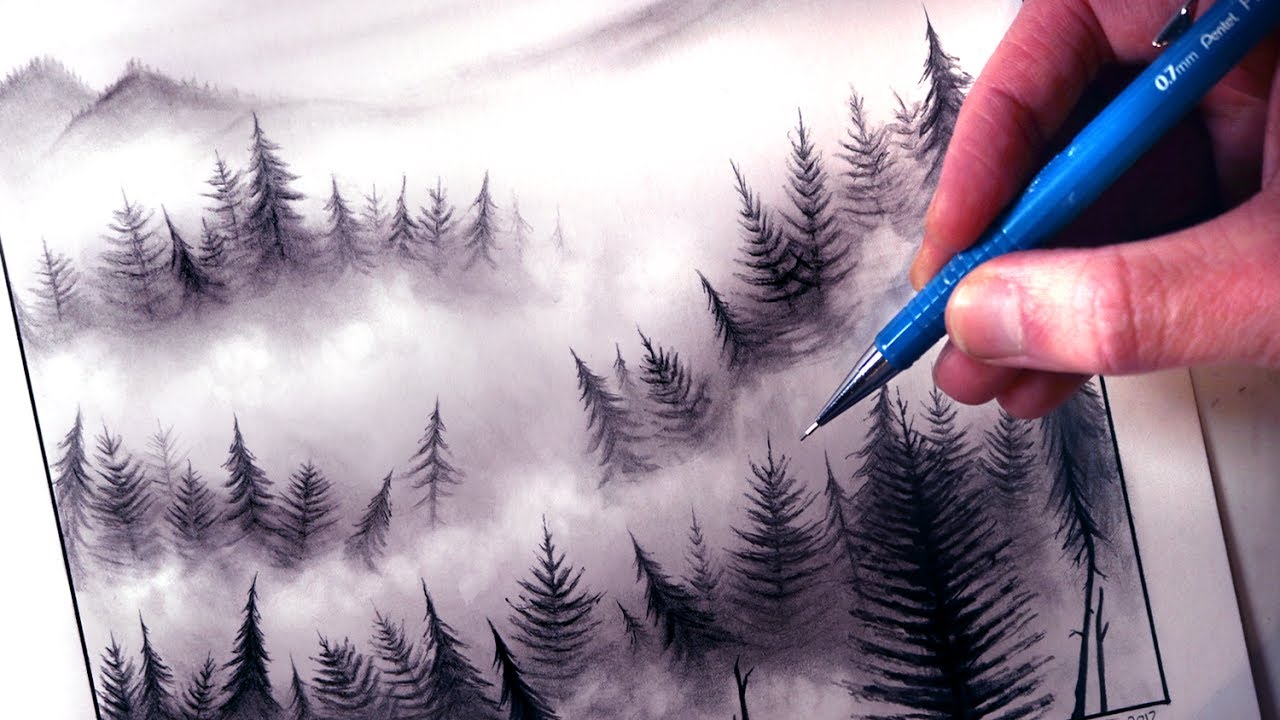
Drawing Whisps Of Smoke
To draw whisps of smoke, start with light, feathery strokes. Imagine the smoke curling and twisting through the air. Use the side of your pencil to create soft, flowing lines. Keep your hand relaxed to achieve a gentle touch. Vary the thickness of your lines to suggest depth and movement. Consider how smoke disperses and fades—this will help guide your shading. Layer your strokes gradually, allowing them to build upon each other. This layering technique creates the illusion of smoke’s transparency and subtlety. Have you ever watched smoke rising from a candle? Remember how it seems to dance unpredictably—capture that essence in your art.
Imitating Fog Flow
Fog is denser than smoke, requiring a different approach. Begin by mapping out the areas where the fog is thickest. Use a blending tool or your finger to smudge pencil marks, creating a soft, diffused look. Think about how fog hugs the ground or wraps around objects. Use horizontal strokes to suggest this enveloping nature. Contrast is crucial; darken areas where the fog is heaviest and lighten where it thins out. Experiment with erasers to lift pencil marks, creating highlights and adding depth. This technique mimics how light interacts with fog. Have you ever walked through a morning fog and noticed how it obscures and reveals the world around you? Try to capture that mysterious quality. Capturing movement in fog and smoke drawings is about observation and practice. How will you use these techniques to add life to your art?
Enhancing Depth
Creating realistic fog or smoke with pencil involves layering and blending techniques. Begin with light, feathery strokes to outline the fog. Gradually build depth by adding shadows and varying pressure, softening edges for a natural look.
Creating realistic fog or smoke with pencil is all about enhancing depth. The illusion of depth in your drawing can make the smoke or fog appear truly lifelike. To achieve this, you need to use specific techniques that manipulate light and shadow effectively. Let’s dive into some practical ways to enhance depth in your artwork.
Using Shading Techniques
Shading is crucial for achieving the soft, ethereal quality of fog or smoke. Begin with light, gentle strokes. This allows you to build layers gradually, giving a more realistic look. Try varying the pressure on your pencil. Light pressure creates softer shadows, while firmer pressure can add intensity. Layering these different pressures can mimic the way light diffuses through smoke. Have you ever noticed how smoke curls and twists in the air? Capture this by shading in a flowing, continuous motion. This will help replicate the dynamic nature of smoke.
Incorporating Contrast
Contrast is your best friend when creating depth. It makes the lighter parts of your drawing stand out, enhancing the realism. Use a range of pencil grades to achieve contrast. A softer pencil can create darker areas, while a harder pencil is perfect for lighter sections. This variety can make the smoke seem to leap off the page. Consider the background of your drawing. A darker background can make lighter smoke appear more pronounced. This contrast can create the illusion of the smoke hovering in front of the viewer. Ask yourself, how do the light and dark areas interact in real life? By observing and reflecting this in your work, you’ll bring your drawing to life. Remember, practice is key. Experiment with these techniques and observe the results. Each attempt will teach you something new about the art of enhancing depth.
Detailing And Refinement
Creating realistic fog or smoke with pencil involves more than just smudging graphite across a page. It’s about capturing the ethereal essence and subtle movement of these elements. The magic lies in the detailing and refinement, where your drawing transforms from simple lines and shades to a lifelike depiction that mesmerizes the viewer.
Adding Intricate Details
To make your fog or smoke appear realistic, pay attention to the intricate details. Consider how light interacts with the fog or smoke. Is it dense in some areas and wispy in others? Use a variety of pencil pressures to mimic this effect.
A light touch can represent the airy, less dense parts, while a firmer hand can create depth in denser sections. Experiment with different pencil grades to achieve this variability. HB for initial outlines, and softer 2B or 4B pencils for shading and depth.
Think about the environment surrounding the fog or smoke. Is it settling over a lake or rising from a chimney? Tailor your details to reflect the surroundings, giving context to the misty effect.
Refining Edges
Sharp edges can ruin the illusion of fog or smoke. Instead, focus on refining the edges to maintain a soft and blurred transition. Use a blending stump or even your finger to gently smudge the graphite, creating seamless fades.
Pay close attention to the edges where the fog meets other elements in your drawing. Consider how fog might obscure details, softening lines and merging gently with the background.
Ask yourself: how can you use contrast to highlight the fog’s presence without overshadowing the main subject? Delicate adjustments can make a huge difference in conveying realism.
Drawing realistic fog or smoke is not only about technique but also about observing nature closely. Next time you see fog rolling in or smoke rising from a bonfire, take a moment to notice its nuances. These observations will enhance your ability to translate those details onto paper.
Common Mistakes To Avoid
Creating realistic fog or smoke with pencil can be challenging. Even skilled artists make mistakes. Avoiding common errors improves your drawings. This section covers mistakes to avoid.
Overworking The Drawing
Adding too many layers makes fog or smoke look unnatural. Pencil strokes should be light and gentle. Heavy pressure can make the fog appear solid. This ruins the ethereal effect. Use subtle shading to capture the misty feel. Overworking can lead to frustration and fatigue. Keep your movements smooth and controlled.
Neglecting Light Source
Light affects how fog and smoke look. Ignoring the light source can make your drawing flat. Light creates shadows and highlights. These add depth and realism. Always consider where the light is coming from. Think about how it interacts with the smoke. This helps in creating a believable effect. Place your shadows and highlights carefully. They bring your drawing to life.
Practice And Observation
Capturing realistic fog or smoke with a pencil involves careful shading and blending techniques. Light, wispy strokes create soft edges, while layering enhances depth. Observing real-life smoke patterns helps refine texture and movement, making the drawing more lifelike.
for drawing realistic fog or smoke with a pencil, practice and observation are your best allies. You need to develop a keen eye for detail and understand how light interacts with these elements. By honing your observational skills and practicing regularly, you can add life-like fog or smoke to your art. ###
Studying Real-life Scenes
Start by observing real-life scenes where fog or smoke naturally occurs. Think about the way morning fog settles over a meadow or how smoke curls from a chimney on a winter’s day. Notice the way light filters through fog, creating layers of depth and mystery. Take photos or make sketches of these scenes. Use them as references to understand the shapes and transparency of fog and smoke. Have you ever noticed how the edges of smoke are softer than the core? Paying attention to these nuances can transform your drawing. ###
Experimenting With Styles
Don’t be afraid to try different styles when drawing fog or smoke. Use a soft pencil to create light, wispy strokes for a gentle fog effect. For denser smoke, apply more pressure with your pencil and layer your strokes. Test different techniques like smudging with your finger or a blending stump. This can help you create smooth transitions and realistic textures. Which method gives you the most satisfying result? Adjust your approach based on the mood you want to convey in your drawing. A smoky scene in a bustling city might need more dramatic contrasts than a tranquil fog over a lake. The choice is yours, so let your creativity lead the way. In your journey to master drawing fog and smoke, practice and observation are essential. Keep experimenting, observing, and refining your skills. You’ll soon find yourself capturing the essence of fog and smoke in your art with remarkable realism.
Frequently Asked Questions
How To Make A Smoke Effect With A Pencil?
Create a smoke effect by sketching lightly with a pencil. Use soft strokes for a wispy appearance. Blend edges with a blending stump or tissue. Gradually build layers for depth, varying pressure for contrast. Finalize by adding highlights with an eraser.
Practice enhances realism.
How To Make A Pencil Drawing Look Realistic?
Use varied pencil pressures for depth. Add fine details for realism. Blend smoothly with a tissue or blending stump. Focus on light and shadow for contrast. Layer gradually to build texture.
How To Draw Fog Or Smoke?
To draw fog or smoke, use soft, curved lines and blend shades of gray. Apply light strokes for a misty effect. Gradually layer and smudge with a blending tool to enhance realism. Focus on depth and transparency by varying opacity in different areas.
Use digital or pencil techniques for best results.
How To Draw Mist With A Pencil?
Start with light, circular strokes to create a soft base. Gradually layer with varying pencil pressure. Blend gently using a tissue or blending stump. Focus on lighter areas for a misty effect. Add depth with darker shades, but keep edges soft.
Practice for a realistic mist appearance.
Creating realistic fog or smoke with a pencil enhances drawings. Focus on light, shading, and blending techniques. Practice soft strokes to achieve delicate textures. Patience is key to mastering this skill. Experiment with different pencil pressures. Each technique adds depth to your art.
Study real-life smoke patterns for better accuracy. Remember, perfection comes with practice. Try various erasers for different effects. Small adjustments make a big difference. Keep practicing and refining your methods. Your artwork will improve over time. Drawing fog or smoke takes dedication and creativity.
Enjoy the process, and let your imagination guide you.