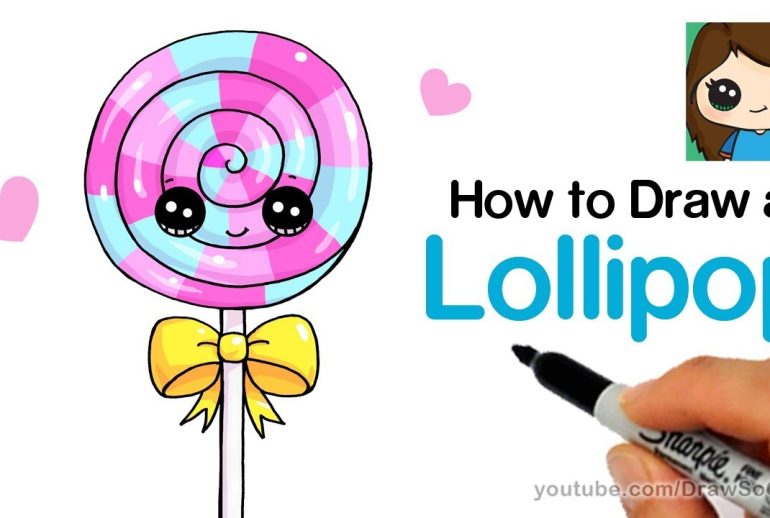
Want to learn how to draw a lollipop? It’s easier than you think.
With simple steps, you can create a fun and sweet drawing. Drawing a lollipop can be a great way to start learning art. It’s a simple design with bright colors that can make anyone smile. Whether you’re a beginner or looking to improve your skills, this guide will help.
You’ll learn to draw the perfect circle, add the stick, and create the swirls. By the end, you’ll have a colorful lollipop drawing that looks good enough to eat. So, grab your paper and pencils, and let’s start drawing!

Credit: www.youtube.com
Materials Needed
Drawing a lollipop can be a fun and simple activity. To get started, you will need a few basic supplies. Some optional tools can also enhance your drawing experience. Let’s explore what you need to create a beautiful lollipop drawing.
Basic Supplies
First, gather your basic supplies. You will need a pencil. Choose one with a soft lead for smooth lines. Next, get an eraser. This will help you correct any mistakes. You will also need paper. Any kind will do, but thicker paper works best. Finally, use colored pencils or markers to add vibrant colors to your lollipop.
Optional Tools
Optional tools can make your drawing easier. A ruler can help you draw straight lines for the stick. Stencils can help you create perfect circles for the lollipop. You might also want a blending tool. This helps blend colors smoothly. Using these tools can make your drawing look more professional.
Sketching The Basic Shape
Learning how to draw a lollipop can be a fun and simple task. Start with sketching the basic shape. This will form the foundation of your drawing. Follow these easy steps, and you will have a perfect lollipop in no time.
Drawing The Circle
The first step is to draw a circle. This will be the top part of your lollipop. Use a light pencil so you can erase mistakes easily. Try to make the circle as round as possible. You can use a round object to trace if needed. Keep your hand steady and draw slowly.
Adding The Stick
Now, add the stick to your lollipop. Draw two straight lines coming down from the bottom of the circle. The lines should be parallel and of equal length. Connect the bottom of these lines with a short, curved line. This will give the stick a slight 3D effect. Make sure the stick looks sturdy and is centered under the circle.
Refining The Outline
Refining the outline of your lollipop drawing is a crucial step. It transforms your basic sketch into a polished piece of art. This process involves smoothing the lines and perfecting the proportions. Let’s dive into these aspects to make your lollipop look more realistic and appealing.
Smoothing The Lines
Start by looking at your initial sketch. Notice any rough or uneven lines. Use a soft eraser to gently refine these areas. Make the edges of your lollipop round and smooth. This will give it a clean and professional look. A steady hand helps, but patience is key.
Next, trace over your refined lines with a darker pencil or pen. This will make your lollipop stand out more. Be careful not to press too hard. Light, consistent pressure works best. This step ensures that your lines are clear and defined.
Perfecting The Proportions
Check the size of your lollipop’s circle. Is it even on all sides? Use a ruler to measure if needed. This ensures that your lollipop looks balanced. If the circle isn’t perfect, adjust it until it looks right.
Look at the stick of your lollipop. It should be straight and centered. If it appears crooked, use your eraser to fix it. Draw the stick in light, even strokes. This will help you keep it straight and proportional.
Finally, observe the overall shape and size of your lollipop. Compare it to a real lollipop if possible. Make any necessary adjustments to ensure it looks realistic. Your goal is to create a well-proportioned, appealing drawing.
Adding Details
Adding details to your lollipop drawing brings it to life. It makes the image more appealing and realistic. Two key aspects to focus on are drawing swirls and creating highlights. These elements add depth and dimension to your artwork.
Drawing Swirls
Swirls are the heart of a lollipop design. They give it a fun and whimsical look. To draw swirls:
- Start at the center of the circle.
- Draw a spiral that gradually moves outward.
- Keep the distance between the lines even.
Tip: Use light, smooth strokes. You can darken them later. This makes it easier to correct mistakes.
Creating Highlights
Highlights make your lollipop appear shiny and delicious. To add highlights:
- Choose a light source direction.
- Draw small, curved lines where the light hits.
- Use a white or light-colored pencil for the highlights.
Note: Highlights should follow the curve of the swirls. This adds a realistic touch to your drawing.
With these details, your lollipop drawing will look vibrant and three-dimensional. Keep practicing to perfect your technique!
Inking The Drawing
Inking your lollipop drawing can bring it to life. It adds boldness and clarity. This step is crucial for creating a polished look. Let’s dive into the essentials of inking your lollipop drawing.
Choosing The Right Pen
Selecting the correct pen is important. Choose a pen with a fine tip. It helps in achieving detailed lines. A felt-tip pen or a fine liner works best. These pens offer smooth and consistent ink flow. Ensure the pen is waterproof. This prevents smudging when you add color later.
Inking Techniques
Start by tracing over your pencil lines. Use steady and controlled strokes. Avoid pressing too hard. This ensures clean and smooth lines. Work on one section at a time. This prevents mistakes and smudging.
Add depth by varying line thickness. Thicker lines can be used for the outline. Thinner lines can be used for details. This creates a dynamic look. Use short, quick strokes for shading. This adds texture and dimension to your lollipop.
Coloring The Lollipop
Coloring the lollipop is a fun and creative part of the drawing process. It brings your drawing to life. In this section, we will explore how to select the right colors and apply shading to make your lollipop look realistic and vibrant.
Selecting Colors
Choosing the right colors is essential for a vibrant lollipop. Consider these tips:
- Bright and Bold Colors: Use colors like red, blue, yellow, and green.
- Complementary Colors: Pair colors that complement each other for a harmonious look.
- Multiple Shades: Incorporate different shades of the same color for depth.
Applying Shading
Shading adds dimension and realism to your lollipop. Follow these steps:
- Identify Light Source: Determine where the light is coming from.
- Add Highlights: Use a lighter color to add highlights where the light hits.
- Create Shadows: Apply a darker shade on the opposite side of the light source.
- Blend Colors: Use a blending tool or finger to smooth transitions between colors.
Here is a simple table to summarize the steps:
| Step | Action |
|---|---|
| 1 | Identify Light Source |
| 2 | Add Highlights |
| 3 | Create Shadows |
| 4 | Blend Colors |
By following these steps, your lollipop will look more three-dimensional and realistic. Happy coloring!
Final Touches
Final touches bring your lollipop drawing to life. They add depth and detail. This makes your artwork more realistic and appealing. Let’s explore these steps.
Adding Texture
Start by adding some texture to your lollipop. Use light, curved lines. This gives the impression of a smooth, round surface. Add small, random marks. This adds a sense of realistic detail. These marks can represent tiny bumps or swirls.
Reviewing Your Work
Review your drawing carefully. Look for any areas that need improvement. Make sure the shapes are accurate. Check the proportions. Ensure that the stick is straight and even. Correct any mistakes you see.
Consider the lighting. Add shadows where needed. This adds depth to your drawing. Look at the overall balance of the drawing. Make sure every part looks cohesive.
Take a step back. Sometimes, seeing your work from a distance helps. You might notice things you missed before. Make final adjustments. Now, your lollipop drawing should look polished and complete.

Credit: helloartsy.com

Credit: helloartsy.com
Frequently Asked Questions
How Do You Draw A Simple Lollipop?
Start with a circle for the candy. Add a stick below it. Color it.
What Materials Do I Need To Draw A Lollipop?
You need paper, a pencil, and colors. Optional: a black marker for outlines.
Can Beginners Draw A Lollipop Easily?
Yes, drawing a lollipop is simple. It has basic shapes and easy steps.
How Can I Add Details To My Lollipop Drawing?
Add swirls inside the circle. Draw light and shadow for depth. Use bright colors.
Conclusion
Drawing a lollipop is simple and fun. Follow the steps carefully. Practice makes perfect, so don’t worry about mistakes. Enjoy the process and let your creativity shine. Share your drawing with friends and inspire others. Keep practicing different designs and colors.
Soon, you will create beautiful lollipop drawings easily. Happy drawing!

