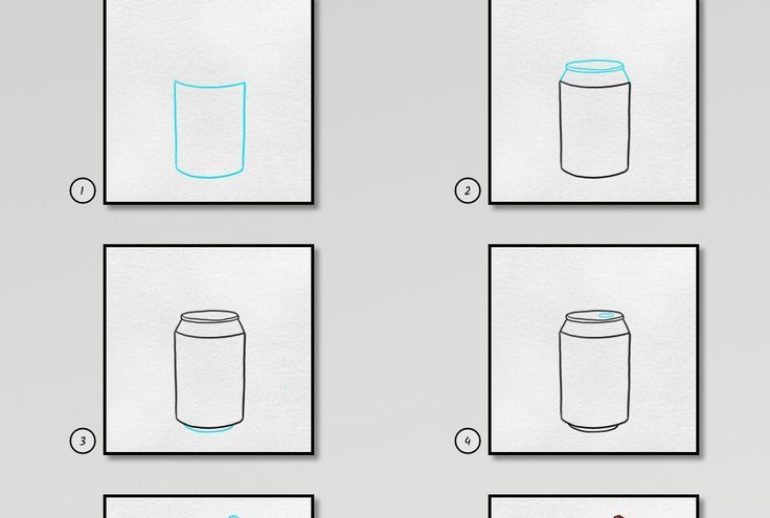
Drawing a soda can is easier than you might think. With a few simple steps, you can create a realistic soda can in no time.
Whether you’re a beginner or an experienced artist, learning to draw everyday objects is a valuable skill. A soda can is a great starting point because of its basic shapes and familiar features. In this guide, we will break down the process into easy-to-follow steps.
You’ll learn how to capture the cylindrical shape, add details, and create a realistic look. Grab your paper and pencil, and let’s get started on drawing a soda can. With a bit of practice, you’ll be amazed at how quickly your drawing skills improve. Ready to draw? Let’s dive in!

Materials Needed
Drawing a soda can can be a fun and rewarding experience. To start, you need to gather the right materials. This section will guide you through the basic tools and optional supplies needed for this project. Having the right materials will help you create a great drawing.
Basic Tools
To draw a soda can, you need some basic tools. First, you will need a pencil. A standard HB pencil is perfect. It allows for light sketching and easy erasing. You will also need an eraser. Choose a soft eraser that does not damage the paper. Paper is another essential item. A plain sheet of paper works well. If you prefer, use a sketchbook.
Next, you will need a ruler. This helps you draw straight lines and measure dimensions. Finally, you will need a sharpener. Keeping your pencil sharp makes your lines crisp and clear.
Optional Supplies
There are a few optional supplies that can enhance your drawing. Colored pencils can add life to your soda can drawing. Choose colors that match the soda can you want to draw. Markers are another option. They provide bold and bright colors.
A blending stump can be useful. It helps you blend pencil lines for a smooth look. You may also use a fine-tip pen. This can add detailed lines and final touches. A lightbox is another optional tool. It helps you trace and refine your drawing.
These optional supplies are not necessary but can improve your drawing experience. Use them if you have them available.

Setting Up Your Workspace
Drawing a soda can is easier with a well-organized workspace. A clean and comfortable setup boosts creativity. Ensure you have all your materials ready.
Choosing The Right Surface
Choose a flat, smooth surface to draw on. A sturdy table or desk works best. Avoid uneven or textured surfaces. They can affect your lines and shading.
Use a drawing board if needed. It provides stability. Clip your paper to prevent movement. This helps in creating precise lines.
Lighting Tips
Good lighting is crucial. Natural light is ideal. Position your workspace near a window. This reduces shadows and provides even lighting.
If natural light is not available, use a desk lamp. A lamp with an adjustable arm is best. It allows you to direct light where needed. Avoid harsh or dim lighting. It strains your eyes.
Consider using a lightbox. It helps in tracing and adding details. A lightbox is especially useful for beginners.
Ensure the light source is consistent. Changing light can alter the appearance of your drawing. This consistency helps in maintaining uniformity in your artwork.
Sketching The Basic Shape
Sketching the basic shape of a soda can is simple and fun. Start by breaking down the can into basic geometric shapes. This makes the drawing process easier. First, draw the cylinder. Then, add the top and bottom details. Let’s dive into each step.
Drawing The Cylinder
Begin with two parallel vertical lines. These lines will form the sides of the cylinder. Ensure the lines are equally spaced. This helps keep your cylinder symmetrical. Next, connect these lines with two horizontal curves. The top curve should face upwards. The bottom curve should face downwards. This creates a 3D effect.
Adding The Top And Bottom
Now, focus on the top of the can. Draw a smaller oval inside the top curve. This represents the can’s opening. Add a small rectangle on one side of the oval. This is the pull tab. For the bottom, add a small curve inside the bottom curve. This adds depth and realism to your drawing.
Refining The Outline
Once you have your basic outline of a soda can, it’s time to refine it. This step is crucial to make your drawing look more realistic. By smoothing the edges and defining the curves, you can transform your simple sketch into a detailed artwork.
Smoothing The Edges
Start by checking the edges of your soda can outline. The edges should be smooth and clean. If they look rough or uneven, use an eraser to gently refine them.
- Use a fine-tipped eraser for precision.
- Make sure the top and bottom edges are perfectly circular.
- Smooth out any sharp corners.
A smooth outline will make the can look polished. Pay attention to the small details. Even tiny adjustments can make a big difference.
Defining The Curves
The next step is to define the curves of your soda can. Curves give the can its volume and shape. Focus on the top and bottom curves first.
- Draw a light curve at the top to show the rim.
- Sketch another curve at the bottom for the base.
- Ensure both curves are symmetrical.
Once these curves are in place, add more detail to the body of the can. Draw gentle curves along the sides to show its cylindrical shape. This will make your drawing look more three-dimensional.
Remember to keep your lines light and flexible. You can always darken them later once you are satisfied with the shape.
| Step | Description |
|---|---|
| 1 | Smooth the edges with a fine-tipped eraser. |
| 2 | Draw light curves at the top and bottom. |
| 3 | Ensure the curves are symmetrical. |
| 4 | Add gentle curves to the sides for volume. |
By refining the outline, you are one step closer to completing your soda can drawing. These details might seem small, but they are essential for a realistic look.
Adding Details
Adding details to your soda can drawing can make it look more realistic. Focus on small elements like the tab and label. These details bring your drawing to life.
Drawing The Tabs
The tab is a small yet significant part of a soda can. Begin by sketching an oval at the top center of the can. This will be the base of the tab. Next, draw a smaller oval inside the first one. This creates the hole where the tab is pulled.
To add depth, shade the inside of the smaller oval lightly. Draw two small lines connecting the inner oval to the outer one. These lines represent the hinges. Lastly, add a slight curve to the top edge of the tab. This gives it a more realistic look.
Adding The Label
The label is the most colorful part of the soda can. Start by drawing a rectangle around the middle of the can. Make sure it wraps around the can evenly. Inside the rectangle, sketch the brand name and other details. Use bold letters for the brand name.
To make the label stand out, add a few colors. Use red, blue, or green for the background of the label. For the text and small details, use white or black. This contrast makes the label pop. If there are any designs or patterns on the label, sketch them lightly first. Then, go over them with a darker shade to make them clear.
By focusing on these details, your soda can drawing will look much more authentic. Always remember, small details make a big difference.
| Detail | Description |
|---|---|
| Tab | Draw an oval, then a smaller oval inside. Add hinges and shading. |
| Label | Draw a rectangle, add brand name, use colors for detail. |
These steps will help you add the perfect details to your soda can drawing. Follow them carefully to achieve a realistic look.
Shading Techniques
Shading techniques are crucial for adding realism to your soda can drawing. Proper shading helps create the illusion of depth and dimension. This section will guide you through light source considerations and how to create depth in your drawing.
Light Source Considerations
First, decide where the light source is coming from. Imagine a lamp or the sun hitting your soda can. This will determine where the highlights and shadows fall. Draw a small arrow to indicate the light direction. This will guide you as you shade the can.
Remember, the side facing the light will be the brightest. The opposite side will have the darkest shadows. The middle will have mid-tones. These gradients will make your soda can look three-dimensional.
Creating Depth
To create depth, start with the basic shading. Use light strokes to mark where the shadows and highlights are. Gradually build up the darker areas. Blend the edges between light and dark for a smooth transition.
Pay attention to the curves of the can. The top and bottom edges will have more defined highlights and shadows. This is because they curve more sharply. Use a blending tool or your finger to soften the shading. This will make your soda can look more realistic.
Lastly, add a slight shadow on the surface where the can sits. This will ground your drawing and make it more believable.
Final Touches
The Final Touches are essential in making your soda can drawing stand out. These touches add depth, detail, and realism. Let’s dive into the key steps to perfect your artwork.
Highlighting
Adding highlights can make your soda can look more realistic. Use a white pencil or eraser to create light reflections. Focus on areas where the light naturally hits the can.
- Top rim of the can
- Edges and curves
- Brand logo or text
Keep the highlights subtle. Too much white can ruin the effect. Light strokes work best.
Correcting Mistakes
Even the best artists make mistakes. The key is knowing how to fix them. First, use a clean eraser. Gently rub the area you want to correct.
- Erase small sections at a time.
- Redraw the corrected part.
- Blend the new lines with the old ones.
For smudges, use a kneaded eraser. Roll it gently over the smudge to lift it off. Avoid pressing too hard. This can damage the paper.
With these final touches, your soda can drawing will look polished and complete. Remember, practice makes perfect. Keep refining your skills and enjoy the process!

Frequently Asked Questions
How Do You Start Drawing A Soda Can?
Begin with a simple vertical rectangle. This will be the body of the can.
What Tools Do You Need To Draw A Soda Can?
You need a pencil, eraser, ruler, and paper. Optional: colored pencils or markers.
How Do You Add Details To A Soda Can Drawing?
Draw the top and bottom curves. Add the can’s label and any logos.
How Do You Make The Soda Can Look Realistic?
Shade the sides. Add highlights and shadows to give it a 3D effect.
Conclusion
Drawing a soda can is easier with practice. Follow the steps carefully. Start with simple shapes. Add details gradually. Use shading for depth. Take your time. Practice regularly. Your skills will improve. Enjoy the process. Drawing should be fun and relaxing.
Share your artwork proudly. Keep experimenting with different styles. Happy drawing!

