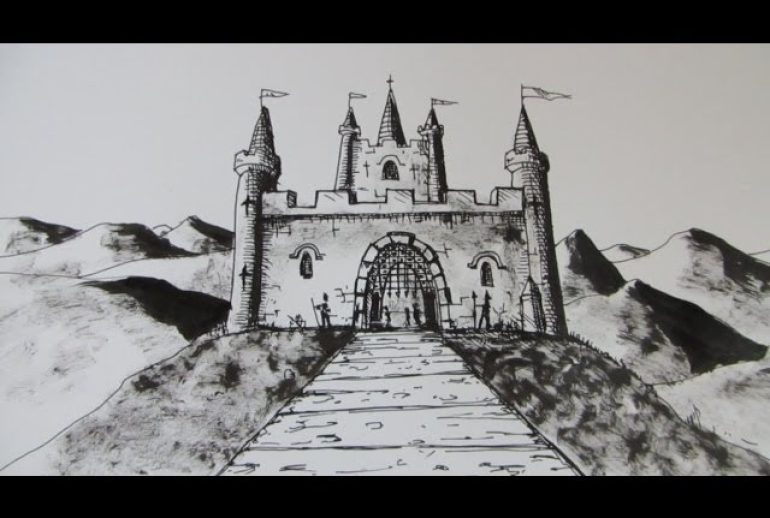
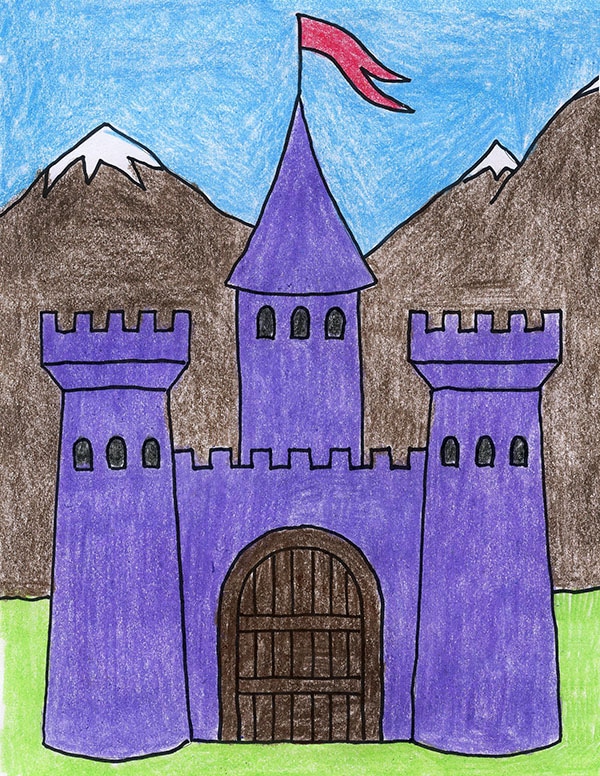
Learning to draw a castle can be fun and exciting. It’s easier than you think.
Drawing a castle involves simple shapes and a bit of imagination. Castles are magical and can transport you to a world of knights and dragons. Whether you are a beginner or have some drawing experience, this guide will help you create a beautiful castle.
We will break down the process into easy steps. So, grab your pencil and paper. Let’s start drawing your dream castle!
Materials Needed
Drawing a castle can be a delightful and rewarding experience. To start, you need the right materials. Having the right tools ensures your drawing process is smooth and enjoyable. Let’s dive into the materials you need to bring your castle drawing to life.
Essential Supplies
First, you need a good quality drawing paper. It should be thick enough to handle erasing and layering. Next, get a set of pencils. A range from hard (H) to soft (B) pencils will be useful. You also need a reliable eraser. A kneaded eraser works best for detailed corrections. A sharpener is essential to keep your pencils ready. Lastly, you need a ruler to draw straight lines and measure proportions accurately.
Optional Tools
For a more detailed drawing, you might want some optional tools. Colored pencils or markers can add life to your castle. A blending stump helps in creating smooth shading. If you want to add texture, use a texture sheet. A lightbox can help transfer your sketch to a clean sheet. Lastly, some artists prefer using a mechanical pencil for fine lines.

Basic Structure
Drawing a castle can seem like a daunting task, but starting with the basic structure makes it easier. This section will guide you through the essential steps, focusing on the outline and the main towers.
Drawing The Outline
Begin by sketching a simple rectangle. This will be the main body of the castle. Ensure the lines are straight and even. Use a ruler if needed. Then, add a horizontal line near the top. This will represent the wall walk.
Next, draw vertical lines from the top corners of the rectangle. These lines will define the height of the towers. Connect these lines with a horizontal line at the bottom to complete the outline. This should form a large rectangular shape with two smaller rectangles on top.
Adding The Main Towers
Start by drawing the tower bases. Draw two squares or rectangles on each side of the main body. These should extend upwards from the corners.
Then, add the tower tops. Draw smaller rectangles on top of the tower bases. Make sure they are symmetrical. Add battlements to the top of each tower. These are the small, rectangular blocks you see on castle towers.
Finally, add some details. Draw windows and doors on the castle. Use simple shapes like squares and rectangles. This will make your castle look more realistic.
Defining The Walls
Defining the walls of your castle is an exciting step. This is where your castle starts to take shape. The walls are the main feature and they show the strength of your castle. Let’s get started with creating the outer walls and adding details.
Creating The Outer Walls
First, draw a big rectangle for the outer walls. This will be the main structure. Then, draw vertical lines inside the rectangle. These lines will make the walls look like they are made of stone blocks. Make sure the lines are evenly spaced.
Next, add some towers to the corners of your rectangle. Draw small rectangles or circles on each corner. These will be the base of your towers. The towers make the castle look strong and grand.
Adding Details To The Walls
Now, let’s add more details to the walls. Draw small squares or rectangles along the top edge of the walls. These are called battlements. They give the castle a medieval look. Make sure the battlements are evenly spaced.
Then, draw some windows on the walls. Windows can be small rectangles or circles. Place them randomly to give a realistic look. You can also add a big gate in the middle of the front wall. Draw an arch shape for the gate. This is where people enter the castle.
Finally, add some texture to the walls. Draw small lines or dots on the walls. This will make them look like they are made of stone. Your castle walls are now complete.

Drawing The Towers
Drawing the towers is a crucial part of creating a castle. Towers add height and grandeur to your castle. They also offer a place for details like windows and battlements. In this section, we will cover the basics of designing tower tops and adding windows and details. Let’s dive into the steps to make your castle’s towers stand out.
Designing Tower Tops
Designing the tops of your towers can be fun and creative. Tower tops can be pointed, flat, or even dome-shaped. Here are some simple steps:
- Draw a simple cylinder for the tower’s base.
- Add a cone for a pointed top or a half-sphere for a dome.
- For a flat top, just draw a horizontal line at the top of the cylinder.
Feel free to experiment with different shapes and sizes. Each castle can have unique towers.
Adding Windows And Details
Windows and details make your towers look more realistic. They also add character. Follow these steps to add windows and details:
- Draw small rectangles or circles for windows.
- Add lines inside the windows to create panes.
- For extra detail, draw small bricks or stone patterns on the tower walls.
You can also add flags or banners to the tops of towers. This adds a royal touch to your castle.
By focusing on these elements, you can create towers that are both impressive and unique. Keep practicing, and your castle drawings will improve with each attempt.
Incorporating The Gate
Incorporating the gate into your castle drawing adds an element of grandeur and mystery. The gate is often the focal point of the castle’s entrance. It sets the tone for the entire structure. This section will guide you on drawing the main gate and adding intricate gate details to make your castle look more realistic and captivating.
Drawing The Main Gate
Start by sketching two vertical lines for the sides of the gate. These lines should be tall and parallel. Next, draw a curved line connecting the tops of the vertical lines. This will form the arch of the gate. Make sure the curve is symmetrical.
You can also add another arch inside the first one, leaving a small gap to create depth. This will make the gate look more three-dimensional. Draw horizontal lines at the base of the vertical lines to complete the gate’s frame.
Adding Gate Details
Once the main structure is ready, it’s time to add details. Start by drawing the wooden planks inside the gate. Use vertical lines and make them slightly uneven for a rustic look.
Next, add iron studs or nails along the planks. Small circles will do the trick. You can add a small handle or a lock in the center of the gate. This will make it look more functional.
For an extra touch of realism, draw some brickwork around the gate. Use small, rectangular shapes and vary their sizes. This will create a more authentic look.
Lastly, you can add some vines or moss growing around the gate. This will give your castle an aged, ancient feel.
| Step | Description |
|---|---|
| 1 | Sketch vertical lines for the gate sides. |
| 2 | Draw a curved line for the arch. |
| 3 | Add another arch inside the first one. |
| 4 | Draw horizontal lines at the base. |
| 5 | Add wooden planks and iron studs. |
| 6 | Draw a handle or lock. |
| 7 | Add brickwork and vines. |
Enhancing With Details
Adding details can make your castle drawing more realistic. Small touches bring the scene to life. Let’s explore some ways to enhance your castle with details.
Adding Flags And Banners
Flags and banners add charm and movement to your castle. Draw flags on the highest towers. Make them wave as if caught in the wind. Use simple shapes for the flags. Triangles or rectangles work best. Add a pole to each flag, connecting it to the tower. Vary the sizes of flags for a realistic look.
Design banners to hang from the walls. Draw long, narrow shapes with pointed ends. Attach them to the battlements or above the entrance. Use patterns or symbols to decorate the banners. Stripes, stars, or a coat of arms can make them special.
Incorporating Textures
Textures give depth to your castle drawing. Start with the walls. Use short, horizontal lines to show stone blocks. Vary the lengths for a natural look. Add small cracks and chips to some stones. This makes the walls look aged and worn.
Draw bricks for a different texture. Use small, rectangular shapes stacked in rows. Make sure the rows are slightly uneven. This adds realism to the brickwork. For the roof, draw curved lines to show shingles. Overlap the lines to create layers. This gives the roof a three-dimensional look.
For wooden doors and beams, use long, vertical lines. Add knots and grain patterns to the wood. This brings out the natural texture. Use shading to enhance the textures. Lightly shade areas that would be in shadow. This adds depth and makes the textures stand out.
Final Touches
After sketching your castle, it’s time for the final touches. These steps will bring your drawing to life. You’ll add depth, texture, and highlights. These details make a big difference. Let’s explore the final touches for your castle drawing.
Shading Techniques
Shading gives your castle depth and realism. Start with light pressure. Use small strokes. Gradually build up the dark areas. Focus on where the light hits. Shadows fall on the opposite side. Use a blending tool or your finger. Soften the edges. This makes the shading smooth. Avoid harsh lines. Blending creates a natural look. Pay attention to the texture of the castle. Stones have rough surfaces. Add light shading to show this texture. Windows and doors need darker shading. They look more recessed.
Adding Final Highlights
Highlights make your castle stand out. Use an eraser or a white pencil. Add highlights to the tops of walls. Light hits these areas first. Highlight edges of windows and doors. This adds a 3D effect. Add small touches to stone details. Highlights create contrast. They make the castle more vibrant. Don’t overdo it. Just a few highlights make a big impact. Your castle should now look detailed and realistic.
Frequently Asked Questions
How Can I Start Drawing A Castle?
Begin by sketching the basic shapes. Use squares and rectangles for towers and walls.
What Tools Do I Need To Draw A Castle?
You need paper, a pencil, an eraser, and colored pencils or markers for details.
How Do I Add Details To My Castle Drawing?
Add windows, doors, and bricks. Use simple lines for these features.
How Can I Make My Castle Look Realistic?
Add shading and texture. Draw small details like flags, vines, and stones for realism.
Conclusion
Drawing a castle can be fun and rewarding. Follow these simple steps to create your own masterpiece. Practice regularly to improve your skills. Enjoy the process and let your creativity flow. Share your artwork with friends and family. They will surely appreciate your effort.
Remember, patience and practice make perfect. Happy drawing!

