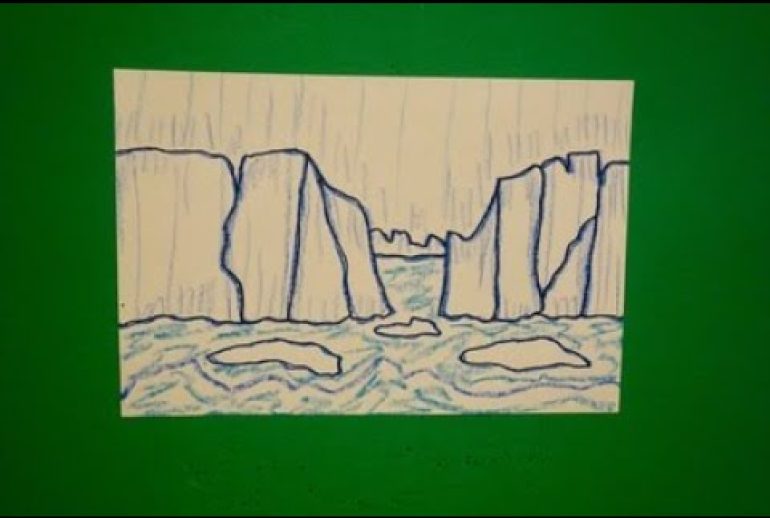
Drawing a glacier can seem daunting. But with simple steps, it becomes easy.
Glaciers are majestic and powerful. They move slowly, shaping landscapes over time. Capturing their beauty on paper requires patience and practice. You don’t need to be an expert artist to draw a glacier. Anyone can do it with the right guidance.
In this blog post, we will explore easy steps to draw a glacier. You will learn how to sketch the outline and add realistic details. Whether you’re a beginner or looking to improve your skills, this guide will help you create stunning glacier drawings. Let’s get started and bring the icy beauty of glaciers to your sketchbook!
Materials Needed
Creating a beautiful drawing of a glacier is not only a fulfilling activity but also an excellent way to improve your artistic skills. To begin this creative journey, you need the right materials. Below, we’ve categorized the necessary items into basic tools and optional supplies. This ensures you have everything you need to get started.
Basic Tools
Basic tools are essential for any drawing project. Here is a list of items you will need:
- Pencils: Use a range of pencils from 2H to 6B for different shades and details.
- Eraser: A high-quality eraser helps in correcting mistakes.
- Paper: Choose a smooth, acid-free drawing paper for best results.
- Sharpener: Keep your pencils sharp for precise lines and details.
Optional Supplies
Optional supplies can add more depth and texture to your glacier drawing. Consider these additional items:
- Colored Pencils: These can add color and vibrancy to your artwork.
- Blending Stumps: Useful for smooth shading and blending pencil strokes.
- Ruler: Helps in creating straight lines and accurate measurements.
- Charcoal: Adds a rich, dark contrast for dramatic effect.
- Fixative Spray: Protects your finished drawing from smudges.
Having these materials ready will make your drawing experience enjoyable and productive. Gather your tools, and let’s start drawing a stunning glacier.
Understanding Glaciers
Understanding glaciers is key to drawing them accurately. Glaciers are massive, slow-moving ice rivers. They shape landscapes and create stunning natural scenes. By grasping their formation and types, you can depict them better in your artwork.
Formation And Structure
Glaciers form from compacted snow. Over time, layers of snow compress and turn into ice. This process can take hundreds of years. The weight of the ice causes it to move slowly downhill.
A glacier has two main parts: the accumulation zone and the ablation zone. The accumulation zone is where new snow adds to the glacier. The ablation zone is where ice melts or breaks off. Understanding these zones helps in drawing realistic glaciers.
Types Of Glaciers
There are two main types of glaciers: alpine and continental. Alpine glaciers form in mountains. They flow down valleys, creating sharp peaks and deep valleys. These are often called valley glaciers.
Continental glaciers are much larger. They cover vast areas of land. Greenland and Antarctica have continental glaciers. These glaciers shape entire landscapes, flattening everything in their path.
Knowing the type of glacier you want to draw helps in capturing its unique features. Alpine glaciers have rugged, dramatic shapes. Continental glaciers are vast and smooth. Each type has its own beauty.
Sketching The Basic Shape
Drawing a glacier can seem challenging. But, breaking it down helps. Start with its basic shape. This part is crucial. It lays the foundation for all other details. You will see that drawing a glacier is not as hard as it seems.
Outline The Glacier
First, grab a pencil and paper. Begin with a rough outline. Glaciers have irregular shapes. Think of a large, uneven mass of ice. Draw a wavy line at the top. This represents the glacier’s peak.
Add some curves and dips. This gives a natural look. The base should be wider. It supports the weight of the glacier. You can use a reference photo. It helps you get the proportions right.
Define The Landscape
A glacier does not exist in isolation. It sits within a landscape. Start with the ground line. This is where the glacier meets the earth. Draw a horizontal line beneath your glacier outline.
Add some slopes and hills. They give context to your drawing. Include rocks or boulders. These are common in glacial landscapes. You can also sketch some trees or shrubs. This adds variety.
Remember to keep it simple. Overloading your sketch with too many elements can be overwhelming. Focus on the main features first. Details can be added later.

Adding Details
Adding details to your glacier drawing brings it to life. It creates depth and realism. This section will guide you through the process. Focus on key elements. Understand how to draw crevasses, ridges, snow, and ice textures. These are essential for a realistic glacier.
Crevasses And Ridges
Crevasses are deep cracks in the glacier. They form due to the glacier’s movement. To draw them:
- Sketch zigzag lines across the glacier’s surface.
- Vary the width and depth of the lines.
- Add shadows to enhance the depth.
Ridges are the raised areas between crevasses. To draw ridges:
- Draw smooth, curved lines following the glacier’s flow.
- Highlight the ridges with lighter shades.
- Add subtle shadows on one side.
Snow And Ice Textures
Snow and ice textures add realism. They show the glacier’s surface conditions. Here’s how to draw them:
| Texture | Technique |
|---|---|
| Snow | Use small, circular strokes with a soft pencil. |
| Ice | Draw smooth, sweeping lines. Add reflections and highlights. |
For snow, focus on a soft, powdery look. For ice, aim for a glossy, smooth appearance. Use light and shadow to create depth. Blend these textures seamlessly.
Incorporating Shadows
Drawing a glacier requires attention to detail and realism. One key aspect is incorporating shadows. Shadows give depth and dimension to your drawing. They make the glacier look more lifelike. Here are some tips to help you master this.
Light Source
First, decide where your light is coming from. This is your light source. The direction of the light affects where the shadows fall.
Examples of light sources:
- Sunlight from the right
- Sunlight from the left
- Sunlight from above
Once you’ve chosen your light source, make sure to stick with it. Consistency is key.
Shading Techniques
There are various shading techniques to use. Each creates different effects. Here are a few:
- Hatching: Drawing parallel lines close together.
- Cross-hatching: Drawing intersecting sets of parallel lines.
- Stippling: Using dots to create shading.
Choose the technique that suits your style. Practice makes perfect.
| Shading Technique | Description |
|---|---|
| Hatching | Parallel lines close together |
| Cross-hatching | Intersecting sets of parallel lines |
| Stippling | Dots creating shading |
By understanding your light source and using effective shading techniques, you can make your glacier drawing pop. Keep practicing and experimenting. Your skills will improve over time.

Coloring The Glacier
Coloring a glacier adds life to your drawing. It brings out the beauty of the icy landscape. Let’s explore how to choose the right colors and blend them seamlessly.
Choosing Colors
Selecting colors for a glacier is crucial. Blue and white are the primary choices. Use different shades of blue. Light blue can highlight the icy texture. Dark blue can show the depth and shadows.
White is essential. It helps to depict the snow and ice. Adding a hint of gray can add realism. It shows the rough texture of the glacier. You can also use light purple or turquoise. These colors give a magical touch.
Blending Techniques
Blending colors is key to a realistic glacier. Start with the base color. Typically, a light blue or white. Use soft strokes to apply this base.
Next, add darker shades for depth. Blend these gently with the base color. Use circular motions for a smooth transition. Don’t press too hard on the paper.
Highlight the glacier’s edges with white. This makes the ice stand out. Use a blending tool or your finger. Smooth out the colors for a natural look.
Finally, add small details. Use gray or darker blue for cracks and crevices. Blend these details lightly. This adds texture and realism.
Final Touches
The final touches can make your glacier drawing truly stand out. At this stage, focus on refining the details and ensuring everything looks just right. This section will guide you through the last steps to perfect your artwork.
Highlighting Details
Start by highlighting the details in your glacier. Use a lighter shade of blue or white to add reflections on the ice. This will give your glacier a realistic, shimmering effect. Pay attention to the edges and peaks, where the light naturally hits.
Add texture to the ice surface by drawing small lines and cracks. These details will make the glacier look more natural. Remember, the closer the lines, the rougher the ice appears. Spread them out for smoother areas.
Review And Adjustments
Take a step back and review your drawing. Look for any areas that need adjustment. Check the proportions and perspective. Make sure the glacier fits well within your scene.
Adjust shadows and highlights to enhance depth. Darken the shadows in crevices and under overhangs. This will create contrast and make your glacier look more three-dimensional.
Erase any stray marks or smudges. Clean up your lines to give your drawing a polished look. You might also add final touches like small snowflakes or mist around the glacier to complete the scene.

Frequently Asked Questions
What Materials Do I Need To Draw A Glacier?
You need paper, pencils, erasers, and colored pencils or markers.
How Do I Start Drawing A Glacier?
Begin by sketching the outline of the glacier with light pencil strokes.
How Can I Add Details To My Glacier Drawing?
Add texture and shading to show ice and snow using different pencil techniques.
How Do I Make My Glacier Drawing Look Realistic?
Use shading, highlights, and blending to create depth and a realistic ice effect.
Conclusion
Drawing a glacier is a fun and rewarding activity. Follow the steps we discussed to achieve a realistic result. Practice regularly to improve your skills. Use different shades and textures for a more detailed look. Remember, patience is key. Enjoy the creative process and keep experimenting.
With time, your glacier drawings will look amazing. Happy drawing!

