Drawing a star can seem tricky at first. But with simple steps, anyone can do it.
Learning how to draw a star is not only fun but also a great way to improve your drawing skills. Stars are often used in art, decorations, and even school projects. Whether you want to draw a perfect five-pointed star or a more complex one, this guide will help you.
You don’t need to be an artist to draw a star. All you need is a pencil, paper, and a bit of patience. So, let’s get started on this creative journey together. By the end of this guide, you’ll be able to draw a star with ease and confidence.

Materials Needed
Creating a star on paper can be a delightful and simple task. To ensure your drawing experience is smooth, you need the right materials. Below are the essentials and some additional supplies you might consider.
Basic Tools
Start with these basic tools to draw a star:
- Pencil: A regular HB pencil works well for initial sketches.
- Eraser: Use a good-quality eraser to correct any mistakes.
- Paper: Any drawing paper or notebook is suitable.
- Ruler: A ruler helps in creating straight lines.
- Sharpener: Keep your pencil sharp for precise lines.
Optional Supplies
If you want to add more detail to your star drawing, consider these optional supplies:
- Colored Pencils: Add color to your star for a vibrant look.
- Markers: Use markers to outline and define your star.
- Compass: A compass can help create perfect circles, if needed.
- Blending Stumps: Blend pencil shading smoothly for a professional touch.
- Graph Paper: Helps in maintaining symmetry and proportions.
Having these materials ready will make the drawing process easier and more enjoyable. Whether you stick to the basics or go for the optional extras, you’ll be well-equipped to create a beautiful star.
Choosing The Right Paper
Choosing the right paper for drawing a star is crucial. The paper affects how your drawing looks and feels. It also impacts the ease with which you can draw. Let’s explore the different types and sizes of paper you can use.
Paper Types
There are several paper types to consider. Each has its own qualities. Printer paper is widely available and affordable. But it may not give the best results. Sketch paper is a better option. It has a slightly rough surface. This texture helps the pencil grip the paper well. Watercolor paper is another choice. It is thicker and more textured. This type is perfect if you plan to color your star with watercolors.
Paper Sizes
Paper sizes also matter. Small papers are good for quick sketches. You can use an A5 size for portability. For more detailed work, larger papers are better. An A4 size is standard and versatile. You have more space to add details. If you want to create a big piece of art, go for an A3 size. This gives you plenty of room to work with.
Understanding Star Shapes
Stars are fascinating shapes that can be seen in many designs. Understanding the different star shapes will help you draw them with ease. Here, we will look at the most common star shapes.
Five-pointed Star
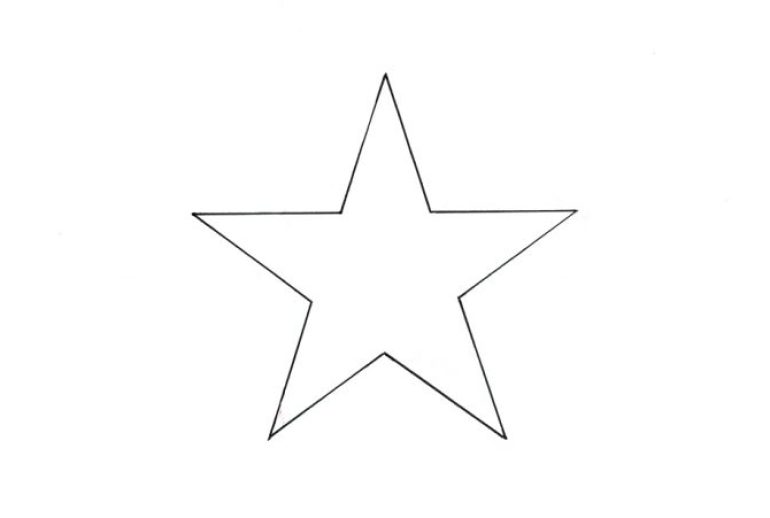
The five-pointed star is a popular choice in art and design. It is also known as the pentagram. To draw a five-pointed star, follow these simple steps:
- Draw a circle as your guide.
- Mark five points evenly spaced around the circle.
- Connect the points with straight lines in a star pattern.
Make sure the lines intersect at the center. This creates the classic five-pointed star shape.
Other Star Variations
There are many other star shapes. Each has its unique appearance and drawing method.
| Star Type | Description |
|---|---|
| Six-Pointed Star | Also known as the Star of David. Formed by two overlapping triangles. |
| Seven-Pointed Star | Less common but has a unique look. Requires careful spacing. |
| Eight-Pointed Star | Often seen in Islamic art. Formed by overlapping squares. |
Each star variation adds a different element to your artwork. Explore these shapes to expand your drawing skills.

Drawing The Basic Outline
Drawing a star may seem tough, but starting with the basic outline helps. This guide will break down the steps to make it easy for you.
Simple Lines
Begin by drawing a simple line. Make it vertical and about 5 inches long. This will be the center of your star.
Next, draw a second line. This line should cross the first line at a 45-degree angle. Ensure both lines meet in the middle.
Draw a third line, crossing the first two lines. This line should also be at a 45-degree angle, creating an asterisk shape.
Connecting Points
Now, focus on connecting the points. Start from the top point of your star. Draw a line to the bottom left point.
Move to the bottom right point. Draw a line to the top left point.
Repeat the process for the remaining points. Ensure all lines connect smoothly. This will form the basic outline of your star.
| Step | Action |
|---|---|
| 1 | Draw a vertical line |
| 2 | Draw a second line at a 45-degree angle |
| 3 | Draw a third line, forming an asterisk |
| 4 | Connect top to bottom left point |
| 5 | Connect bottom right to top left point |
With these steps, you have created a basic star outline. Practice these steps to perfect your star drawing skills.
Adding Details
After drawing the basic shape of a star, adding details can make it more visually appealing. This step involves enhancing the inner lines and edges to bring depth and character to your star. Let’s dive into these details.
Inner Lines
To add inner lines, start by drawing lines from each point of the star to its opposite inner corner. These lines will intersect at the center, creating a web-like effect. This simple addition can transform a plain star into a more intricate design.
- Draw a line from each point to the opposite inner corner.
- Ensure lines intersect at the center of the star.
- Keep lines straight for a geometric look.
For a different effect, you can draw lines from the points to the middle of each side. This adds a unique twist and can make your star look more dynamic.
Enhancing Edges
Enhancing the edges of your star can add depth and dimension. Start by thickening the lines of the star’s outline. This will make the star more prominent on the page.
- Thicken the outline of the star.
- Add small triangles or curves to the points for extra detail.
- Use shading or color to create a 3D effect.
Another way to enhance the edges is by adding small triangles or curves to the points of the star. This can give it a more stylized look. You can also use shading techniques to create a 3D effect, making the star look like it pops out of the page.
| Technique | Description |
|---|---|
| Thickening Outline | Make the star’s outline bolder. |
| Adding Triangles/Curves | Enhance points with small shapes. |
| Shading | Create a 3D effect with light and shadow. |
By focusing on these details, you can turn a simple star into an eye-catching design. Remember, practice makes perfect. So keep experimenting with different styles and techniques!

Coloring And Shading
Coloring and shading can bring your star drawing to life. It adds depth, dimension, and a vibrant touch. Whether you choose bright colors or subtle shades, this step is crucial in making your star stand out.
Choosing Colors
Picking the right colors is important for your star. Bright, primary colors like yellow, blue, and red can make your star pop. For a more cosmic look, consider using silver, gold, or neon colors.
Here are some color combinations you might like:
- Yellow and Orange: For a classic star.
- Blue and Silver: For a cool, cosmic vibe.
- Red and Gold: For a festive touch.
Shading Techniques
Shading gives your star a three-dimensional look. Here are some techniques:
- Gradient Shading: Start with a dark color at the edges and fade to a lighter color in the center.
- Cross-hatching: Use intersecting lines to create texture and depth.
- Stippling: Create shadow with small dots. The closer the dots, the darker the area.
For a realistic look, consider the light source. Shadows should fall on the opposite side.
Here is a quick example:
| Technique | Description |
|---|---|
| Gradient Shading | Dark at edges, light in center |
| Cross-hatching | Intersecting lines for texture |
| Stippling | Small dots for shadow |
Experiment with these techniques to find what works best for your star.
Final Touches
You’ve drawn your star, and it looks great. Now it’s time for the final touches. These steps will help you perfect your star. They ensure that your drawing stands out. Let’s dive into the details.
Reviewing Your Work
Take a moment to review your star drawing. Look at each line. Are they straight and even? Are the points sharp? Compare your star to a reference image if you have one. This will help you spot any areas that need work.
Consider the symmetry of your star. Each point should be equal. The angles between the points should be the same. If you find any inconsistencies, don’t worry. We will fix them in the next step.
Making Adjustments
Now, let’s make some adjustments. Here’s a simple checklist:
- Line Thickness: Are the lines too thick or too thin? Adjust as needed.
- Angles: Check the angles of each point. They should be even.
- Symmetry: Ensure all points are equal in size.
Use a ruler to straighten any crooked lines. You can erase and redraw any lines that don’t look right. Take your time. Small changes can make a big difference.
Once you are happy with the adjustments, you can add some final details. You might want to shade your star to give it depth. Or you could add some color to make it more vibrant.
Now your star is complete. It looks polished and professional. Great job!
Frequently Asked Questions
What Tools Do I Need To Draw A Star?
You need paper, a pencil, and a ruler. Optional: eraser and colored pencils.
How Do I Draw A Perfect Five-pointed Star?
Draw a pentagon, then connect every other corner with straight lines. Practice helps.
Can I Draw A Star Without A Ruler?
Yes. Freehand drawing is possible, but it may not be as symmetrical. Practice improves skill.
What Is The Easiest Method To Draw A Star?
The easiest method is to draw two overlapping triangles. Practice makes perfect.
Conclusion
Drawing a star is fun and easy. Start with simple lines. Connect the points carefully. Practice often to improve. Show your creativity with different star designs. Share your art with friends and family. Enjoy the process and keep drawing. Anyone can draw a star with patience.
Keep exploring and happy drawing!

