Drawing a pyramid can seem tricky at first. But with the right steps, it becomes easy.
Pyramids have fascinated people for centuries. Their unique structure and historical significance make them an interesting subject to draw. Whether you are an art student, a hobbyist, or just curious, learning to draw a pyramid is a fun skill. In this guide, we will break down the process into simple steps.
You’ll learn how to create a perfect pyramid with ease. Grab your pencil and paper, and let’s get started on this artistic journey. You’ll be amazed at how quickly you can master this drawing technique.
Materials Needed
To draw a pyramid, you need some essential materials. These materials will help you create a clear and precise drawing. Here, we will discuss the necessary drawing tools and paper types.
Drawing Tools
Having the right tools is crucial for a good drawing. Below is a list of drawing tools you will need:
- Pencils: Use a range of pencils, from HB to 4B.
- Eraser: A soft eraser helps remove mistakes cleanly.
- Ruler: A ruler ensures your lines are straight.
- Sharpener: Keep your pencils sharp for fine lines.
- Compass: Useful for drawing the base circle of the pyramid.
Paper Types
Choosing the right paper type can make a big difference. Here are some paper types you might consider:
- Sketch Paper: Ideal for practice and rough sketches.
- Drawing Paper: Thicker and better for final drawings.
- Grid Paper: Useful for maintaining proportions.
Using the right materials is the first step to drawing a perfect pyramid. Gather your tools and paper, and get ready to create something amazing!

Basic Shapes
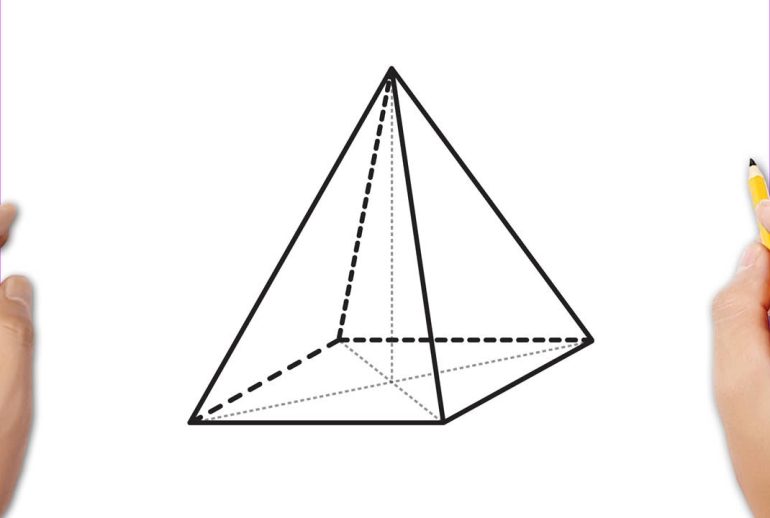
To draw a pyramid, start with basic shapes. Understanding the fundamental shapes helps create a solid foundation. The two main shapes are triangles and lines. These shapes form the pyramid structure.
Triangles
Triangles are essential for drawing a pyramid. Begin by drawing a triangle. This will be the front face of the pyramid. Ensure the base is straight and the sides are equal. This creates a symmetrical look.
- Draw a large triangle for the front face.
- Make sure the base is horizontal and the sides are even.
Next, draw two more triangles for the sides. These triangles share sides with the front triangle. Align the bases with the front triangle’s sides. This completes the basic shape of the pyramid.
Lines
Lines connect the triangles to form the pyramid. Start with the vertical lines. Draw lines from the top of the front triangle to the base corners. These lines create the sides of the pyramid.
- Draw vertical lines from the triangle’s top to the base corners.
- Connect the base corners with a horizontal line.
Ensure the lines are straight and connect precisely. This gives the pyramid a clean, defined look. Use a ruler for accuracy.
With triangles and lines, you have the basic shape of a pyramid. Practice these steps to improve your drawing skills.
Drawing The Base
Starting with the base is crucial in drawing a pyramid. This step lays the foundation for the rest of your drawing. Follow these steps to ensure your pyramid has a strong base.
Horizontal Line
The first step is to draw a horizontal line. This line will serve as the bottom edge of your pyramid. Make sure it is straight and even. You can use a ruler for accuracy. A straight horizontal line ensures the pyramid will stand upright.
Base Triangle
Next, draw a base triangle on top of the horizontal line. Start by marking the center of the horizontal line. From this center point, draw two diagonal lines that meet above the horizontal line. This forms the basic shape of the triangle, which is the base of the pyramid.
Ensure that both diagonal lines are equal in length. This balance is important for the pyramid’s symmetry. Use a ruler to measure the lengths if needed.
Here’s a quick summary of the steps in a table:
| Step | Description |
|---|---|
| 1 | Draw a straight horizontal line |
| 2 | Mark the center of the line |
| 3 | Draw two equal diagonal lines from the center |
Once the base triangle is complete, you are ready to move on to the next steps. The base provides a strong foundation for the pyramid’s structure.

Creating The Sides
After drawing the base of your pyramid, it’s time to create the sides. This step involves connecting lines and forming side triangles. Follow these steps to ensure your pyramid looks accurate and proportional.
Connecting Lines
First, draw lines from each corner of the base to a central point above the base. This central point will be the pyramid’s peak. Ensure that these lines are straight and meet at the same point. These lines represent the edges of your pyramid.
Side Triangles
Next, create the side triangles by connecting the base corners to the pyramid’s peak. Each side of the pyramid will form a triangle. Make sure the triangles are equal in size for a symmetrical pyramid.
Use a ruler to keep the lines straight. This helps in making the triangles look more accurate.
The sides should have equal angles to maintain balance. Check each angle to ensure they are the same.
Here is a simple table to summarize the steps:
| Step | Action |
|---|---|
| 1 | Draw lines from base corners to the peak. |
| 2 | Ensure lines meet at the central point. |
| 3 | Form side triangles from the base to the peak. |
| 4 | Check angles for symmetry. |
Following these steps will help you draw accurate and visually appealing pyramid sides. Remember to be precise and patient.
Adding Dimensions
Adding dimensions to your pyramid drawing can make it look more realistic. It involves creating depth and perspective. This section will guide you through these steps. Follow along to give your pyramid a three-dimensional look.
Depth Lines
Start by drawing the base of your pyramid. Use a ruler to ensure straight lines. Next, add the top point, or apex, of the pyramid. From the apex, draw lines down to each corner of the base. These lines create the sides of the pyramid. They add depth and make your pyramid appear three-dimensional.
Perspective
Perspective is key in making your pyramid look realistic. To achieve this, use a vanishing point. Choose a point on the horizon line. Draw lines from this point to the corners of your pyramid. These lines help to align the sides correctly. They make the pyramid look like it recedes into space. Adjust the angles as needed to enhance the effect.
By following these steps, you can add depth and perspective to your pyramid. Practice makes perfect. Keep refining your technique to improve your drawings.
Detailing The Pyramid
Detailing the pyramid is crucial to making your drawing stand out. It involves adding texture and shading to make the pyramid look realistic. These elements will give your drawing depth and dimension.
Texture
To create texture, focus on the surface of the pyramid. Think about the materials used to build it. Are there stones, bricks, or a smooth surface? Use short, quick strokes to represent individual stones or bricks.
Varying the length and direction of these strokes can add more realism. If the pyramid has a smooth surface, use even, gentle shading to show this. For sand or rough surfaces, add tiny dots or scribbles.
Texture can also be added with a technique called hatching. Hatching involves drawing closely spaced parallel lines. The closer the lines, the darker the area will appear. This can help show the roughness or smoothness of the pyramid’s surface.
Shading
Shading is about creating light and shadow. This gives your pyramid a three-dimensional look. Identify the light source in your drawing. This is where the light is coming from.
Shade the opposite side of the pyramid to show where shadows fall. Use a gradual transition from light to dark. This makes the shading look more natural. Start with light pressure and increase pressure to darken the area.
For deeper shadows, use cross-hatching. This involves drawing intersecting lines. The more lines you add, the darker the shadow becomes. This technique is great for adding depth to the shadowed side of the pyramid.
Don’t forget to add subtle shading to the ground around the pyramid. This anchors the structure and makes it look more realistic. Use soft, horizontal strokes to shade the ground.
Final Touches
Drawing a pyramid can be a fun and rewarding experience. Once you have the basic shape, it’s time to add the final touches to bring your pyramid to life. These steps will help you refine your drawing and make it look more realistic and polished.
Refining Lines
First, take a close look at your drawing. Make sure the lines are straight and the angles are sharp. Use a ruler if necessary to correct any crooked lines. This will make your pyramid look more precise and professional.
Next, adjust the thickness of your lines. Thicker lines can add depth and dimension to your drawing. Use a fine-tipped pen or pencil for this step. You can also add shading to create a sense of light and shadow.
Cleaning Up
Once your lines are refined, it’s time to clean up your drawing. Use an eraser to remove any unwanted marks or sketch lines. This will make your pyramid look cleaner and more polished.
To make your drawing stand out, consider adding some final details. You can draw small stones or bricks on the pyramid’s surface. This adds texture and realism to your drawing.
| Step | Action |
|---|---|
| Refine Lines | Ensure lines are straight and angles are sharp |
| Adjust Thickness | Use a fine-tipped pen to vary line thickness |
| Clean Up | Erase unwanted marks and sketch lines |
| Add Details | Draw small stones or bricks for texture |
Following these steps will help you create a beautiful and realistic pyramid. Keep practicing, and soon you’ll be able to draw a perfect pyramid with ease.

Common Mistakes
Many people make mistakes when drawing a pyramid. Crooked lines, uneven proportions, and incorrect perspectives are common errors. Practice helps in avoiding these pitfalls and achieving a more accurate drawing.
Drawing a pyramid can be tricky. Many beginners make common mistakes. Knowing these can help you avoid them.
Misaligned Lines
One big mistake is drawing misaligned lines. Pyramids have straight lines. But many drawings show wavy or crooked lines. Use a ruler to keep them straight. Check each line as you draw. Keeping lines straight helps your pyramid look real.
Incorrect Proportions
Another mistake is incorrect proportions. Each side of the pyramid should be even. Some drawings show one side longer than the other. This makes the pyramid look odd. Measure each side to ensure they match. Keep the base and height balanced. This will make your pyramid look more accurate.
Frequently Asked Questions
What Tools Do I Need To Draw A Pyramid?
You need a pencil, ruler, and paper. Optionally, use a compass for precise angles.
How Do I Start Drawing A Pyramid?
Begin with a square base. Then, draw four triangular sides converging at a point.
Can Beginners Draw A Pyramid Easily?
Yes, pyramids are simple geometric shapes. Beginners can follow basic steps to draw them.
What Are Common Mistakes In Drawing Pyramids?
Common mistakes include uneven base sides and incorrect angles. Use a ruler for precision.
Conclusion
Drawing a pyramid can be fun and easy. Follow the steps closely. Practice regularly for better results. Remember, patience is key. Over time, your skills will improve. Keep your lines straight and angles precise. Use a ruler for accuracy. Share your drawings with friends.
Enjoy the process and be creative. Happy drawing!


