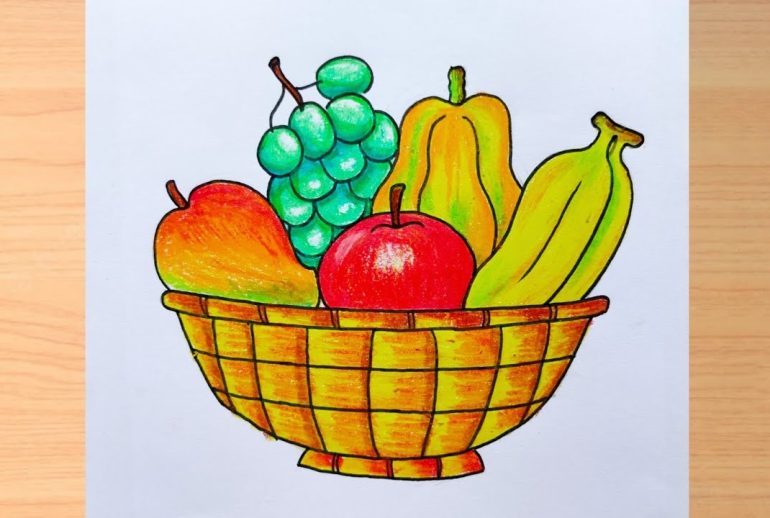
Drawing a fruit basket can be easy and fun. Anyone can do it with a bit of practice.
Are you eager to learn how to draw a fruit basket? This guide will show you the steps to create a lovely fruit basket drawing. Whether you are a beginner or have some drawing experience, you will find these tips helpful.
Drawing a fruit basket allows you to practice different shapes and textures. It’s a great way to improve your drawing skills and create beautiful artwork. Let’s get started on this creative journey together. By the end, you’ll have a fruit basket drawing you can be proud of.
Materials Needed
Drawing a fruit basket can be a fun and rewarding activity. Before starting, gather the necessary materials. Having the right supplies will make the process easier and more enjoyable. Let’s dive into what you need.
Drawing Supplies
First, you need basic drawing supplies. These include pencils, erasers, and sharpeners. A set of colored pencils or markers will add vibrancy to your drawing. Opt for a range of pencil grades. This helps in creating different shades and textures. A quality eraser is essential. It should be soft and leave no marks. A sharpener ensures your pencils are always ready.
Choosing The Right Paper
The type of paper you use is important. Choose a paper that suits your drawing style. For detailed work, smooth paper is best. It allows for clean lines and fine details. If you prefer a textured look, use rough paper. It gives your drawing a unique feel. Make sure the paper is thick enough. This prevents tearing and allows for multiple layers of color.
Sketching The Outline
Begin by drawing the main shapes of the fruit. Focus on simple, light lines to outline the basket. Add detail gradually to build up the drawing.
Sketching the outline is the first step in drawing a fruit basket. This part sets the foundation for your entire drawing. Start with simple shapes and gradually refine them. This method helps you to map out the composition of your artwork.
Basic Shapes
Begin with basic shapes. Draw circles for apples and oranges. Use ovals for bananas and pears. Sketch each fruit lightly with a pencil. This allows easy adjustments later. Focus on getting the shapes right.
Positioning The Basket
Now, position the basket. Draw a horizontal oval for the basket’s opening. Add two lines down from the sides to form the basket’s body. Make sure it looks balanced. Place the fruits inside the basket. Adjust their positions to look natural. Make sure no fruit is floating. Remember, accuracy in this step makes the later stages easier. Take your time. Sketch lightly and correct mistakes as you go. This will ensure a strong base for your fruit basket drawing. “`
Drawing The Basket
Drawing a fruit basket can seem challenging, but it becomes easy with simple steps. Let’s start with the basket. The basket is the base that holds all the fruits together. The key to a realistic basket is the basket weave pattern and adding depth.
Basket Weave Pattern
To create a realistic basket, begin with the basket weave pattern. This gives the basket its texture and detail.
- Start by drawing a large oval shape. This will be the top of the basket.
- Draw two curved lines from each side of the oval. These lines should meet at a point, forming the bottom of the basket.
- Inside the oval, draw horizontal lines across the width of the basket. These lines should be equally spaced.
- Next, draw vertical lines that intersect the horizontal lines. This creates a grid pattern.
- To complete the weave, add diagonal lines in each grid square. Alternate the direction of these lines to mimic a weave.
Take your time with the weave pattern. This step adds the texture and makes the basket look realistic.
Adding Depth
Adding depth to your basket will make it appear more three-dimensional. This can be done with shading and line work.
- Begin by shading the bottom of the basket. Use a light pencil to create soft shadows.
- Shade the sides of the basket. This will make the basket look round.
- Darken the lines on the inside of the basket. This adds contrast and makes the weave pattern stand out.
- Add shading to the weave pattern. Shade one side of each weave to create depth.
Depth is important. It gives the basket form and makes it look like it can hold fruits.
Adding Fruits
Adding fruits to your basket can bring it to life. This step involves drawing different fruits, each with its unique shape and texture. Let’s start with some common fruits that are easy to draw and instantly recognizable.
Drawing Apples
Begin by sketching a simple circle. This will be the base of your apple. Add a slight indent at the top for the stem. Draw a short, curved line for the stem. Ensure it’s centered at the top indent. Sketch two small, curved lines at the bottom for the apple’s base. This gives it a more realistic look. Lightly shade the apple to show its round shape.
Sketching Bananas
Start by drawing a curved line. This will be the banana’s main shape. Add another curved line parallel to the first one. Connect these lines at both ends. This forms the body of the banana. Draw the banana’s stem at the top. It should be short and slightly curved. Lightly shade the banana to give it dimension. For a realistic touch, add a few small spots.
Detailing The Fruits
Detailing the fruits in your drawing is essential. It adds depth and makes your fruit basket look realistic. Focus on shading, texture, and small details to make each fruit stand out.
Shading Techniques
Shading brings your fruits to life. Use light and shadow to create a three-dimensional effect. Here are some shading techniques:
- Hatching: Draw parallel lines to create shadows.
- Cross-hatching: Layer intersecting lines for darker areas.
- Stippling: Use dots to build up value and texture.
- Blending: Smooth out lines with a blending tool or finger.
Experiment with these techniques to see what works best for each fruit. For example, apples might need smooth blending, while oranges could use stippling for their bumpy skin.
Highlighting Texture
Texture makes your fruits look more realistic. Each fruit has a unique texture. Highlight these differences to add variety to your drawing.
Consider these tips:
| Fruit | Texture Technique |
|---|---|
| Apple | Use smooth shading with slight reflections. |
| Orange | Stippling for the bumpy skin. |
| Banana | Long, curved lines to show peel ridges. |
| Grapes | Small, round shading for each grape. |
Pay attention to the light source. Highlight areas where light hits directly. This creates a shiny, realistic effect. For example, add small white spots to highlight grapes.
Combine shading and texture techniques to create a detailed and engaging fruit basket drawing. Practice makes perfect, so keep experimenting until you achieve the desired look.
Final Touches
Once you have drawn the basic shapes and added color, it’s time to focus on the final touches. These small details can make a big difference in your drawing. In this section, we will discuss how to correct mistakes and enhance contrast to make your fruit basket look more realistic and polished.
Correcting Mistakes
It’s normal to make mistakes while drawing. Here are some tips to fix them:
- Eraser: Use a clean eraser to gently remove unwanted lines.
- Blending: Blend colors to hide small errors.
- White Pen: Use a white pen to cover tiny mistakes.
Enhancing Contrast
Contrast can make your drawing pop. Here’s how to enhance it:
- Shading: Add darker shades to areas in shadow.
- Highlights: Use a white pencil to add highlights.
- Layering: Layer colors to create depth.
By correcting mistakes and enhancing contrast, your fruit basket drawing will look more vibrant and realistic. These final touches are essential in bringing your artwork to life.
Displaying Your Artwork
Displaying your artwork can be just as important as creating it. The right display can enhance the beauty of your fruit basket drawing. You have multiple options to consider. Each one can make your drawing stand out in different ways. Let’s explore some effective ways to showcase your artwork.
Framing Options
Frames protect and highlight your artwork. Choose a frame that matches the style of your drawing. Wooden frames offer a classic look. Metal frames give a modern feel. Try different frame styles to see what fits best.
Consider using a mat inside the frame. Mats add depth and draw the eye to the drawing. Pick a mat color that complements your artwork. Light mats work well with bright drawings. Dark mats can make light colors pop.
Presentation Tips
Placement matters. Hang your drawing at eye level. This makes it easy for viewers to enjoy. Good lighting is key. Natural light works best. Avoid direct sunlight to prevent fading.
Group your art. If you have other drawings, create a gallery wall. Arrange your pieces in a balanced layout. This gives a professional look. Rotate your artwork. Change the display every few months. This keeps your space fresh and interesting.

Frequently Asked Questions
What Materials Do I Need To Draw A Fruit Basket?
You need paper, pencils, eraser, and colored pencils or markers.
How Do I Start Drawing The Fruit Basket?
Start by sketching the basket outline. Then, draw the fruits inside.
What Fruits Should I Include In My Drawing?
Include common fruits like apples, bananas, grapes, and oranges for a colorful basket.
How Can I Make My Fruit Basket Drawing Look Realistic?
Add shading and highlights to the fruits. This gives them a three-dimensional look.
Conclusion
Creating a fruit basket drawing can be fun and easy. Follow these simple steps and watch your skills improve. Keep practicing and experimenting with different fruits. Enjoy the process and express your creativity. Drawing helps relax the mind and enhances focus.
Share your artwork with friends and family. They will appreciate your effort and creativity. So, grab your pencils and start today. Happy drawing!

