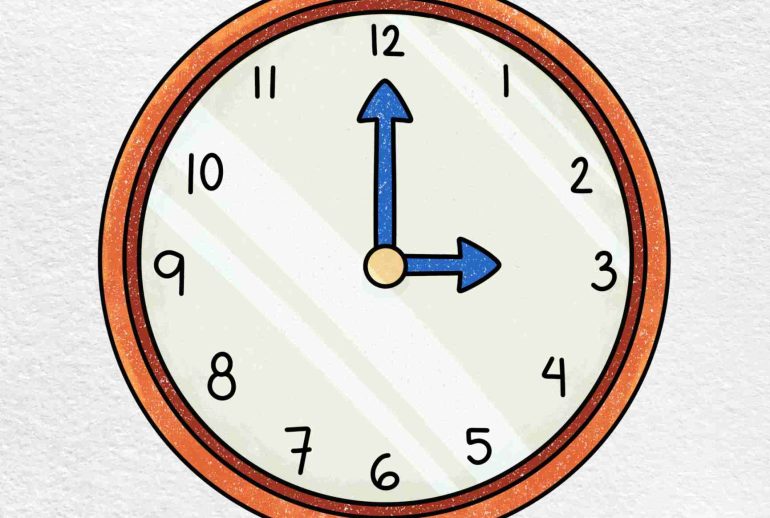
Drawing a clock can seem tricky at first. But it’s actually quite simple.
With a few steps, you can create a perfect clock. Drawing helps improve your creativity and focus. A clock is a great start for beginners. It combines basic shapes and symmetry. This guide will show you how to draw a clock step-by-step.
You don’t need any special tools, just a pencil, paper, and a little patience. Whether for fun or learning, this task can be both enjoyable and rewarding. So, let’s dive in and learn how to draw a clock!
Materials Needed
Before you start drawing a clock, gather all the necessary materials. These supplies will help you create a precise and beautiful clock drawing. Below is a list of essential and optional items.
Essential Supplies
| Item | Description |
|---|---|
| Pencil | A pencil is crucial for sketching the clock. Use a good quality pencil for clean lines. |
| Eraser | An eraser helps correct mistakes and refine your drawing. |
| Ruler | A ruler ensures straight lines for the clock’s face and hands. |
| Compass | A compass helps draw perfect circles for the clock’s outline. |
| Paper | Use good quality paper to draw on. It should be smooth and sturdy. |
Optional Additions
- Colored Pencils or Markers: Add colors to make your clock vibrant.
- Fine-tip Pens: Use these for detailed work and outlining.
- Stencils: Helpful for drawing numbers and other details accurately.
- Protractor: For precise angles, especially useful for clock hands.
Having the right materials makes a big difference. Start with the essential supplies and add optional items for more detail and creativity.
Drawing The Clock Face
Drawing a clock face can be a fun and creative activity. It also helps improve your drawing skills. Below, we will guide you through the steps to draw a perfect clock face. Let’s get started!
Sketching The Circle
To begin, you need to draw a perfect circle. Use a compass for accuracy. If you don’t have a compass, use a round object like a cup or a lid. Place it on the paper and trace around it to get your circle.
A table can help you understand the tools needed:
| Tool | Use |
|---|---|
| Compass | Draws perfect circles |
| Round Object | Traces circles |
| Pencil | Sketches the circle |
Dividing The Circle
Next, divide the circle into 12 equal parts. These will mark the hours. Start by drawing a vertical line through the center. Then draw a horizontal line. This gives you four sections.
To divide further:
- Draw diagonal lines through the center, making an X.
- Divide each section in half again, to get 12 sections.
Each section represents an hour on the clock. Mark these points clearly.
With these steps, your clock face is now ready. You have sketched the circle and divided it accurately. Continue to add the numbers and hands. Happy drawing!
Adding Numbers
Adding numbers to your clock drawing is a crucial step. This ensures the clock is functional and easy to read. Let’s break down the process into simple steps.
Positioning The Numbers
First, mark the 12, 3, 6, and 9 positions. These marks divide the clock into four equal parts. Use a ruler to ensure accuracy. Then, add the remaining numbers between these points. This helps maintain balance and symmetry. Positioning the numbers correctly makes your clock look professional.
Ensuring Even Spacing
Spacing the numbers evenly is vital. Start by dividing the clock face into 12 equal segments. You can use a protractor for this. Each segment should cover 30 degrees. Place each number in the center of its segment. Double-check the spacing to avoid clutter. Even spacing ensures your clock is easy to read and looks neat.
Drawing The Hands
Drawing the hands of a clock is a crucial step. It requires precision to ensure the time can be read accurately. The hour hand and minute hand need to be distinct and correctly placed. Let’s explore how to draw each hand of the clock.
Hour Hand
The hour hand is shorter and thicker than the minute hand. Start by drawing a line from the center of the clock. Ensure it’s pointing to the correct hour. Make this line about one-third the length of the clock’s radius. This proportion helps in distinguishing the hour hand from the minute hand.
To add more clarity, consider coloring the hour hand differently. A common choice is to use black or a dark color. This color contrast helps people identify it quickly. You can also add a small circle or shape at the end of the hour hand. This detail can make your clock look more accurate and stylish.
Minute Hand
The minute hand is longer and thinner than the hour hand. Draw a line from the center of the clock to the edge. This line should be about two-thirds the length of the clock’s radius. This length helps show the minute hand’s importance in indicating time.
Use a lighter color for the minute hand, such as grey or white. This choice ensures it stands out against the hour hand. To enhance readability, make the minute hand slightly narrower. You can also add a pointed tip to the minute hand. This detail helps in reading the exact minute more precisely.
Here’s a quick comparison table for clarity:
| Hand | Length | Thickness | Color |
|---|---|---|---|
| Hour Hand | One-third of the radius | Thicker | Dark (e.g., black) |
| Minute Hand | Two-thirds of the radius | Thinner | Light (e.g., grey) |
By following these steps, you can draw accurate and clear clock hands. This precision ensures the clock is easy to read and functional.
Including Details
Including details in your clock drawing can make it stand out. Detailed elements add depth and character to your artwork. They also help to make your clock look more realistic and interesting. In this section, we will explore how to add the second hand and decorative elements to your clock drawing.
Adding The Second Hand
The second hand is a thin, long needle that moves continuously. Start by drawing a straight line from the center of the clock. Make sure it is longer than the minute hand. The second hand should be sleek and slightly thinner than the minute hand.
Add a small circle at the end of the second hand. This small detail helps to make it look more realistic. Ensure the second hand is distinct and does not blend in with the other hands.
Decorative Elements
Decorative elements can give your clock a unique look. Start by adding numbers or Roman numerals around the clock face. These should be evenly spaced and clear to read.
You can also add a border around the clock face. This could be simple or intricate, depending on your style. Patterns, such as dots or lines, can add texture and interest.
Consider adding small designs, such as stars or flowers, at the corners of the clock face. These small touches can make your drawing more appealing. Remember to keep the design balanced and not overcrowded.
These details can turn a simple clock drawing into a piece of art. By carefully adding the second hand and decorative elements, your clock will look detailed and professional.

Final Touches
After sketching the basic shape of your clock, it’s time for the final touches. These steps will bring your drawing to life. Let’s make it look polished and complete.
Inking The Drawing
Use a fine-tip pen or marker to ink the drawing. Carefully trace over your pencil lines. Ensure your hand is steady. This will make the lines clean and sharp. Work slowly to avoid mistakes.
Start from the outside and move inwards. This helps avoid smudging. Pay attention to details like the numbers and hands of the clock. Make sure they are bold and clear.
Once you finish inking, let it dry completely. This prevents smudging when you erase the guidelines.
Erasing Guidelines
Now that the ink is dry, it’s time to erase the guidelines. Use a soft eraser for this step. Gently erase all the pencil marks. Be careful not to damage the inked lines.
Check your drawing for any remaining pencil marks. Erase them to keep the drawing clean. Look at the clock from different angles to ensure all guidelines are gone.
After erasing, your clock drawing should look clean and detailed. The final touches are complete, and your clock is ready to be admired!
Tips For Improvement
Improving your clock drawing skills can be fun. Whether you’re a beginner or someone looking to refine their art, these tips can help. Practice and experimentation are key.
Practice Regularly
Consistency is vital. Draw clocks daily to build muscle memory. Start with simple designs. Focus on the basic shape and structure. Make sure the circle is even. Use light strokes to sketch the outline. Gradually add details like numbers and hands.
Don’t worry about perfection. Each drawing will improve with time. Keep a journal of your sketches. Compare them to see your progress. Over time, your lines will become smoother. Your numbers will look more uniform.
Experiment With Styles
Try different styles to find what suits you. Start with a classic analog clock. Then, move to digital or antique styles. Each style has unique features. Experimenting can teach you new techniques.
Use various tools and materials. Pencils, markers, and pens each offer different effects. Color can add life to your drawings. Try different color schemes. Use shading to create depth and dimension.
Look at different clock designs for inspiration. Study how other artists draw clocks. Incorporate elements you like into your work. This will help you develop your own style.

Frequently Asked Questions
What Tools Do I Need To Draw A Clock?
You need paper, a pencil, a ruler, and a compass.
How Do I Draw The Clock Face?
Draw a circle using a compass, and mark the center.
How Do I Add Numbers To The Clock?
Use the ruler to evenly space and write the numbers 1 to 12 around the circle.
How Do I Draw The Clock Hands?
Draw two straight lines from the center. One for the hour, one for the minute.
Conclusion
Drawing a clock is fun and simple. Follow the steps, practice often. You’ll get better with each try. Remember, patience is key. Soon, you’ll be creating detailed clocks. Enjoy the process. Happy drawing!


