

Drawing a cliff might seem challenging at first. But, with the right steps, you can create a stunning piece of art.
Learning to draw a cliff can upgrade your landscape drawings and bring them to life. In this guide, we will walk you through the process of drawing a cliff. Whether you’re a beginner or have some experience, these steps will help you.
You’ll learn to capture the rugged beauty of cliffs in your artwork. By the end, you’ll have a drawing that looks both natural and impressive. So, grab your pencils and let’s get started on this artistic journey.
Introduction To Drawing Cliffs
Drawing cliffs can be an exciting and rewarding experience. They offer a perfect blend of challenge and creativity. Whether you are a beginner or an experienced artist, cliffs provide a unique subject to draw. Their rugged beauty and dramatic presence make them a favorite among nature lovers and artists alike.
Why Draw Cliffs?
Cliffs are fascinating natural formations. Their towering heights and jagged edges capture the imagination. Drawing cliffs helps improve your skills in depicting texture and depth. It also allows you to practice shading and perspective. Cliffs can be a great addition to any landscape drawing. They add drama and interest to your artwork.
Materials Needed
To draw cliffs, you need some basic materials. Start with good quality paper. You can use sketch paper or drawing paper. Next, you need pencils. Use a range of pencils from light to dark. This helps in creating depth and shadows. An eraser is also important for corrections and highlights. Additionally, you might want to use a blending tool. This helps in smoothing out pencil strokes and creating realistic textures.
Basic Shapes And Structure
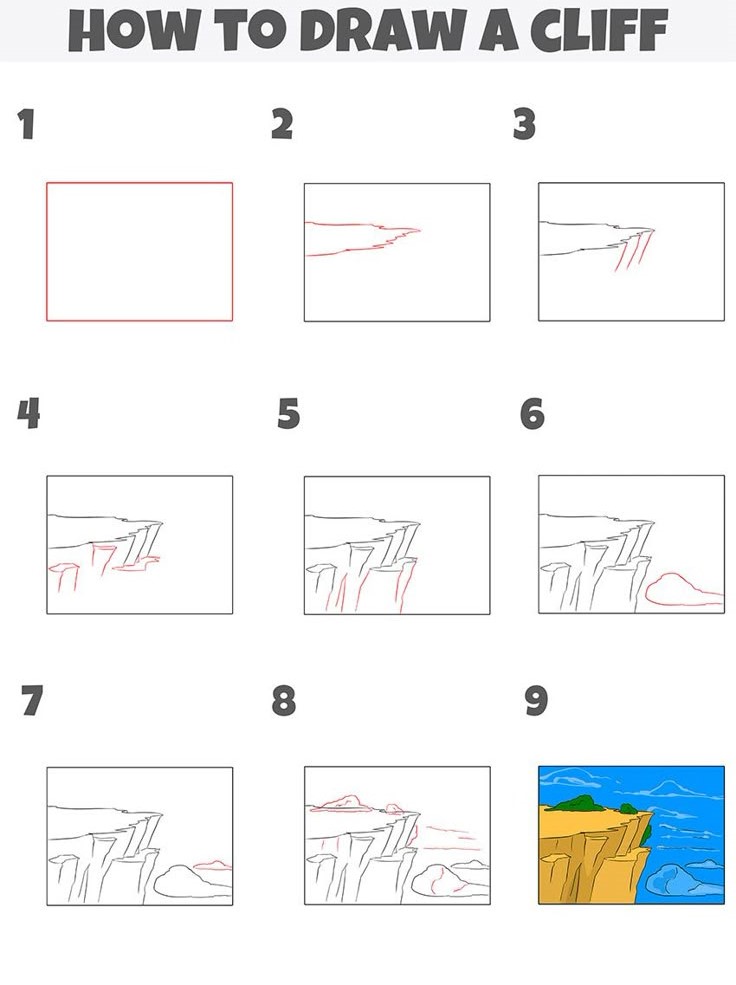
Drawing a cliff might seem complex. But breaking it down helps. Start with basic shapes and structure. This simplifies the process. Focus on key elements. These include the outline and geometric forms. Follow these steps for a solid foundation.
You might also like: is it bad to draw while.
Sketching The Outline
Begin with a light sketch. Use a pencil. Draw a simple line. This represents the cliff’s edge. Keep it jagged and uneven. Cliffs are rarely smooth. Add some curves and dips. This creates a natural look. Don’t worry about details yet.
Next, sketch the base. Draw a wavy line. This forms the bottom of the cliff. Connect it with the edge line. Ensure it looks rough. The base should mirror the top. This maintains balance.
Adding Geometric Forms
Now, add geometric shapes. Use triangles and rectangles. Place them along the outline. These shapes represent rocks. They give the cliff structure. Vary the sizes. This adds realism.
Draw a few large shapes first. Then fill in with smaller ones. Overlap some shapes. This creates depth. Make sure the forms are irregular. Real cliffs are uneven. These shapes are guides. You will refine them later.
Review your sketch. Check the balance. Make adjustments if needed. Your cliff should look sturdy. The basic shapes set the stage. Now, you are ready for details.
Creating Textures And Details
Drawing a cliff requires attention to textures and details. These elements make the cliff look realistic. By focusing on rocky surfaces and adding cracks and crevices, your cliff drawing will stand out. Let’s dive into these aspects.
You might also like: how do artists draw straight lines.
Rocky Surfaces
To create a realistic rocky surface, use irregular shapes. Draw uneven lines and forms to mimic natural rock formations. Vary the size and direction of these shapes. This variation adds depth and interest.
- Use jagged lines for rough textures.
- Apply shading to show shadows and highlights.
- Mix larger and smaller rocks for a natural look.
Shading is important. It gives the rocks dimension. Start with light pressure and build up darker areas. Use a soft pencil for smooth shading. A harder pencil can create sharp edges.
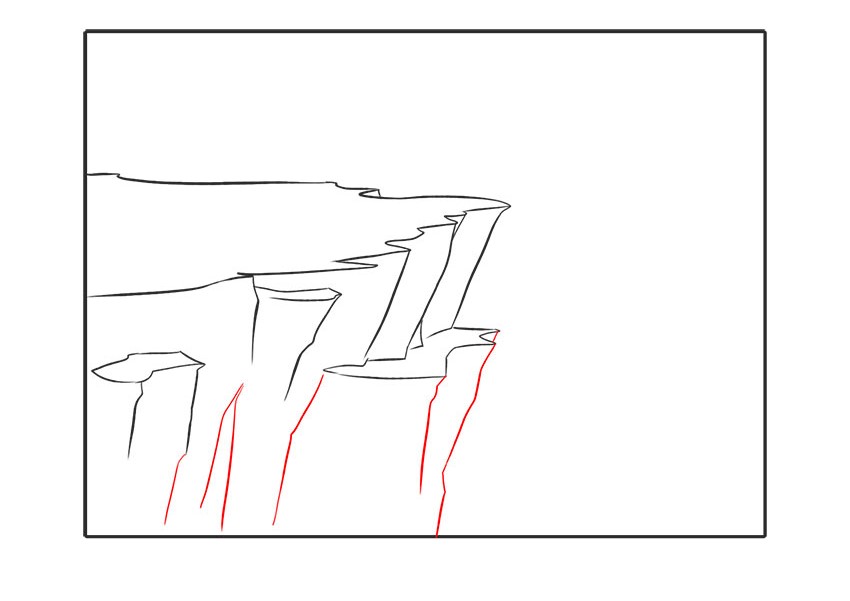
Adding Cracks And Crevices
Cracks and crevices add realism to your cliff. They show the effects of erosion and weathering. Start with thin lines. Make them uneven and random. Avoid straight lines. Nature is irregular.
- Draw thin, jagged lines to represent cracks.
- Vary the length and direction of the lines.
- Add shading to one side of the crack for depth.
| Technique | Details |
|---|---|
| Thin Lines | Use for small cracks and fine details. |
| Jagged Lines | Mimic natural fractures in rock. |
| Shading | Adds depth and realism. |
Pay attention to where the light hits the cliff. Shadows will fall on the opposite side of the light source. This creates a three-dimensional effect.
By focusing on these techniques, your cliff drawing will look more realistic and detailed. Practice makes perfect. Keep refining your skills.
Shading Techniques
Shading brings depth to your cliff drawing, making it realistic. In this section, we’ll explore some essential shading techniques.
You might also like: can i draw with my eyes.
Light Source And Shadows
Understanding the light source is crucial for shading. Determine where the light is coming from.
- If the light is from the left, the right side will be in shadow.
- If the light is from above, the bottom areas will be darker.
Observe how natural light falls on objects. Shadows will be more prominent on the opposite side of the light source. Create contrast by darkening the shadowed areas.
Here’s a simple table to illustrate:
| Light Source | Shadow Direction |
|---|---|
| Left | Right |
| Above | Bottom |
Blending And Smudging
Blending and smudging help to smooth out the shaded areas. They create a more natural look.
- Use a blending stump or your finger to smudge the graphite.
- Apply gentle, circular motions to blend the shades.
- For more defined shadows, press harder while shading.
To avoid harsh lines, ensure a gradual transition between light and dark areas. Practice blending on a scrap piece of paper before applying it to your drawing.
Here are a few tips to remember:
You might also like: how do i draw motion blur.
- Keep your blending tools clean to avoid unwanted marks.
- Use different pressure levels for varied shading intensity.
- Experiment with different tools like tissue or cotton swabs.
These techniques will enhance the three-dimensional effect of your cliff drawing.
Adding Depth And Dimension
Drawing a cliff can be challenging. But, adding depth and dimension makes it look realistic. This section will help you learn how to do that. Simple techniques can make your cliff drawing pop. Let’s dive in!
Foreground And Background
Divide your drawing into foreground and background. The foreground is closer to the viewer. Draw larger and more detailed elements here. Rocks, plants, and shadows can add interest. Use smaller and less detailed elements in the background. This creates a sense of distance.
Vary the size of objects. Small objects appear far away. Big objects look close. This trick helps build depth. Pay attention to overlapping. Overlapping objects show which is closer.
Perspective Tricks
Perspective is key for depth. Use lines that converge at a point on the horizon. This point is the vanishing point. Draw the cliff edges to meet at this point. This creates a three-dimensional effect.
Consider the angle of the cliff. A steep angle looks more dramatic. Use shading to enhance the perspective. Shadows and highlights create volume. Light source direction is crucial. Shadows should fall in the same direction.
You might also like: what are fun objects to draw.
With these tips, your cliff drawing will have depth and dimension. Practice and observe nature. See how light and perspective work in real life. Happy drawing!
Incorporating Surrounding Elements
Incorporating surrounding elements can make your cliff drawing more realistic. These elements add depth and interest. They tell a story about the cliff’s environment. Let’s explore some ways to enhance your drawing.
Adding Vegetation
Vegetation brings life to your cliff. Draw shrubs and bushes on ledges. Use different shades of green for variety. Add trees at the base or top. Vary the sizes to create depth. Include small plants in cracks. This adds realism and detail.
Including Water Bodies
Water bodies can enhance your cliff drawing. Add a river or stream at the base. Draw small waterfalls flowing from the cliff. Use blue and white to show water movement. Create a pond or lake nearby. Reflections in the water can add a realistic touch. This makes the scene more dynamic.
Final Touches And Review
The final touches and review of your cliff drawing can truly elevate your artwork. Paying attention to small details and evaluating your work is crucial. These steps will ensure your cliff looks realistic and captivating. Let’s dive into the final stages of refining and reviewing your masterpiece.
Refining Details
Now it’s time to refine the details. Focus on the textures of the cliff. Use short, light strokes to represent rough and uneven surfaces. Add shadows to create depth. Darken areas where light wouldn’t reach. This adds a sense of realism.
You might also like: how to draw a person.
Consider adding vegetation. Small bushes or grass can enhance the natural look. Use lighter shades for highlights and darker shades for shadows. This creates a three-dimensional effect. Be patient and take your time with these details.
Reviewing Your Work
Step back and review your work. Look at it from a distance. This helps you see the overall composition. Check for any areas that might need more detail or correction.
Ask yourself questions. Does the cliff look realistic? Are the shadows consistent? Does the texture look natural? Make necessary adjustments based on your observations.
Sometimes, it’s helpful to take a break. Return to your drawing with fresh eyes. This can help you spot areas for improvement you might have missed before. Remember, practice makes perfect.
Frequently Asked Questions
What Materials Do I Need To Draw A Cliff?
You will need paper, pencils, eraser, and a blending tool. Optional: colored pencils.
How Do I Start Drawing A Cliff?
Begin by sketching the basic shape. Use light pencil strokes to outline the cliff.
You might also like: cool drawing ideas.
How Can I Add Texture To The Cliff?
Create texture by adding small, jagged lines. Vary line pressure for depth.
How Do I Shade A Cliff Drawing?
Shade by using different pencil pressures. Blend gently for smooth transitions. Focus on light and shadow.
Drawing a cliff can be a fun and rewarding experience. Practice often to improve your skills. Use basic shapes to outline the cliff. Add details to make it realistic. Focus on light and shadow for depth. Enjoy the process and be patient.
Share your artwork with friends and family. Keep exploring new techniques. Happy drawing!


