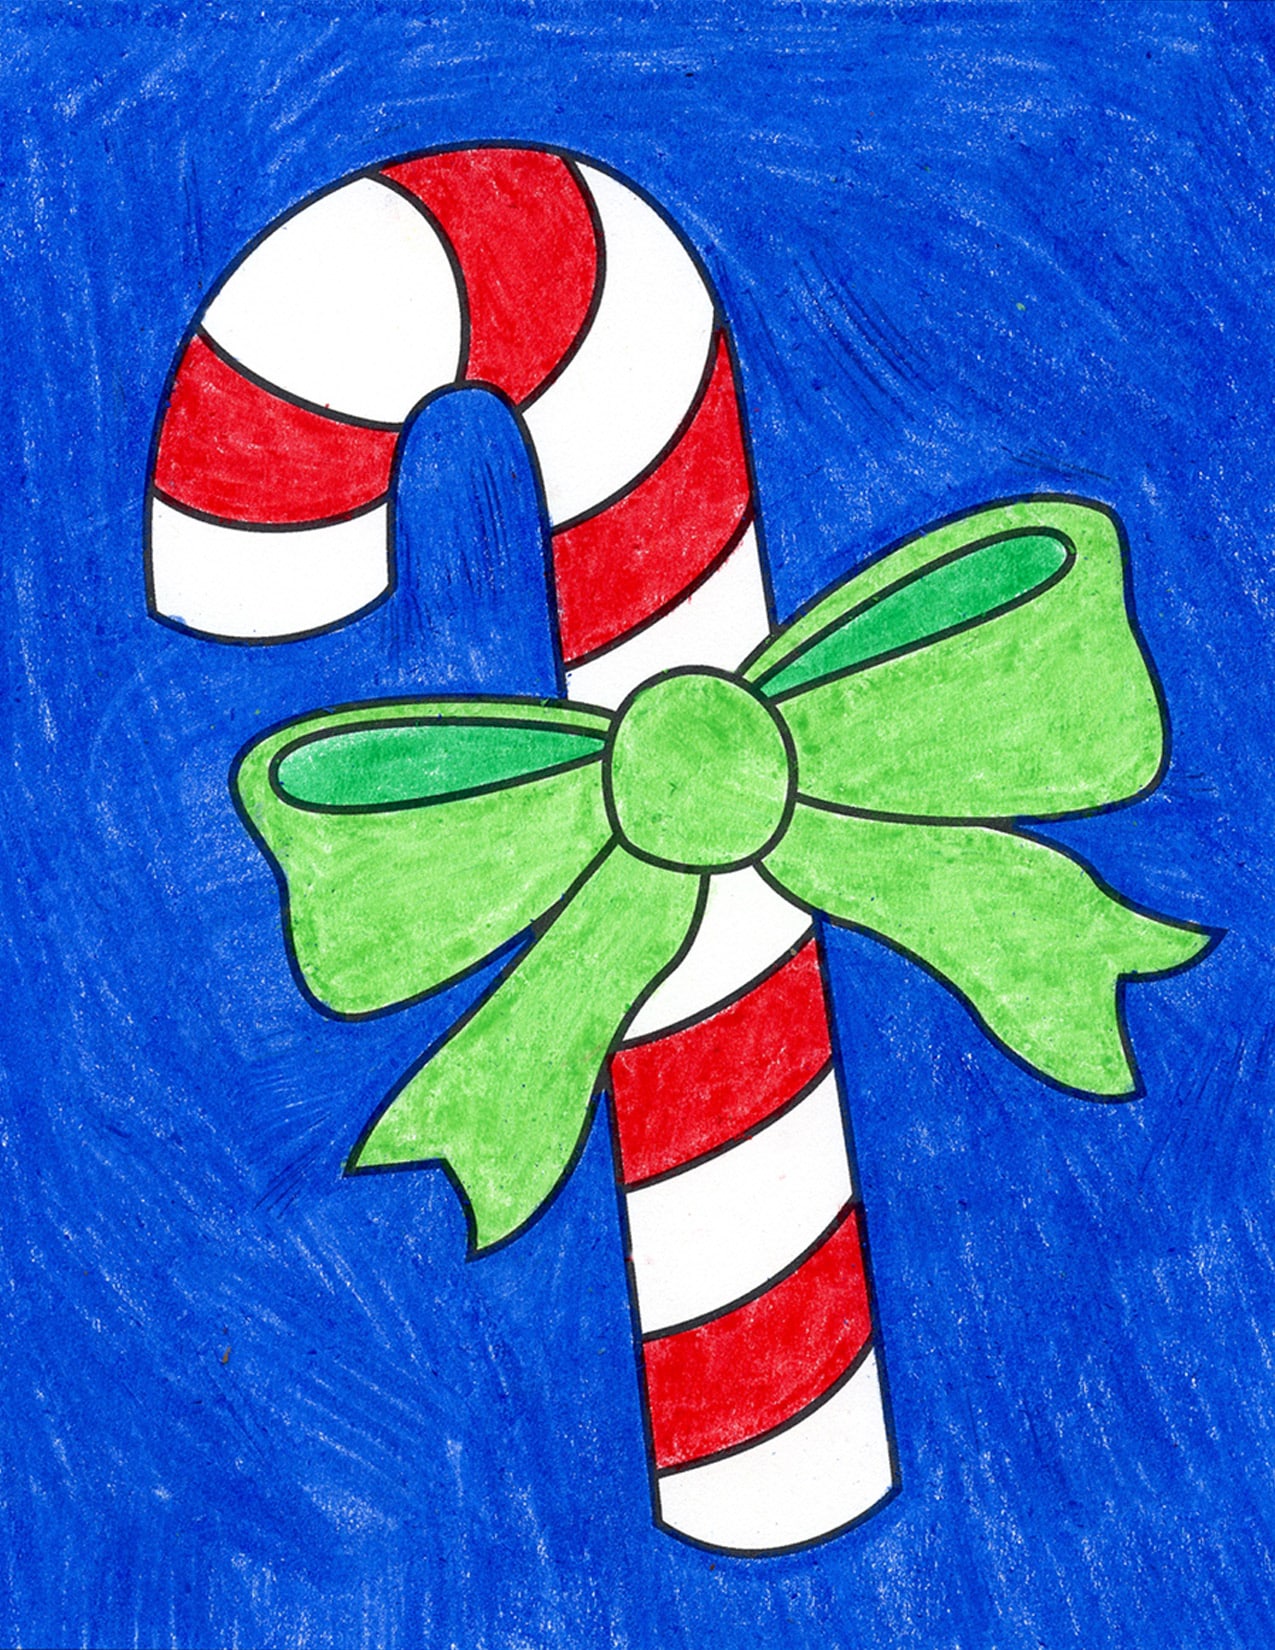
Drawing a candy cane is easier than you think. With a few simple steps, you can create a festive candy cane drawing that will impress.
Candy canes are a classic holiday treat. Their shape and stripes are fun to draw and can add a festive touch to any artwork. Whether you are a beginner or have some drawing experience, learning how to draw a candy cane can be a delightful activity.
In this guide, we’ll break down the process into easy steps. By the end, you’ll have a charming candy cane drawing to share. So, grab your pencils and let’s get started on this sweet drawing adventure.
Materials Needed
Drawing a candy cane is fun and easy. It requires only a few supplies. Having the right materials makes the process smoother and more enjoyable.
Essential Supplies
First, gather your essential supplies. You will need paper. Any type will do, but drawing paper is best. Next, get a pencil. A standard HB pencil works well. You will also need an eraser. Mistakes happen, and it’s good to fix them. Lastly, colored pencils or markers. Red and white are the traditional colors for candy canes.
Optional Tools
Some optional tools can make your drawing even better. A ruler is useful for drawing straight lines. It helps with the candy cane’s shape. A fine-tip pen can add detail. It can make your drawing stand out. Finally, consider a blending stump. It can help blend colors smoothly.
Choosing Your Candy Cane Style
Drawing a candy cane can be a fun and creative activity. Before starting, decide on the style of your candy cane. Do you prefer the classic red and white look, or do you want to explore more creative variations? Your choice will guide the colors and patterns you use. Let’s dive into some popular styles!
Classic Red And White
The classic red and white candy cane is a timeless favorite. It is instantly recognizable and often associated with Christmas. To draw this style:
- Start with a simple, curved shape.
- Divide the cane into even sections.
- Color alternating sections with red and white stripes.
Make sure the stripes are even and consistent. This ensures a clean, classic look. You can use colored pencils or markers to achieve vibrant colors. The classic style is perfect for beginners and traditionalists alike.
Creative Variations
If you want to add a personal touch, consider creative variations. Here are some ideas:
- Use different colors like blue, green, or pink.
- Add glitter or metallic markers for sparkle.
- Incorporate patterns like polka dots or zigzags.
These variations make your candy cane unique. You can mix and match colors and patterns to suit your style. This approach is great for those who love to experiment with their drawings.
Here is a simple comparison of the two styles:
| Style | Description |
|---|---|
| Classic Red and White | Traditional look with red and white stripes |
| Creative Variations | Personalized with different colors and patterns |
Choosing your candy cane style sets the tone for your drawing. Whether you go classic or creative, enjoy the process and have fun!
Sketching The Basic Shape
Drawing a candy cane can be a fun and festive activity. The first step is sketching the basic shape. This involves drawing the hook and the straight part of the candy cane. By breaking it down into simple steps, you can create a neat and realistic candy cane drawing.
Drawing The Hook
Start by drawing a curved line. This will be the hook of the candy cane. Think of it like drawing a large letter “J”. Keep the curve smooth and even. The hook should be about one-third of the total candy cane length. Make sure both ends of the hook are rounded. This will make your candy cane look more realistic.
Adding The Straight Part
Next, draw a straight line down from the bottom of the hook. This line will form the body of the candy cane. Make sure this line is vertical and even. The length should be about twice the length of the hook. This will give your candy cane a balanced look.
Now you have the basic shape of a candy cane. A curved hook and a straight part. This simple structure will serve as the foundation for your detailed drawing.
Creating The Stripes
Drawing a candy cane is not complete without its iconic stripes. The stripes give the candy cane its festive look. This section will guide you on how to create perfect stripes on your candy cane.
Determining Stripe Width
First, decide how wide you want each stripe to be. Stripes can be wide or narrow. Choose a width that fits the size of your candy cane. Make sure the stripes are even. Uneven stripes can look messy.
Drawing Curved Stripes
Next, draw the stripes in a curved manner. Start from the top of the candy cane. Curve the stripes around the bend. This gives the candy cane a realistic look. Keep your hand steady as you draw. Practice if needed. Curved stripes can be tricky.
Continue the stripes down the length of the candy cane. Make sure they are evenly spaced. Use a ruler if necessary. This helps to keep the stripes straight and uniform. Don’t rush. Take your time to ensure neat stripes.
Adding Details
Adding details to your candy cane drawing can make it look more realistic and appealing. Simple touches can bring your illustration to life. Let’s explore two key aspects: enhancing the stripes and adding highlights and shadows.
Enhancing The Stripes
Start by defining the candy cane’s stripes clearly. Use a ruler for straight lines. Make sure they curve around the cane smoothly. This gives the candy cane a 3D look. Choose vibrant colors like red and white. Alternate these colors for a classic look. You can also use pastels or glitter pens for a fun twist.
Pay attention to the width of the stripes. Keep them uniform for a neat appearance. If you want a more whimsical look, vary the width. Ensure the stripes wrap around the candy cane. This helps maintain the illusion of depth.
Adding Highlights And Shadows
Highlights and shadows give your candy cane a realistic touch. Identify the light source first. This will guide where you place highlights and shadows. Use a lighter shade of your main color for highlights. Place them on the side facing the light.
For shadows, use a darker shade of your main color. Place shadows on the opposite side of the light source. Softly blend the shadows into the base color. This adds depth and dimension to your drawing.
Consider using a white pencil or marker for highlights. This can make the candy cane look shiny and smooth. Shadows can be blended with a soft brush or your finger. This creates a softer, more natural look.

Inking Your Drawing
Inking your drawing brings it to life. It adds depth and character to your candy cane. This step makes your sketch look polished and professional. Below, we’ll guide you through the process.
Choosing The Right Pen
Using the right pen is crucial. It affects the final look of your candy cane. Here are some tips:
- Fine-tip pens: Great for detailed work and thin lines.
- Brush pens: Ideal for bold lines and adding texture.
- Gel pens: Smooth and consistent for clean lines.
Choose a pen based on your style and preference. Test different pens on scrap paper first. This helps you find the best one for your drawing.
Tracing Your Pencil Lines
Tracing your pencil lines carefully is important. Follow these steps:
- Start with the main outline of the candy cane.
- Use steady, even pressure to avoid wobbly lines.
- Work slowly and patiently to ensure clean lines.
- After outlining, add details like stripes and shadows.
Make sure to let the ink dry before erasing the pencil marks. This prevents smudging. Use a light touch to erase the pencil lines. This keeps your ink lines intact and sharp.
Inking is a fun and rewarding step. It transforms your candy cane from a sketch to a finished artwork. Enjoy the process and watch your drawing come to life.
Coloring The Candy Cane
After sketching your candy cane, the next step is to bring it to life with colors. This part adds a festive touch, making your candy cane pop. Let’s dive into the exciting process of coloring the candy cane.
Selecting Colors
Start by selecting the colors for your candy cane. The traditional colors are red and white, but you can get creative. Consider using other festive colors like green, gold, or silver. Ensure the colors you choose complement each other.
| Color | Effect |
|---|---|
| Red and White | Classic and Festive |
| Green and White | Fresh and Holiday |
| Gold and Silver | Elegant and Shiny |
Applying Color Evenly
Once you’ve chosen your colors, it’s time to apply them. Use short, even strokes to fill in the stripes. This ensures the color is evenly distributed. Start with one color first. For example, color all the red stripes first.
- Choose your first color.
- Color all the stripes with short, even strokes.
- Repeat with the second color.
Use a fine-tipped marker or colored pencil for precise lines. Avoid pressing too hard to keep the colors smooth and even.
Remember, the key to a beautiful candy cane is consistency. Keep your strokes even and your colors vibrant. Happy coloring!

Frequently Asked Questions
What Materials Do I Need To Draw A Candy Cane?
You need paper, a pencil, an eraser, and colored markers.
How Do I Start Drawing A Candy Cane?
First, draw a curved line in the shape of a “J”.
How Do I Add Stripes To My Candy Cane?
Draw diagonal lines across the candy cane. Then color them alternately.
How Do I Make My Candy Cane Look 3d?
Shade one side of the candy cane lightly. It gives depth and dimension.
Creating a candy cane drawing is easy and fun. Follow the steps, use simple lines and shapes. Practice makes it perfect. Soon, you will draw candy canes with confidence. Share your art with friends and family. They will love your new skill.
Happy drawing!