Drawing reflective surfaces like metal can be challenging. Start with understanding light and reflections.
Practice observing how light interacts with metal objects around you. Capturing the gleam and shine of metal requires a keen eye for detail. Reflective surfaces bend light, creating intricate patterns and highlights. Shadows and reflections play a key role in achieving realism.
Many artists struggle with this due to the complex interplay of light and surface. Before you start drawing, study different types of metal. Notice how a shiny chrome appears compared to brushed steel or copper. Each metal has unique reflective properties. Understanding these differences is crucial. This skill enhances your ability to capture the essence of reflective materials. Join us as we explore techniques to bring your metal drawings to life.
Capturing The Shine
Drawing reflective surfaces like metal can be quite a challenge, especially when you’re trying to capture the shine that makes them stand out. The magic lies in understanding how light interacts with these surfaces, creating dazzling reflections and highlights. Whether you’re sketching a shiny sword or a sleek car, knowing how to depict the gleam of metal can transform your artwork from ordinary to extraordinary.
Observing Light Reflections
Have you ever noticed how metal surfaces mirror their surroundings? This is because they reflect light in fascinating ways. To draw these reflections effectively, start by observing real-life examples. Take a spoon or a piece of jewelry and move it around under different lighting conditions. Notice how the light dances across its surface.
Use these observations in your drawings. Pay attention to the areas that catch the light directly and those that remain in shadow. This contrast is what gives metal its reflective quality. Try to replicate this by carefully shading and highlighting your artwork.
Understanding Specular Highlights
Specular highlights are the bright spots where light hits a reflective surface directly. These highlights are crucial for depicting shine. Think of them as the sparkle in your drawing. They often appear as small, bright, and sharp spots.
To incorporate specular highlights, identify the light source in your composition. Where does it hit the metal object? Use a sharp pencil or white marker to add these highlights, but be mindful of their placement. Overdoing it can make your drawing look unnatural.
Consider the surface texture of the metal. A rough surface scatters light differently than a smooth one. Experiment with different techniques to capture this effect. This will help you accurately portray the material’s unique shine.
Next time you draw something reflective, ask yourself: How does the light interact with this surface? Observing and understanding these elements will help you capture the brilliance of metal with ease.
Choosing The Right Tools
Capturing the essence of reflective surfaces in your art requires precision and the right tools. The sheen and texture of metal can be tricky to portray. Choosing the right materials can make this task easier and more effective.
Selecting Pencils And Pens
Pencils with varying hardness are crucial. Softer pencils like 2B create rich, dark shades. They are perfect for deep shadows and intense reflections. Harder pencils like 2H provide lighter tones. They help in sketching fine details and subtle highlights.
Pens offer sharp lines that pencils can’t. Fine-tip pens are great for defining edges and intricate patterns. Gel pens can add brightness to your drawing. They reflect light well, mimicking the shine of metal surfaces.
Utilizing Digital Tools
Digital art software gives you flexibility. Programs like Photoshop and Procreate offer many brushes. Use gradient and smudge tools to blend colors smoothly. This helps to create a realistic metallic sheen.
Layering is vital in digital art. Layers let you experiment without ruining your main drawing. Try different opacity levels to find the perfect reflection effect. Digital tools allow easy correction of mistakes.
Mastering Textures
Mastering textures in art can transform ordinary drawings into dynamic pieces. Capturing the reflective quality of metal requires attention to detail. The surface of metal can vary from smooth to rough. Understanding these textures is key to drawing reflective objects effectively.
Creating Smooth Surfaces
Smooth surfaces in metal often reflect light evenly. Start with a light pencil sketch to outline the object. Use soft shading to mimic the gentle light reflection. Gradual transitions between light and dark areas create the illusion of a smooth surface. Blending tools like tortillons can help achieve this effect. Pay attention to the light source. It determines the highlight and shadow placement.
Incorporating Rough Textures
Metal surfaces may have imperfections. These create unique reflections. To depict rough textures, use varied pencil strokes. Create contrast with darker shading. This enhances the texture’s depth. Study real metal objects. Notice how light interacts with uneven surfaces. Adding small details like scratches adds realism. Combine these techniques to portray the true nature of metal.

Achieving Realism
Creating realistic art involves careful observation and technique. Reflective surfaces, like metal, challenge many artists. Getting the right look requires a few key steps. These steps help in portraying the true essence of metal. It’s all about the play of light and shadow.
Balancing Contrast
Contrast is essential in drawing reflective surfaces. It helps define the shiny nature of metal. Use both dark and light shades. This creates a striking effect. High contrast makes the drawing pop. Pay attention to the light source. It dictates where highlights and shadows fall.
Using Gradients Effectively
Gradients add depth to your metal drawings. Smooth transitions between shades mimic real metal. Start from dark to light. This shows the reflective nature well. Practice blending to achieve seamless gradients. Each stroke counts in creating a realistic effect.
Exploring Color Use
Drawing reflective surfaces like metal can be challenging. Understanding color use is vital. The right colors capture the unique shine of metal. This section explores how to use colors effectively. You’ll learn about metallic hues and adding depth.
Implementing Metallic Hues
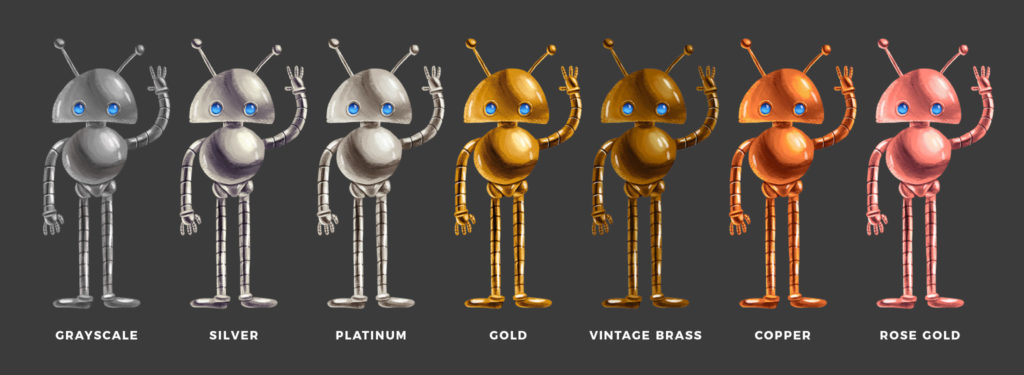
Metallic hues are essential for drawing reflective surfaces. These colors mimic the natural shine of metal. Silver, gold, and bronze are common choices. Each hue reflects light differently. Observe real metal objects to see how light interacts with them. This helps you choose the right hues for your drawing.
Mixing colors can also create metallic effects. Combine grays with other colors for a silvery look. Add a touch of blue or green for a cool tone. Warm tones like red or orange can mimic copper or brass. Experiment with different combinations to achieve realistic results.
Adding Depth With Colors
Depth makes metal appear three-dimensional. Use darker shades for shadows. This gives the illusion of depth. Lighten areas where the light hits directly. This contrast between light and dark enhances realism.
Blending is crucial for smooth transitions. Use a soft brush or tool to blend colors. This removes harsh lines and creates a seamless look. Pay attention to reflections. Metal reflects its surroundings. Incorporate hints of nearby colors for authenticity. This detail adds life to your drawing.
Emphasizing Details
Emphasizing details transforms a simple drawing into a captivating piece. When drawing reflective surfaces like metal, focusing on details is crucial. It brings life and realism to your artwork. Let’s look at the importance of highlighting edges and focusing on intricate patterns.
Highlighting Edges
Edges play a vital role in drawing reflective metal surfaces. They define boundaries and enhance dimensionality. Sharp edges can make your artwork stand out. Use a fine-tipped pencil for precision. This helps in capturing the light reflecting off the surface. Vary the pressure to create subtle contrasts. Soft edges can give a smoother appearance. Experiment with different techniques to find what suits your style.
Focusing On Intricate Patterns
Metal surfaces often have unique patterns. These patterns might include scratches or grooves. Observing these details can add depth to your drawing. Start by identifying the main patterns. Sketch them lightly with a pencil. Pay attention to the direction of the lines. This can mimic how light interacts with the surface. Use shading techniques to highlight these textures. This will make your metal drawing appear more realistic and engaging.
Experimenting With Light
Capturing the shine of metal involves understanding how light interacts with surfaces. Light reflects differently based on angles and textures. Highlight bright spots and incorporate contrasting shadows for depth.
Drawing reflective surfaces like metal can be both challenging and rewarding. One key aspect to master is experimenting with light, which can dramatically transform your artwork. The reflection of light on metal gives it its distinct look. It’s not just about drawing; it’s about observing and understanding how light interacts with the surface. Have you ever noticed how a shiny metal object can change its appearance simply by shifting it under different lighting? This is the magic of light reflection.
Shadow Placement
Shadows play a crucial role in making metal appear reflective. Incorrect shadow placement can make metal look flat and lifeless. Consider the direction of your light source; shadows will always fall on the opposite side. Experiment by placing a small object, like a spoon, under a lamp. Observe where the shadows form. In your drawing, ensure shadows are sharp and well-defined to give metal its characteristic sheen.
Reflected Light Effects
Reflected light is what gives metal its shine. This is the light that bounces off the surface and hits another area. It’s different from direct light because it often takes on the colors of surrounding objects. Try placing a colorful object near a metal surface. Notice how the metal picks up hues from the object. In your drawing, add hints of these colors to depict accurate reflections. This subtle detail can make your artwork pop. Have you considered how reflections can alter the mood of your drawing? It’s fascinating how a simple play of light can evoke depth and drama. Experimenting with light can be a fun way to enhance your skills. It’s about observing, experimenting, and applying what you see. What will you try next to improve your reflective drawing skills?
Common Mistakes
Drawing reflective surfaces like metal can be tricky. Common mistakes include ignoring light sources and shading inconsistently. Focus on capturing reflections and highlights to create realism.
Drawing reflective surfaces like metal can be a challenging yet rewarding task for any artist. However, there are common mistakes that can easily derail your efforts. By understanding these pitfalls, you can create more realistic and dynamic metal reflections in your artwork.
Avoiding Over-saturation
One of the biggest mistakes in drawing reflective metal is over-saturation. It’s tempting to use vivid colors to capture the shine, but this can lead to an unrealistic look. Reflective surfaces often have subtle color shifts rather than bright, bold hues. Consider the metal surface you are replicating. Is it silver, gold, or something more industrial like steel? Each has its own color palette. Stick to a limited color range that reflects the metal’s true nature. This will help maintain a believable appearance.
Preventing Flat Appearances
Another common issue is creating a flat appearance. Reflective surfaces need depth and dimension to appear realistic. Without this, the metal can look lifeless and dull. Think about the environment surrounding the reflective object. What elements are being mirrored? Show these reflections with varying shades and highlights. You can create a sense of curvature and volume by playing with light and shadow. A personal experience taught me the importance of reflections in giving metal its character. I once sketched a simple spoon, but it lacked life until I added the subtle reflection of a nearby window. Suddenly, it popped from the page. Have you ever noticed how a small detail can transform an entire drawing? Think about how your reflections can tell a story.

Frequently Asked Questions
How To Make Something Look Metallic In Drawing?
To draw metallic objects, focus on contrast, highlights, and reflections. Use sharp edges and bright whites. Incorporate subtle gradients and darker shadows. Blend colors smoothly to mimic light interaction. Experiment with different shades of gray and blue to create depth.
Practice observing real metallic surfaces for accuracy.
How To Draw Reflective Material?
To draw reflective material, use high-contrast colors and sharp highlights. Incorporate gradients for realistic shine. Add reflections of surrounding objects for accuracy. Experiment with different textures to capture the material’s unique reflective properties.
How Do You Make Something Look Like It’s Glowing Drawing?
To create a glowing effect in drawings, use bright colors and layer with white or light shades. Add soft edges and blend gently for a radiant look. Enhance contrast and apply a subtle blur for a luminous finish. Experiment with digital brushes or colored pencils for vibrant results.
How To Draw A Reflecting Surface?
Begin by sketching a horizontal line for the surface. Add texture and shading to create a reflective effect. Use lighter tones for highlights and darker tones for shadows. Incorporate nearby objects as reflections to enhance realism. Adjust details to depict material type, such as water or glass.
Drawing reflective surfaces like metal can be challenging. Practice helps improve technique. Start with simple shapes. Focus on light and shadow. Notice reflections and highlights. Use pencils to capture shine. Experiment with different textures. Gradually add details for realism. Study real-life examples for guidance.
Learning takes time and patience. Don’t rush the process. Enjoy experimenting and discover your style. Share your artwork and get feedback. Drawing is a journey, not a race. Keep refining your skills. Stay curious and creative. Remember, every artist started as a beginner.
Embrace imperfections and keep drawing.