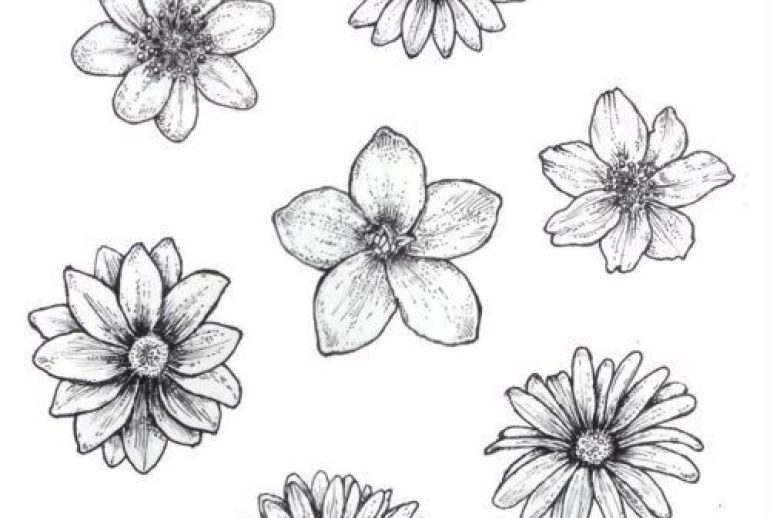
Flower drawing can be both relaxing and inspiring. It’s a great way to explore your creativity.
Whether you’re a beginner or experienced artist, finding fresh ideas can help you improve. Drawing flowers can add beauty to your sketchbook. Each flower has unique shapes and details. This makes it an interesting subject to draw. You’ll enjoy capturing the delicate petals, vibrant colors, and intricate patterns.
Plus, it’s a fantastic way to practice your drawing skills. In this post, we will explore different flower drawing ideas. These will spark your imagination and help you create stunning flower artwork. Let’s get started on this colorful journey!
Getting Started With Flower Drawing
Drawing flowers can be a wonderful way to express creativity. Even if you are a beginner, you can create beautiful flower drawings with some basic tools and techniques. This section will guide you through the essentials to get started.
Essential Tools
Before you begin, gather the necessary tools. Here is a list of items you will need:
- Pencils: Use HB pencils for outlines and 2B or 4B for shading.
- Eraser: A kneaded eraser works well for lightening areas.
- Paper: Choose smooth, high-quality drawing paper.
- Blending Stump: Helps in blending pencil strokes.
- Ruler: For drawing straight lines and measuring proportions.
Having the right tools will make your drawing experience smoother and more enjoyable.
Basic Techniques
Mastering basic techniques is key to drawing flowers. Here are some techniques to practice:
- Simple Shapes: Start with basic shapes like circles and ovals. These shapes form the basis of most flowers.
- Petal Details: Add details to the petals by drawing curves and lines. Notice how petals overlap and vary in shape.
- Shading: Shading adds depth to your drawing. Use light and dark tones to create contrast.
- Blending: Use a blending stump to smooth out pencil strokes. This technique softens the appearance of your drawing.
- Perspective: Pay attention to the perspective. This helps in making your flower look more realistic.
Practice these techniques regularly to improve your skills. Consistency will lead to better results over time.
Simple Flower Sketches
Drawing flowers can be a delightful and therapeutic activity. Simple flower sketches are perfect for beginners. These sketches are easy to create and look beautiful. Two popular choices are daisies and tulips. Let’s explore these in detail.
Daisies
Daisies are charming and simple. They have a round center and long, thin petals. Follow these steps:
- Draw a small circle for the center.
- Add long, thin petals around the circle.
- Make sure the petals are evenly spaced.
- Add a stem and leaves to complete your daisy.
Tip: Use light strokes to sketch. You can darken them later.
Tulips
Tulips are elegant and easy to draw. They have a unique shape and come in many colors. Follow these steps:
- Draw an oval shape for the flower’s body.
- Add two curved lines on each side of the oval.
- Draw the petals at the top of the oval.
- Add a long stem and some leaves.
Tip: Practice the curves to get a smooth look.
Here is a comparison of the steps for drawing each flower:
| Flower | Step 1 | Step 2 | Step 3 | Step 4 |
|---|---|---|---|---|
| Daisy | Draw a small circle | Add long, thin petals | Space petals evenly | Add stem and leaves |
| Tulip | Draw an oval shape | Add curved lines | Draw petals at the top | Add stem and leaves |
Both flowers are lovely and simple to draw. Enjoy the process and have fun sketching!
Intermediate Flower Designs
Ready to take your flower drawing skills to the next level? Intermediate flower designs offer a perfect challenge. They require more detail and precision. These designs help you improve your drawing abilities. Let’s explore two popular intermediate flowers: roses and sunflowers.
Roses
Roses are intricate and beautiful. They are a favorite among artists. Start with the center of the rose. Draw a small spiral. This represents the rosebud. Gradually add petals around the spiral. Each petal should overlap slightly. This creates a realistic look. Vary the size of the petals. This adds depth and dimension. Focus on the edges of the petals. Make them slightly wavy. This mimics the natural look of a rose. Add leaves and thorns for extra detail. Practice makes perfect. The more you draw, the better you get.
Sunflowers
Sunflowers are bold and eye-catching. They have a simple yet striking appearance. Start with a large circle for the center. This represents the flower’s core. Draw small dots inside the circle. These dots represent the seeds. Next, draw the petals. Sunflower petals are long and narrow. Draw them around the circle. Make sure they overlap slightly. This creates a full and natural look. Add a thick stem and large leaves. Sunflowers have broad, heart-shaped leaves. Pay attention to detail. It makes your drawing stand out.
Advanced Flower Illustrations
For artists aiming to elevate their skills, advanced flower illustrations offer a perfect challenge. Detailed and intricate, these drawings can capture the beauty of nature with precision. Here, we explore two popular flowers: orchids and lotus. Each offers unique shapes and textures to master.
Orchids
Orchids are known for their elegance and complexity. To draw an orchid, start with the central petal, known as the labellum. This petal is often larger and more detailed than the others. Use light, curved lines to outline the shape.
- Focus on symmetry and balance.
- Detail the inner patterns with fine lines.
Next, draw the surrounding petals. These are usually symmetrical and can have wavy or pointed edges. Pay attention to the subtle variations in each petal’s shape.
Finally, add texture to the petals. Orchids often have a velvety appearance. Use gentle shading to create this effect. Highlight the veins and edges with darker lines to add depth.
Lotus
The lotus flower symbolizes purity and beauty. Start your lotus illustration with the central bud. This is a rounded shape, often with overlapping petals.
- Draw the central bud with light, rounded lines.
- Add the surrounding petals, which should gradually open outward.
Each petal should be elongated and slightly pointed at the tip. Use smooth, flowing lines to capture the natural curve.
To enhance your drawing, add the lotus stem and leaves. The leaves are large and round, with a distinct radial pattern. Use fine lines to detail the veins and texture.
Finally, shade the petals and leaves. The lotus has a smooth, almost waxy texture. Use light shading for a realistic effect. Darken the areas where the petals overlap to add dimension.
Using Colors In Flower Drawings
Using colors in flower drawings can bring your artwork to life. Colors add depth, emotion, and realism to your flowers. This section will explore how to choose color palettes and blending techniques for flower drawings.
Choosing Color Palettes
Start by selecting a color palette that suits your drawing. Think about the mood you want to create. Bright colors can make your flowers look lively and cheerful. Soft pastel tones give a calm and delicate feel. Nature offers many beautiful color combinations. Look at real flowers for inspiration.
Using complementary colors can make your drawing pop. These are colors opposite each other on the color wheel. For instance, red and green or blue and orange. Analogous colors are another great choice. These are colors next to each other on the color wheel, like blue and purple. They create a harmonious look.
Blending Techniques
Blending colors can add depth and realism to your flower drawings. Start with light pressure and build up layers gradually. This technique helps in achieving smooth transitions. Use colored pencils, markers, or pastels for blending. Each medium has its own unique effect.
Try blending with a dry brush or blending stump. These tools help mix colors seamlessly. You can also use a bit of water with watercolor pencils or water-based markers. This technique creates a soft, blended look. Experiment with different tools and find what works best for you.
Remember, practice makes perfect. The more you blend, the better you will get. Enjoy the process and let your creativity flow.
Incorporating Backgrounds
Incorporating backgrounds in your flower drawings can make them more captivating. A well-chosen background can transform a simple flower sketch into a masterpiece. Two popular choices for backgrounds are nature scenes and abstract designs. Each style has its own charm and can enhance your artwork in unique ways.
Nature Scenes
Nature scenes as backgrounds can bring your flower drawings to life. Imagine a field of wildflowers with a clear blue sky. Or a single flower with a forest in the background. These scenes add context and depth. They make your flowers part of a bigger picture. Try drawing butterflies or birds around your flowers. Or add a flowing river or a distant mountain. These elements can create a serene and natural setting.
Abstract Backgrounds
Abstract backgrounds offer a different kind of beauty. They allow more freedom and creativity. Think of vibrant colors, geometric shapes, and swirling patterns. These can make your flower stand out. Abstract backgrounds can also reflect emotions or moods. Use bold lines and bright colors for a lively feel. Or soft pastels and gentle curves for a calming effect. The possibilities are endless. Experiment with different styles to find what works best for you.
Digital Flower Art
Creating digital flower art opens a world of endless possibilities. Unlike traditional drawing, digital art offers more flexibility and tools. You can experiment with different styles, colors, and techniques without any mess. It’s perfect for beginners and professionals alike. Let’s dive into some useful tips and techniques.
Software Options
Choosing the right software is crucial for digital flower art. Here are some popular options:
| Software | Features | Price |
|---|---|---|
| Procreate | User-friendly, vast brush library | $9.99 (one-time) |
| Adobe Photoshop | Advanced tools, layer options | Subscription-based |
| Corel Painter | Realistic brush textures | $429 (one-time) |
Digital Techniques
Mastering digital flower art involves learning various techniques. Here are some you can try:
- Layering: Use multiple layers for different elements. This allows easy editing.
- Blending: Experiment with blending modes for smooth transitions between colors.
- Brush Customization: Customize brushes to achieve unique textures and effects.
- Color Selection: Use color palettes to maintain harmony in your artwork.
Practice is key. The more you draw, the better you’ll become. Enjoy the process and let your creativity flow!

Inspiration And Resources
Drawing flowers can be a joyful and calming experience. Finding inspiration and resources is the first step to improving your flower drawing skills. This section will guide you through some valuable online tutorials and art communities that can help you along the way.
Online Tutorials
Online tutorials are a great place to start. Websites like YouTube offer many free tutorials. You can find step-by-step guides for all skill levels. This makes learning accessible and fun. Look for channels dedicated to flower drawing. They often provide detailed instructions and tips.
Another excellent resource is drawing websites. Sites like Skillshare and Udemy offer structured courses. These courses range from beginner to advanced levels. You can learn at your own pace. They also provide feedback from instructors, which is very helpful.
Art Communities
Art communities are a wonderful way to find inspiration. Joining an art community can help you connect with other artists. You can share your work and get constructive feedback. Platforms like DeviantArt and Instagram have large art communities.
Forums and social media groups are also valuable. They allow you to ask questions and share tips. You can learn from the experiences of others. This interaction can greatly enhance your drawing skills.
Frequently Asked Questions
How To Start Drawing Flowers?
Begin by sketching simple shapes like circles and ovals. Then, gradually add petals and details. Practice frequently.
What Tools Are Best For Flower Drawing?
Use pencils, fine-tip pens, and good quality paper. Colored pencils and watercolor can add vibrant effects.
Can Beginners Draw Realistic Flowers?
Yes, with practice and observation, beginners can draw realistic flowers. Start with simple flowers and progress gradually.
Which Flowers Are Easiest To Draw?
Daisies, tulips, and sunflowers are easy for beginners. They have simple shapes and clear structures.
Conclusion
Drawing flowers can be both relaxing and fun. These ideas can spark your creativity. Practice regularly to improve your skills. Remember, every artist starts somewhere. So, grab your pencils and start drawing today. Your unique flower designs await. Happy drawing!


