

Drawing an ellipse can be easy with the right steps. You don’t need to be an artist.
Ellipses are common shapes in art and design. They are like stretched circles. Learning to draw one can improve your skills. It’s useful for creating everything from simple sketches to complex designs. In this guide, we will break down the process into simple steps.
You will see that drawing an ellipse is not as hard as it seems. With a little practice, you can draw perfect ellipses every time. Get your pencil and paper ready, and let’s start this fun drawing journey together!
Materials Needed
Drawing an ellipse can be a fun and rewarding activity. To get started, you need a few essential materials. These items will help you draw accurate and clean ellipses. Let’s explore what you need.
Paper And Pencil
First, you need some paper. Any type of paper will do. Choose a size that fits your drawing space. A standard A4 sheet works well. Next, you need a pencil. A regular HB pencil is perfect for this task. It creates clear and precise lines. Make sure your pencil is sharp. Sharp pencils give you better control and detail.
Compass And Ruler
A compass is crucial for drawing perfect ellipses. It helps you create smooth, curved lines. Adjust the compass to the desired size of your ellipse. A ruler is also important. It helps you draw straight lines. Use it to mark the major and minor axes of the ellipse. These lines guide you as you draw.
Eraser
An eraser is a must-have tool. Mistakes happen. An eraser lets you correct them. Choose a soft, clean eraser. It removes pencil marks without damaging the paper. Keep it handy as you draw. It ensures your final ellipse looks neat and polished.
Basic Concepts
Drawing essentials
These are the everyday tools we recommend for any drawing tutorial on this site, picked for reliability and beginner-friendly pricing.


As an Amazon Associate, drawingseasy.com earns from qualifying purchases. Prices and availability are subject to change.
Drawing an ellipse can seem tricky at first. But understanding the basics makes it easier. Let’s break down the key concepts.
Definition Of An Ellipse
An ellipse is an oval shape. It looks like a squished circle. Imagine stretching a circle from two sides. The result is an ellipse. It has two focal points. The sum of distances from these points to any point on the ellipse is constant. This unique feature defines an ellipse.
Major And Minor Axes
Ellipses have two main lines. These lines are called axes. The longer line is the major axis. The shorter line is the minor axis. They intersect at the center of the ellipse. The major axis passes through both focal points. It determines the ellipse’s width. The minor axis is perpendicular to the major axis. It determines the ellipse’s height.
Knowing these axes helps in drawing an ellipse accurately. Start with the major and minor axes. Then sketch the curve around them. Practice makes perfect. Soon, drawing ellipses will become second nature.
Drawing With A Compass
Drawing an ellipse can be a fun and rewarding activity. One simple way to do this is by using a compass. This tool helps create precise and accurate shapes. Follow these steps to draw a perfect ellipse with a compass.
Setting The Compass
First, you need to set your compass to the right width. Measure the distance between the pencil and the point of the compass. This distance is your radius.
Next, decide the length of your major axis. The major axis is the longest diameter of the ellipse. Set your compass to half of this length. This will be the distance from the center to the edge of the ellipse.
Drawing The Major Axis
Using a ruler, draw a straight line. This line is your major axis. Mark the center point of this line. Place the compass point on this center mark.
Draw a circle by rotating the compass around the center point. This circle will help guide the shape of your ellipse.
Creating The Ellipse
Now, you need to draw the minor axis. The minor axis is the shorter diameter of the ellipse. Set the compass to half the length of the minor axis. This will be the distance from the center to the edge of the ellipse along the minor axis.
Place the compass point back on the center mark. Draw another circle, intersecting the first circle. These intersections are key points to shape the ellipse.
Use the intersections as guides. Draw the ellipse by connecting these points smoothly. Ensure the shape remains symmetric along both axes.
Follow these steps carefully, and you’ll have a perfect ellipse. Practice makes perfect. Happy drawing!
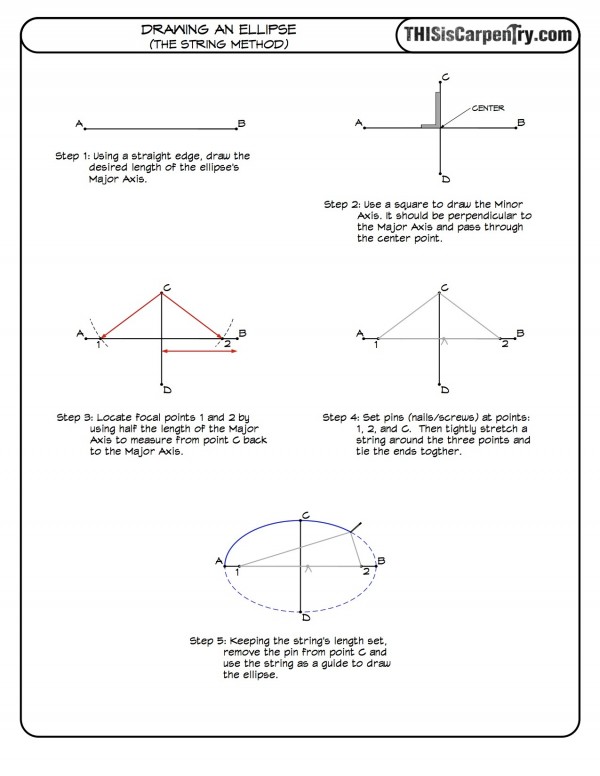
Using The String Method
The string method is a simple way to draw an ellipse. This technique is popular due to its ease and accuracy. You only need a few tools to get started. Follow the steps below to create a perfect ellipse.
Preparing The String
First, gather your materials. You will need a piece of string, a ruler, and two pins.
- Cut a piece of string. Make it longer than the desired width of your ellipse.
- Attach the string ends to the pins. Ensure they are securely tied.
Marking The Foci
Next, determine the foci points on your drawing surface.
- Measure the distance between the foci. This distance should be less than the length of the string.
- Place the pins at these foci points. Push them into the drawing surface.
Tracing The Ellipse
Now, you are ready to trace your ellipse.
- Pull the string taut around the pins. Use a pencil to trace the shape.
- Move the pencil around the pins. Keep the string tight.
- Continue tracing until you complete the shape. Ensure the pencil follows the string.
This method is easy for beginners. It produces a smooth and accurate ellipse. Give it a try and see how simple it can be!
Freehand Technique
Drawing an ellipse freehand can be fun and rewarding. This technique allows for more creativity and personal touch. Let’s break down the process into clear steps for easy understanding.
Sketching Guidelines
Start by lightly drawing a rectangle. This will act as your boundary. Inside this rectangle, draw two perpendicular lines that cross in the center. These lines will guide your ellipse.
Next, mark the midpoints of the rectangle’s sides. These points will help you shape your ellipse evenly. Connect these points with light, curved lines. This forms the basic structure of your ellipse.
Keep your hand relaxed. Move it smoothly as you draw. This helps create fluid curves. Practice will improve your control and confidence.
Refining The Shape
Examine your initial sketch. Make sure the curves are symmetrical. Adjust any areas that look uneven. Add more curves to refine the shape. This step helps in making the ellipse smoother and more accurate.
Use the guidelines you drew earlier. They are helpful in maintaining the correct proportions. Erase any extra lines that are no longer needed. Focus on the main outline of your ellipse.
Remember, patience is key. Take your time to refine the shape. A well-drawn ellipse requires careful adjustments.
Final Touches
Once satisfied with the shape, darken the final outline. Ensure the line is clean and smooth. This gives your ellipse a polished look.
Erase any remaining guidelines. Clean the drawing surface to enhance clarity. This makes your ellipse stand out more.
Consider adding shading or color. This can give your drawing more depth and interest. Enjoy the process and let your creativity shine!

Common Mistakes
Drawing an ellipse can be tricky. Many make common mistakes. These mistakes can alter the final shape. Understanding these mistakes can help improve your drawing.
Uneven Axes
One common mistake is uneven axes. The major and minor axes must be equal. If one axis is longer, the ellipse looks off. Keep both axes even for a balanced shape.
Distorted Shape
Another issue is a distorted shape. This happens if the curve is not smooth. Each point on the ellipse should follow a consistent path. Practice smooth, even strokes. This keeps the shape uniform.
Incorrect Proportions
Incorrect proportions can ruin the ellipse. The major and minor axes must have the correct ratio. If the ratio is wrong, the shape looks wrong. Measure carefully to maintain proper proportions.
Tips And Tricks
Drawing an ellipse can seem daunting, but with some tips and tricks, it becomes easier. By understanding the basics, anyone can draw smooth and balanced ellipses. Let’s dive into some helpful techniques to improve your drawing skills.
Consistent Pressure
Maintaining consistent pressure on your pencil is key. Uneven pressure can lead to wobbly lines. Practice holding your pencil lightly, yet firmly. This will help you control the thickness of your lines.
Start with light strokes. Gradually build up the pressure. This approach helps in creating clean and smooth ellipses.
Smooth Lines
Focus on drawing smooth lines. Jerky movements can ruin the shape. Use your arm, not just your wrist. This provides more control and fluidity.
Practice drawing continuous circles. This helps in making your ellipses look more natural.
Practice Exercises
Regular practice is crucial. Try drawing ellipses of different sizes. This helps in understanding proportion and balance.
Use guides like a cross or a bounding box. These aids help in achieving symmetry. Over time, you will rely on guides less, and your freehand ellipses will improve.

Applications Of Ellipses
Drawing an ellipse involves using a string and two pins to create a smooth, oval shape. Architects and artists use ellipses for designing buildings and creating artwork. This technique ensures precision and symmetry in various fields.
Ellipses are more than just interesting shapes. They have many practical uses. From art to engineering, ellipses show up in many fields. Their unique properties make them useful in various applications.
Art And Design
Ellipses add beauty to many artworks. Artists use ellipses to create depth and perspective. They appear in drawings, paintings, and sculptures. Designers also use ellipses in logos and graphics. They help create smooth, appealing designs. Ellipses can make objects look more realistic.
Engineering And Architecture
Engineers and architects use ellipses in their work. They help design bridges, tunnels, and other structures. Ellipses can distribute forces evenly. This makes structures stronger. Architects use ellipses in building designs. They can create unique and interesting spaces. Domes and arches often use elliptical shapes.
Everyday Objects
Ellipses are found in many everyday objects. Car headlights, mirrors, and tables often have elliptical shapes. These shapes are not just for looks. They can also improve function. For example, elliptical gears work more smoothly. Even in sports, ellipses are common. Think of the shape of a running track. “`
Frequently Asked Questions
How Do You Start Drawing An Ellipse?
To start drawing an ellipse, first decide on the major and minor axes. Then, sketch the two axes intersecting at the center point.
What Tools Do You Need To Draw An Ellipse?
You need a pencil, paper, a ruler, and an ellipse template or a string and pins. These tools help ensure accuracy.
Can You Draw An Ellipse Freehand?
Yes, you can draw an ellipse freehand. However, using tools like templates or a string ensures a more accurate shape.
What Is The Easiest Method For Drawing Ellipses?
The easiest method is using an ellipse template or a string and pins. These methods ensure precise and accurate ellipses.
Drawing an ellipse is easier than you might think. Just follow these steps. Practice makes perfect. Use the right tools. Keep your hand steady. Soon, you will draw ellipses effortlessly. Enjoy the process. Drawing can be fun and relaxing. With time, your skills will improve.
Share your progress with friends. Happy drawing!


