

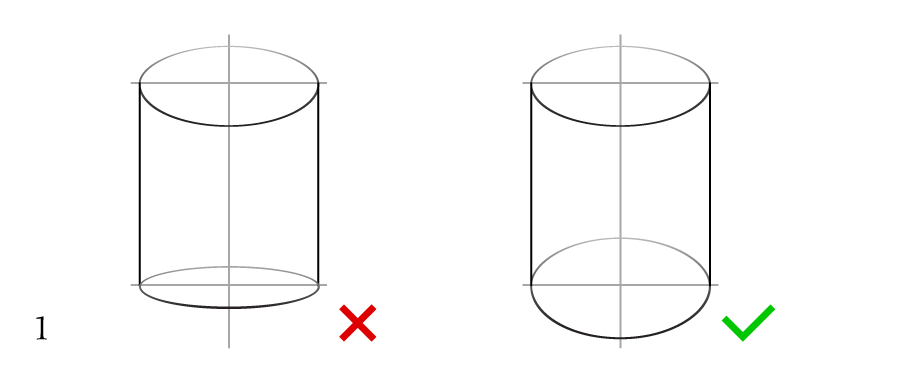
Drawing a cylinder may seem tricky, but it’s simple with the right steps. Start by sketching two circles and connect them with straight lines.
A cylinder is a basic shape you often see in everyday life. From soda cans to pillars, cylinders are everywhere. Learning how to draw one can help improve your drawing skills. This guide will break down the process into easy steps.
You’ll go from drawing simple circles to creating a realistic cylinder. Even if you are new to drawing, don’t worry. With practice and patience, you can do it. Ready to start? Let’s dive in and learn how to draw a cylinder!
Materials Needed
Before you start drawing a cylinder, gather the right materials. Using the right tools makes the process easier and helps your drawing look better. Below are the essential materials you will need.
Drawing Paper
Choose a smooth drawing paper. Thick paper is best for pencil drawings. It holds the pencil lead well and does not tear easily. A4 size paper is a good option to start with. You can find drawing paper in any art store.
Pencil And Eraser
A good pencil is important. Use an HB pencil for basic outlines. It gives a medium tone and is easy to erase. For darker lines, use a 2B or 4B pencil. A soft eraser is also necessary. It helps in correcting mistakes without damaging the paper.
Ruler
A ruler is essential for drawing straight lines. It helps you draw the cylinder’s sides evenly. A clear plastic ruler is a good choice. You can see through it, making it easier to align with your drawing.
Setting Up Your Workspace
Drawing essentials
These are the everyday tools we recommend for any drawing tutorial on this site, picked for reliability and beginner-friendly pricing.


As an Amazon Associate, drawingseasy.com earns from qualifying purchases. Prices and availability are subject to change.
Before drawing a cylinder, prepare your workspace. A good setup helps you focus. It also ensures you have everything you need. Let’s break it down into key steps.
Choosing A Comfortable Spot
Pick a spot with good lighting. Natural light is best. Avoid dark or dim areas. A comfortable chair and desk are important. You should not strain your neck or back. Ensure your space is quiet. This will help you concentrate better.
Gathering Supplies
Gather all necessary supplies. You will need paper and a pencil. Have an eraser handy for mistakes. A ruler can help with straight lines. Consider using a compass for perfect circles. Keep all supplies within easy reach. You don’t want to interrupt your work to find something.
Drawing The Base
Drawing a cylinder starts with the base. The base gives the cylinder its shape and dimension. Without it, the drawing lacks structure. This section will guide you through the initial steps.
Sketching The Ellipse
The base of a cylinder is an ellipse, not a perfect circle. Begin by lightly sketching an oval shape. Ensure the ellipse is symmetrical. This means both sides should mirror each other.
Use light, short strokes to outline the shape. This way, you can easily erase and adjust if needed. Focus on making the ellipse smooth. Avoid sharp corners.
Defining The Bottom
Once your ellipse is in place, it’s time to define the bottom. Draw a straight line down from each end of the ellipse. These lines should be equal in length.
Now, connect the ends of these lines with another ellipse. This creates the bottom of the cylinder. Make sure this second ellipse matches the shape of the first.
With the bottom defined, your cylinder base is complete. You can now move on to detailing the sides and top.
Creating The Sides
Creating the sides of a cylinder is a crucial step in your drawing. This part of the cylinder gives it its distinctive shape and volume. Follow these steps to make sure your cylinder looks realistic and well-proportioned.
Drawing Vertical Lines
Start by drawing two vertical lines. These lines should be parallel to each other. They will form the sides of your cylinder. Keep them straight and even. This will ensure the shape looks symmetrical.
Maintaining Proportions
Maintaining proportions is key to drawing a realistic cylinder. The height of your vertical lines should match the intended size of the cylinder. The distance between the lines will determine the cylinder’s width.
Make sure the top and bottom of the cylinder match in size. This helps in keeping the cylinder proportional and balanced. Check your lines often to make sure they are straight and even.
Adding The Top
Adding the top of your cylinder drawing is crucial for a realistic look. This step involves sketching an ellipse at the top. Make sure it aligns with the base. Let’s break it down into simple steps.
Sketching The Upper Ellipse
Begin by drawing an ellipse above your cylinder’s base. The ellipse represents the top view of the cylinder. Keep it symmetrical. Use light strokes to sketch the ellipse. This helps in making adjustments later. The width should match the base ellipse. The height depends on the cylinder’s perspective.
Aligning With The Base
Ensure the top ellipse aligns with the base. Check the vertical lines on the sides. They should connect the top and base ellipses. These lines should be parallel. Adjust if needed. This maintains the cylinder’s symmetry. Consistency in alignment ensures a realistic shape.

Refining The Shape
Refining the shape of your cylinder drawing is a crucial step. It brings your sketch to life and makes it look more realistic. This section will help you with smoothing the lines and erasing guidelines.
Smoothing The Lines
First, take a closer look at your cylinder. Identify any rough or uneven lines. Use a smooth, continuous stroke to refine these lines. This helps in giving the cylinder a polished look. Try to maintain uniformity in thickness. This keeps the shape balanced. Lighten your strokes if necessary. This makes corrections easier.
Erasing Guidelines
Next, focus on erasing the guidelines. These lines were helpful at the start. But now, they can make the drawing look messy. Use a soft eraser for this task. Be gentle to avoid smudging. Erase only the lines inside the cylinder. Keep the outer edges intact. This gives a clear and clean look to your drawing. Make sure the cylinder’s shape remains consistent.
Shading Techniques
Mastering shading techniques is essential to bring your cylinder drawing to life. Shading adds depth and dimension, making your cylinder appear three-dimensional. Let’s explore two fundamental shading techniques.
Identifying Light Source
Before shading, identify the light source. This is crucial for realistic shading. The light source determines where shadows and highlights fall.
- Decide if the light is coming from the left, right, above, or below.
- Mark the light source on your paper. This helps keep your shading consistent.
Once you identify the light source, you can move on to applying gradients.
Applying Gradients
Gradients create smooth transitions from light to dark. This technique enhances the cylinder’s three-dimensional appearance.
Follow these steps to apply gradients:
- Start with light shading: Use a soft pencil to shade the area closest to the light source.
- Increase pressure gradually: As you move away from the light, apply more pressure.
- Blend the shades: Use a blending tool or your finger to smooth transitions.
- Add the darkest shadows: The farthest area from the light source should have the darkest shading.
Remember, practice makes perfect. Experiment with different pressure levels and blending techniques.
Here’s a quick reference table for shading gradients:
| Shading Area | Shading Pressure |
|---|---|
| Closest to light source | Light |
| Mid-section | Medium |
| Farthest from light source | Heavy |
These steps help you achieve a realistic cylinder drawing with proper shading.
Final Touches
Drawing a cylinder can be simple, but the final touches are essential. They bring your drawing to life and make it look professional. This section covers enhancing details and reviewing the drawing. By following these steps, you’ll ensure your cylinder looks realistic and complete.
Enhancing Details
Enhancing details makes your cylinder look more realistic. Focus on the following areas:
- Shading: Add shading to give your cylinder depth. Use light and dark tones to show light and shadow.
- Highlights: Identify where the light hits the cylinder. Leave these areas lighter to create a highlight effect.
- Edges: Make the edges clear but not too sharp. Soft edges can make the cylinder look more natural.
- Texture: If your cylinder has a texture, add fine lines to represent it. This could be wood grain, metal shine, or other surfaces.
Reviewing The Drawing
Reviewing your drawing helps you spot areas for improvement. Follow these steps:
- Step back and look at your drawing from a distance. This helps you see the overall shape and proportions.
- Check if the cylinder looks balanced. The top and bottom should align.
- Examine the shading. Ensure the light source is consistent throughout the drawing.
- Ask yourself if the details add to the realism. Make adjustments as needed.
- Compare your drawing to a real cylinder. This can help you spot any inaccuracies.
By enhancing details and carefully reviewing your drawing, you can create a realistic and professional-looking cylinder. Keep practicing, and you will improve over time!
Frequently Asked Questions
What Materials Are Needed To Draw A Cylinder?
To draw a cylinder, you need paper, a pencil, an eraser, and a ruler. Optionally, you can use a compass and shading tools.
How Do I Start Drawing A Cylinder?
Start by drawing two parallel lines for the height. Then, draw two ellipses for the top and bottom circles.
How To Shade A Cylinder Drawing?
Shade the cylinder by adding darker tones on the sides and lighter tones in the center. This creates a three-dimensional effect.
What Common Mistakes To Avoid?
Avoid drawing uneven ellipses and misaligned lines. Ensure the top and bottom ellipses match in shape and size.
Drawing a cylinder becomes easy with practice. Start by mastering the basic shapes. Focus on getting the proportions right. Use light lines for your initial sketch. Remember, patience is key. Gradually add details to enhance the drawing. Shading brings your cylinder to life.
Consistent practice improves your skills. Don’t rush the process; enjoy it. Keep practicing and you’ll see progress. Happy drawing!


