

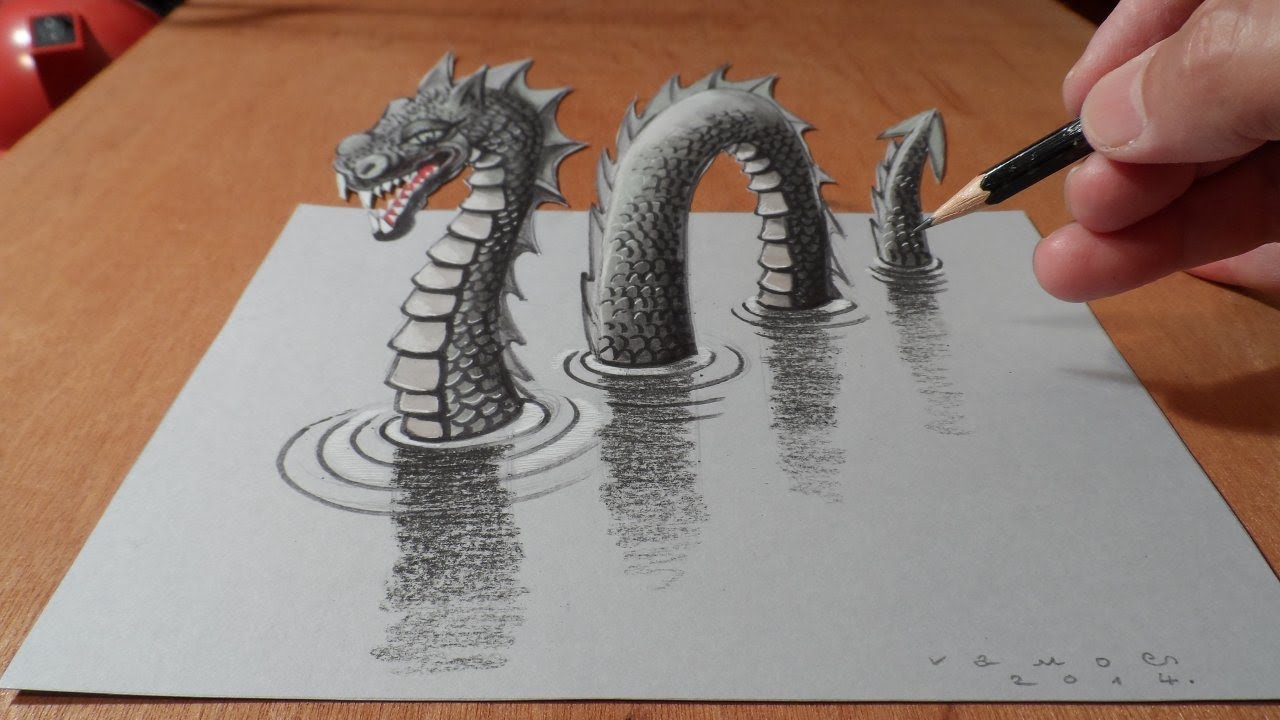
Drawing the hardest drawing in the world seems impossible. But it’s not.
With practice and patience, anyone can improve their skills. Many artists dream of creating complex masterpieces. They want to challenge themselves and push their limits. But where do you start? How do you tackle such a daunting task? This blog will guide you through the process.
We’ll break it down into simple steps. Soon, you’ll feel confident enough to try. Whether you’re a beginner or experienced, this journey will be rewarding. Ready to embark on this artistic adventure? Let’s get started and see what you can create.
Choosing The Right Tools
Choosing the right tools is crucial for creating the most difficult drawing in the world. The tools you use can make a big difference in the quality of your work. Using the right supplies can help you achieve better details and precision.
Essential Drawing Supplies
Start with basic supplies. Good quality pencils are essential. You need different grades, from H to B. H pencils are hard and light. B pencils are soft and dark. Use an eraser that does not damage the paper. A kneaded eraser is a good choice. It can be shaped to erase small areas. Paper quality matters too. Choose smooth paper for fine details. Rough paper is better for texture. A ruler helps with straight lines.
Advanced Tools For Detailed Work
For more detail, you need advanced tools. Mechanical pencils are great. They offer consistent lines. Use fine-tipped pens for sharp details. Brush pens can add depth. A blending stump is useful for shading. It helps create smooth transitions. Digital tools are also an option. Graphic tablets allow precise control. Software like Photoshop or Procreate offers many features. Remember, practice with your tools. Get comfortable with them. This will improve your drawing skills.
Understanding The Subject
Drawing essentials
These are the everyday tools we recommend for any drawing tutorial on this site, picked for reliability and beginner-friendly pricing.


As an Amazon Associate, drawingseasy.com earns from qualifying purchases. Prices and availability are subject to change.
Drawing the hardest drawing in the world is no small task. It involves intricate details and complex shapes. Understanding the subject is the first step to success. By breaking down each part, the task becomes more manageable. Let’s dive into how to get started.
Research And Inspiration
Research is key. Look for images or artworks similar to what you plan to draw. Study them closely. Notice the small details and unique features. This helps you understand the complexity of the drawing.
Find inspiration. Check out art galleries, online portfolios, or even nature. Inspiration can come from anywhere. Keep a collection of images that inspire you. This will help you stay motivated and focused.
Breaking Down Complex Shapes
Complex shapes can be daunting. Break them down into simpler forms. Circles, squares, and triangles are your friends. Start with these basic shapes. Sketch them lightly on your paper.
Once the basic shapes are in place, add details slowly. Focus on one part at a time. This will make the process less overwhelming. Take your time. Patience is crucial.
Remember, practice makes perfect. The more you break down complex shapes, the easier it gets. Keep refining your skills. Each drawing will be better than the last.
Creating A Strong Foundation
Drawing complex subjects can be daunting. To tackle the hardest drawing, start with a strong foundation. This approach ensures a solid structure for your artwork. Here’s how to create that foundation effectively.
Sketching Basic Outlines
Begin with light, simple lines. Outline the main shapes of your subject. Use basic geometric forms like circles, squares, and triangles. These shapes help you see the overall structure. Keep your hand relaxed to avoid stiff lines. Refrain from adding details at this stage.
Establishing Proportions
Check the proportions of your sketch. Compare the sizes of different elements. Ensure they relate well to each other. Use a reference image if needed. Measure the width and height of key parts. Adjust your outlines until the proportions look right. This step is crucial for accuracy.

Adding Intricate Details
Adding intricate details to your drawing can transform it from simple to stunning. Details bring depth and realism, making your artwork stand out. In this section, we’ll explore the essential steps to refine your drawing with intricate details.
Refining Lines And Edges
Start by refining the lines and edges of your drawing. Use a fine-tipped pencil for precision. Carefully trace over your initial sketch, enhancing the clarity of each line. Pay attention to the curves and angles, ensuring they are sharp and clean. This step is crucial for defining the structure and form of your drawing.
Next, focus on the edges. Smooth out any rough or jagged lines. This will give your drawing a polished look. Use an eraser to clean up any unnecessary marks. This makes your drawing look neat and professional. Remember, well-defined lines and edges are the foundation of intricate details.
Incorporating Textures
Incorporating textures adds another layer of depth to your drawing. Think about the different surfaces in your subject. Is it smooth, rough, or bumpy? Use shading techniques to represent these textures. For smooth surfaces, use light, even shading. For rough textures, use cross-hatching or stippling. These techniques create the illusion of texture and make your drawing more realistic.
Observe real-life objects to understand how light interacts with different surfaces. This will help you replicate textures accurately. Practice different shading techniques on a separate sheet. This will improve your ability to depict textures in your drawing. The more you practice, the better your textures will look. Textures make your drawing come alive and add a touch of realism.
Mastering Light And Shadow
Mastering light and shadow can transform your drawings. It adds realism and depth. Light and shadow guide the viewer’s eye. They create mood and atmosphere. Understanding these concepts is essential for any artist.
Drawing the hardest drawing in the world requires mastering these elements. Let’s explore some key techniques.
Techniques For Shading
Shading is crucial for realistic drawings. Start with a light hand. Gradually build up the darkness. Use a soft pencil for smooth shading. Blend with a tissue or blending stump. Cross-hatching is another method. It involves drawing intersecting lines. Vary the distance between the lines. Closer lines create darker areas. Practice these techniques regularly.
Creating Depth And Dimension
Depth and dimension make your drawing come to life. Observe where the light source is. Shadows fall opposite to the light. Use darker shades for deeper shadows. Lighter shades for highlights. Gradients help create a smooth transition. This adds a 3D effect. Look at real-life objects for reference. Notice how light and shadow interact. Apply these observations to your drawing.
Coloring Techniques
Coloring techniques can transform a simple sketch into a masterpiece. This part of the drawing process requires patience and skill. Here, we’ll explore essential methods for choosing and blending colors. These techniques will help you create the hardest drawing in the world.
Choosing The Right Palette
Start by picking a color palette that suits your drawing. A well-chosen palette adds depth and harmony to your artwork. Use these tips to select your colors:
- Complementary Colors: Colors opposite on the color wheel. They create contrast.
- Analogous Colors: Colors next to each other on the wheel. They blend well together.
- Monochromatic Colors: Different shades of one color. They add depth without clashing.
Consider the mood you want to evoke. Warm colors like red and orange can create excitement. Cool colors like blue and green often feel calm.
Blending And Layering Colors
Blending and layering colors are crucial for adding realism. These techniques make your drawing more dynamic.
- Blending: Use a soft brush or blending tool. Blend two colors for a smooth transition.
- Layering: Start with light colors. Gradually add darker shades on top.
- Burnishing: Press hard with a light color. This smooths and blends all layers.
Experiment with different tools for blending. Try colored pencils, markers, or digital brushes. Each tool offers unique effects.
Here’s a simple table to remember these techniques:
| Technique | Description |
|---|---|
| Blending | Using tools to mix colors smoothly. |
| Layering | Applying colors in layers for depth. |
| Burnishing | Using pressure to smooth colors. |
Practice these techniques regularly. Your drawings will become more vibrant and lifelike.
Final Touches And Refinements
The final touches and refinements can make or break your drawing. They bring out the details and ensure your hard work shines through. This stage requires patience and a keen eye for detail. It’s where your drawing comes to life.
Reviewing And Adjusting
Take a step back and review your work. Look for areas that need adjustments. Check for symmetry, proportions, and balance. Use a mirror to view your drawing from a different angle. This can reveal mistakes you might have missed. Make small corrections to enhance the overall look.
Focus on the details. Add shadows and highlights to create depth. Use a fine-tipped pencil for intricate lines. Blend colors smoothly for a realistic effect. Pay attention to light sources and how they affect your drawing. These adjustments can upgrade your work to a new level.
Protecting And Preserving Your Work
Protect your finished drawing to keep it looking fresh. Use a fixative spray to prevent smudging. Hold the spray can at least 12 inches away from the paper. Apply a thin, even coat. Let it dry completely before handling the drawing.
Store your drawing in a safe place. Use a portfolio or a frame with glass protection. Keep it away from direct sunlight and moisture. This will preserve your hard work for years to come. Your drawing deserves the best care you can give it.
Frequently Asked Questions
What Tools Do I Need To Draw Difficult Drawings?
You need paper, pencil, eraser, and a reference image. Optional: colored pencils.
How Can I Improve My Drawing Skills?
Practice daily. Study tutorials. Learn from art books. Observe real-life details.
Why Is It Important To Start With Simple Shapes?
Simple shapes help you build complex drawings. They make difficult parts easier.
What Is The Hardest Part Of Drawing?
Many find details and shading hardest. They require patience and precision.
Drawing the hardest picture in the world is a huge challenge. Practice daily to improve your skills. Use different techniques to enhance your drawing abilities. Stay patient and don’t rush the process. Each attempt will make you better. Remember to enjoy the journey.
Art is about expressing yourself. Keep pushing your limits and stay creative. Your unique style will shine through with time. Happy drawing!


