Drawing a truck is a fun and rewarding activity. It may seem complex, but with clear steps, anyone can do it.
Many people think drawing a truck is hard. But with simple instructions, it becomes easy. Trucks have basic shapes like rectangles and circles. Learning to draw them step-by-step can improve your skills. This guide will break down the process for you.
You will learn to draw different parts of a truck. By the end, you will have a complete truck drawing. Grab your paper and pencil, and let’s get started!
Materials Needed
To draw a truck, you need the right materials. The tools and paper you choose can make a big difference. Let’s explore what you need.
Drawing Tools
A good pencil is essential. Choose one with a medium hardness. It allows for light sketches and dark lines. An eraser is also important. Mistakes happen, and it’s easy to fix them with a good eraser. You might also want a ruler. Trucks have straight lines, and a ruler helps make them perfect. Colored pencils or markers can add life to your drawing. They make your truck look more realistic.
Paper Types
The paper you use matters too. Regular printer paper works, but thicker paper is better. It holds pencil marks well and doesn’t tear easily. Sketchpads are a good choice. They provide a smooth surface for drawing. If you want to use markers, choose marker paper. It prevents ink from bleeding through. Each paper type has its own benefits.
Credit: artprojectsforkids.org
Basic Truck Shapes
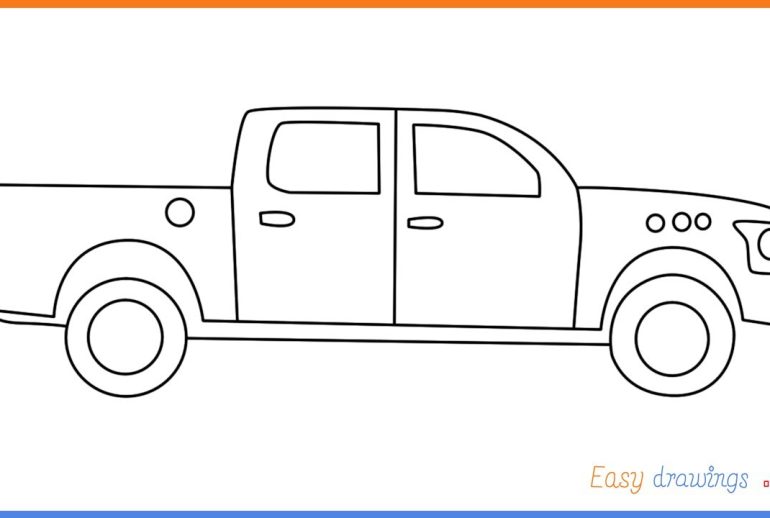
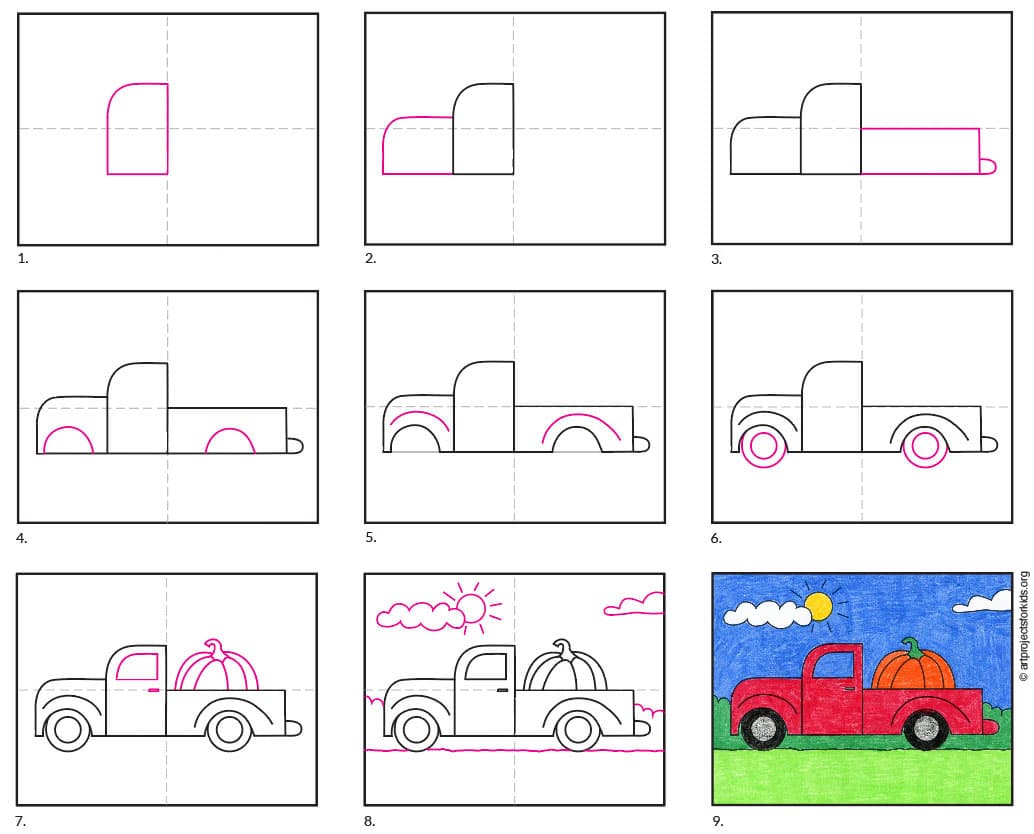
Drawing a truck might seem complex, but breaking it down into basic shapes makes it easier. Start with the main parts of the truck. Focus on simple shapes. These steps will help you create a realistic truck.
Outline The Body
Begin by sketching the truck’s body. Use a rectangle for the main part. This will be the cargo area. Keep the lines straight and even. Ensure the rectangle is long and low.
Next, add the base of the truck. Draw another rectangle below the first one. This represents the truck’s chassis. The base should be slightly shorter than the body. This gives the truck a solid foundation.
For the wheels, draw two large circles below the base. Position them at each end of the rectangle. Make sure the wheels are even and round. This ensures your truck stands properly.
Add The Cab
Now, focus on the cab of the truck. The cab is where the driver sits. Draw a smaller rectangle at the front of the body. This rectangle should be taller than the body rectangle.
Next, add the windshield. Draw a smaller square inside the cab. Place it near the top. This forms the front window. Ensure it is centered and straight.
To complete the cab, add a door. Draw a vertical line down the middle of the cab. This separates the door from the rest of the cab. Add a small square for the window on the door.
Finally, connect the cab to the body. Draw a line from the bottom of the cab to the base rectangle. This will form the front of the truck. Make sure the lines are smooth and connected.
Adding Wheels
The wheels are one of the most important parts of a truck. They give it structure and allow it to move. In this section, we will cover how to add wheels to your truck drawing. We will break it down into simple steps.
Positioning The Wheels
First, decide where the wheels will go. Trucks usually have four wheels. Two at the front and two at the back. Make sure they are evenly spaced. Use a ruler to help with alignment.
Draw two circles near the front of the truck. Draw two more circles near the back. Make sure the wheels are the same size. This will make your truck look balanced.
Drawing Tire Details
Now it’s time to add details to the tires. Start by drawing smaller circles inside each wheel. These are the rims. They give your wheels a realistic look.
Next, add some lines on the tires to show the tread. Draw short, curved lines all around the tire. This will make your truck look more detailed and realistic.
Finally, add some shading to the tires. Shade the bottom of each tire. This will give your drawing depth and make it look three-dimensional.
| Step | Description |
|---|---|
| 1 | Decide wheel positions |
| 2 | Draw circles for wheels |
| 3 | Add smaller circles for rims |
| 4 | Draw tread lines |
| 5 | Shade the tires |
Remember, practice makes perfect. Keep drawing and soon you will be able to draw wheels easily. Happy drawing!

Credit: www.youtube.com
Defining Truck Details
Defining the details of a truck drawing can make your artwork stand out. Paying attention to small elements can bring your truck to life. Let’s explore the key details, focusing on windows, mirrors, headlights, and grille.
Windows And Mirrors
Start by drawing the windows on the truck. Use straight lines for the edges. Ensure the windows are proportionate to the truck’s size. Add the front and side windows. Then, draw the rear window if visible. For the mirrors, sketch small rectangles. Attach them to the truck’s front doors. Position them slightly above the windows. Make sure they are symmetrical on both sides.
Headlights And Grille
Next, focus on the truck’s headlights. Draw two circles or ovals on the front. Place them at equal distances from the center. Add small details inside the headlights. This makes them look realistic. Below the headlights, draw the grille. Use horizontal and vertical lines to create a grid pattern. The grille should span the width of the truck’s front. Add a few more lines to show depth.
Enhancing The Truck
Enhancing your truck drawing can be a rewarding experience. By adding texture and using shading techniques, you can make your truck look more realistic. Here are some tips to help you enhance your truck drawing.
Adding Texture
Adding texture can bring your truck to life. Try these steps:
- Sketch light lines on the truck’s surface to represent metal panels.
- Draw tiny dots and short lines to show rust spots and scratches.
- For the tires, use curved lines to show tread patterns.
Textures can make your truck look worn and used. This gives it a realistic feel.
Shading Techniques
Shading can add depth and dimension to your truck drawing. Follow these steps:
- Identify the light source. Decide where the light is coming from.
- Shade the areas opposite the light source. Use softer pressure for light areas.
- Use hatching and cross-hatching for shading. Hatching involves drawing parallel lines. Cross-hatching uses intersecting lines.
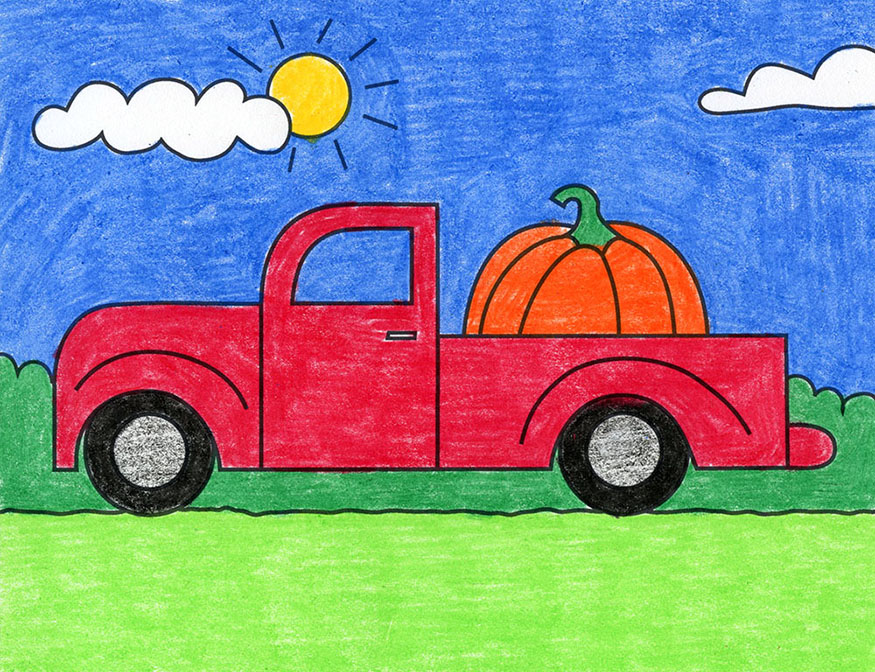
Shading can make your truck look three-dimensional. Practice different shading techniques to find what works best for you.
Credit: artprojectsforkids.org
Final Touches
Completing your truck drawing involves paying attention to the final touches. These steps will enhance your sketch and give it a polished look. Let’s dive into the key aspects of finalizing your truck illustration.
Cleaning Up Lines
Start by cleaning up lines. Use an eraser to remove any unwanted lines. Make sure your lines are smooth and clear. This step helps in giving your truck a neat appearance.
- Erase unnecessary guidelines.
- Darken the main outlines.
- Ensure smooth, consistent strokes.
Reviewing Proportions
Next, focus on reviewing proportions. This ensures your truck looks balanced and realistic. Check the size of the wheels compared to the body. Verify the windows and other elements are in proportion.
- Compare the truck parts for symmetry.
- Adjust any disproportionate elements.
- Ensure everything is in harmony.
Now your truck drawing should look neat and proportionate. The final touches make a big difference!
Common Mistakes
Learning how to draw a truck can be exciting and fun. Yet, many beginners make common mistakes. These mistakes can make the drawing look less realistic. Understanding these errors can help you improve your truck drawings.
Avoiding Symmetry Issues
Symmetry is crucial in drawing trucks. A truck that lacks symmetry looks unbalanced. Here are some tips to avoid symmetry issues:
- Draw a center line first. This helps keep both sides equal.
- Use a ruler for straight lines. This ensures precision.
- Check your drawing from a distance. This helps spot symmetry problems.
Correcting Proportions
Getting the proportions right is essential. A truck with incorrect proportions looks unrealistic. Follow these steps to correct proportions:
- Measure key parts. For example, the height of the cab and the length of the trailer.
- Compare these measurements to your reference image. This ensures accuracy.
- Adjust as needed. Small changes can make a big difference.
Here is a table to help you understand common proportion mistakes:
| Common Mistake | How to Fix |
|---|---|
| Cab too small | Increase the cab height |
| Wheels too large | Reduce wheel size |
| Trailer too long | Shorten the trailer length |
Frequently Asked Questions
What Tools Do I Need To Draw A Truck?
You need paper, pencils, eraser, ruler, and colored pencils or markers.
How Can I Start Drawing A Truck?
Begin by drawing basic shapes like rectangles for the body and circles for the wheels.
How Do I Add Details To The Truck Drawing?
Add windows, doors, headlights, and other details by drawing smaller shapes and lines.
Can I Color My Truck Drawing?
Yes, you can use colored pencils or markers to add colors and make your drawing vibrant.
Conclusion
Drawing a truck can be fun and easy. Just follow the simple steps outlined. Start with basic shapes and gradually add details. Practice makes perfect, so keep trying. Soon, you’ll see improvement in your drawings. Remember, patience is key. Don’t rush the process.
Enjoy your creative journey. Show your truck drawings to friends and family. They will surely appreciate your effort. Happy drawing!

